Products
How to Bulk Edit Tags
Last updated
Tags are the keywords merchandisers use to filter, group, and surface products in collections, search, and theme menus. EditEngine — the Shopify bulk editor — lets you add tags, remove tags, rename a whole tag across the catalog, search-and-replace text inside tag names, or wipe and replace the tag list outright. This guide walks through each action with realistic examples.
Tags is a product field. Each product carries one tag list — there are no per-variant tags. Every matched product gets one tag update.
Shopify treats tags as case-insensitive and trims whitespace, so
Saleandsaleend up as the same stored tag. Casing in your existing tags is preserved on write, but duplicates that only differ by case won't be created.
Step 1: Pick the Tags field
In the Configure Product Edits panel, click Select Field.
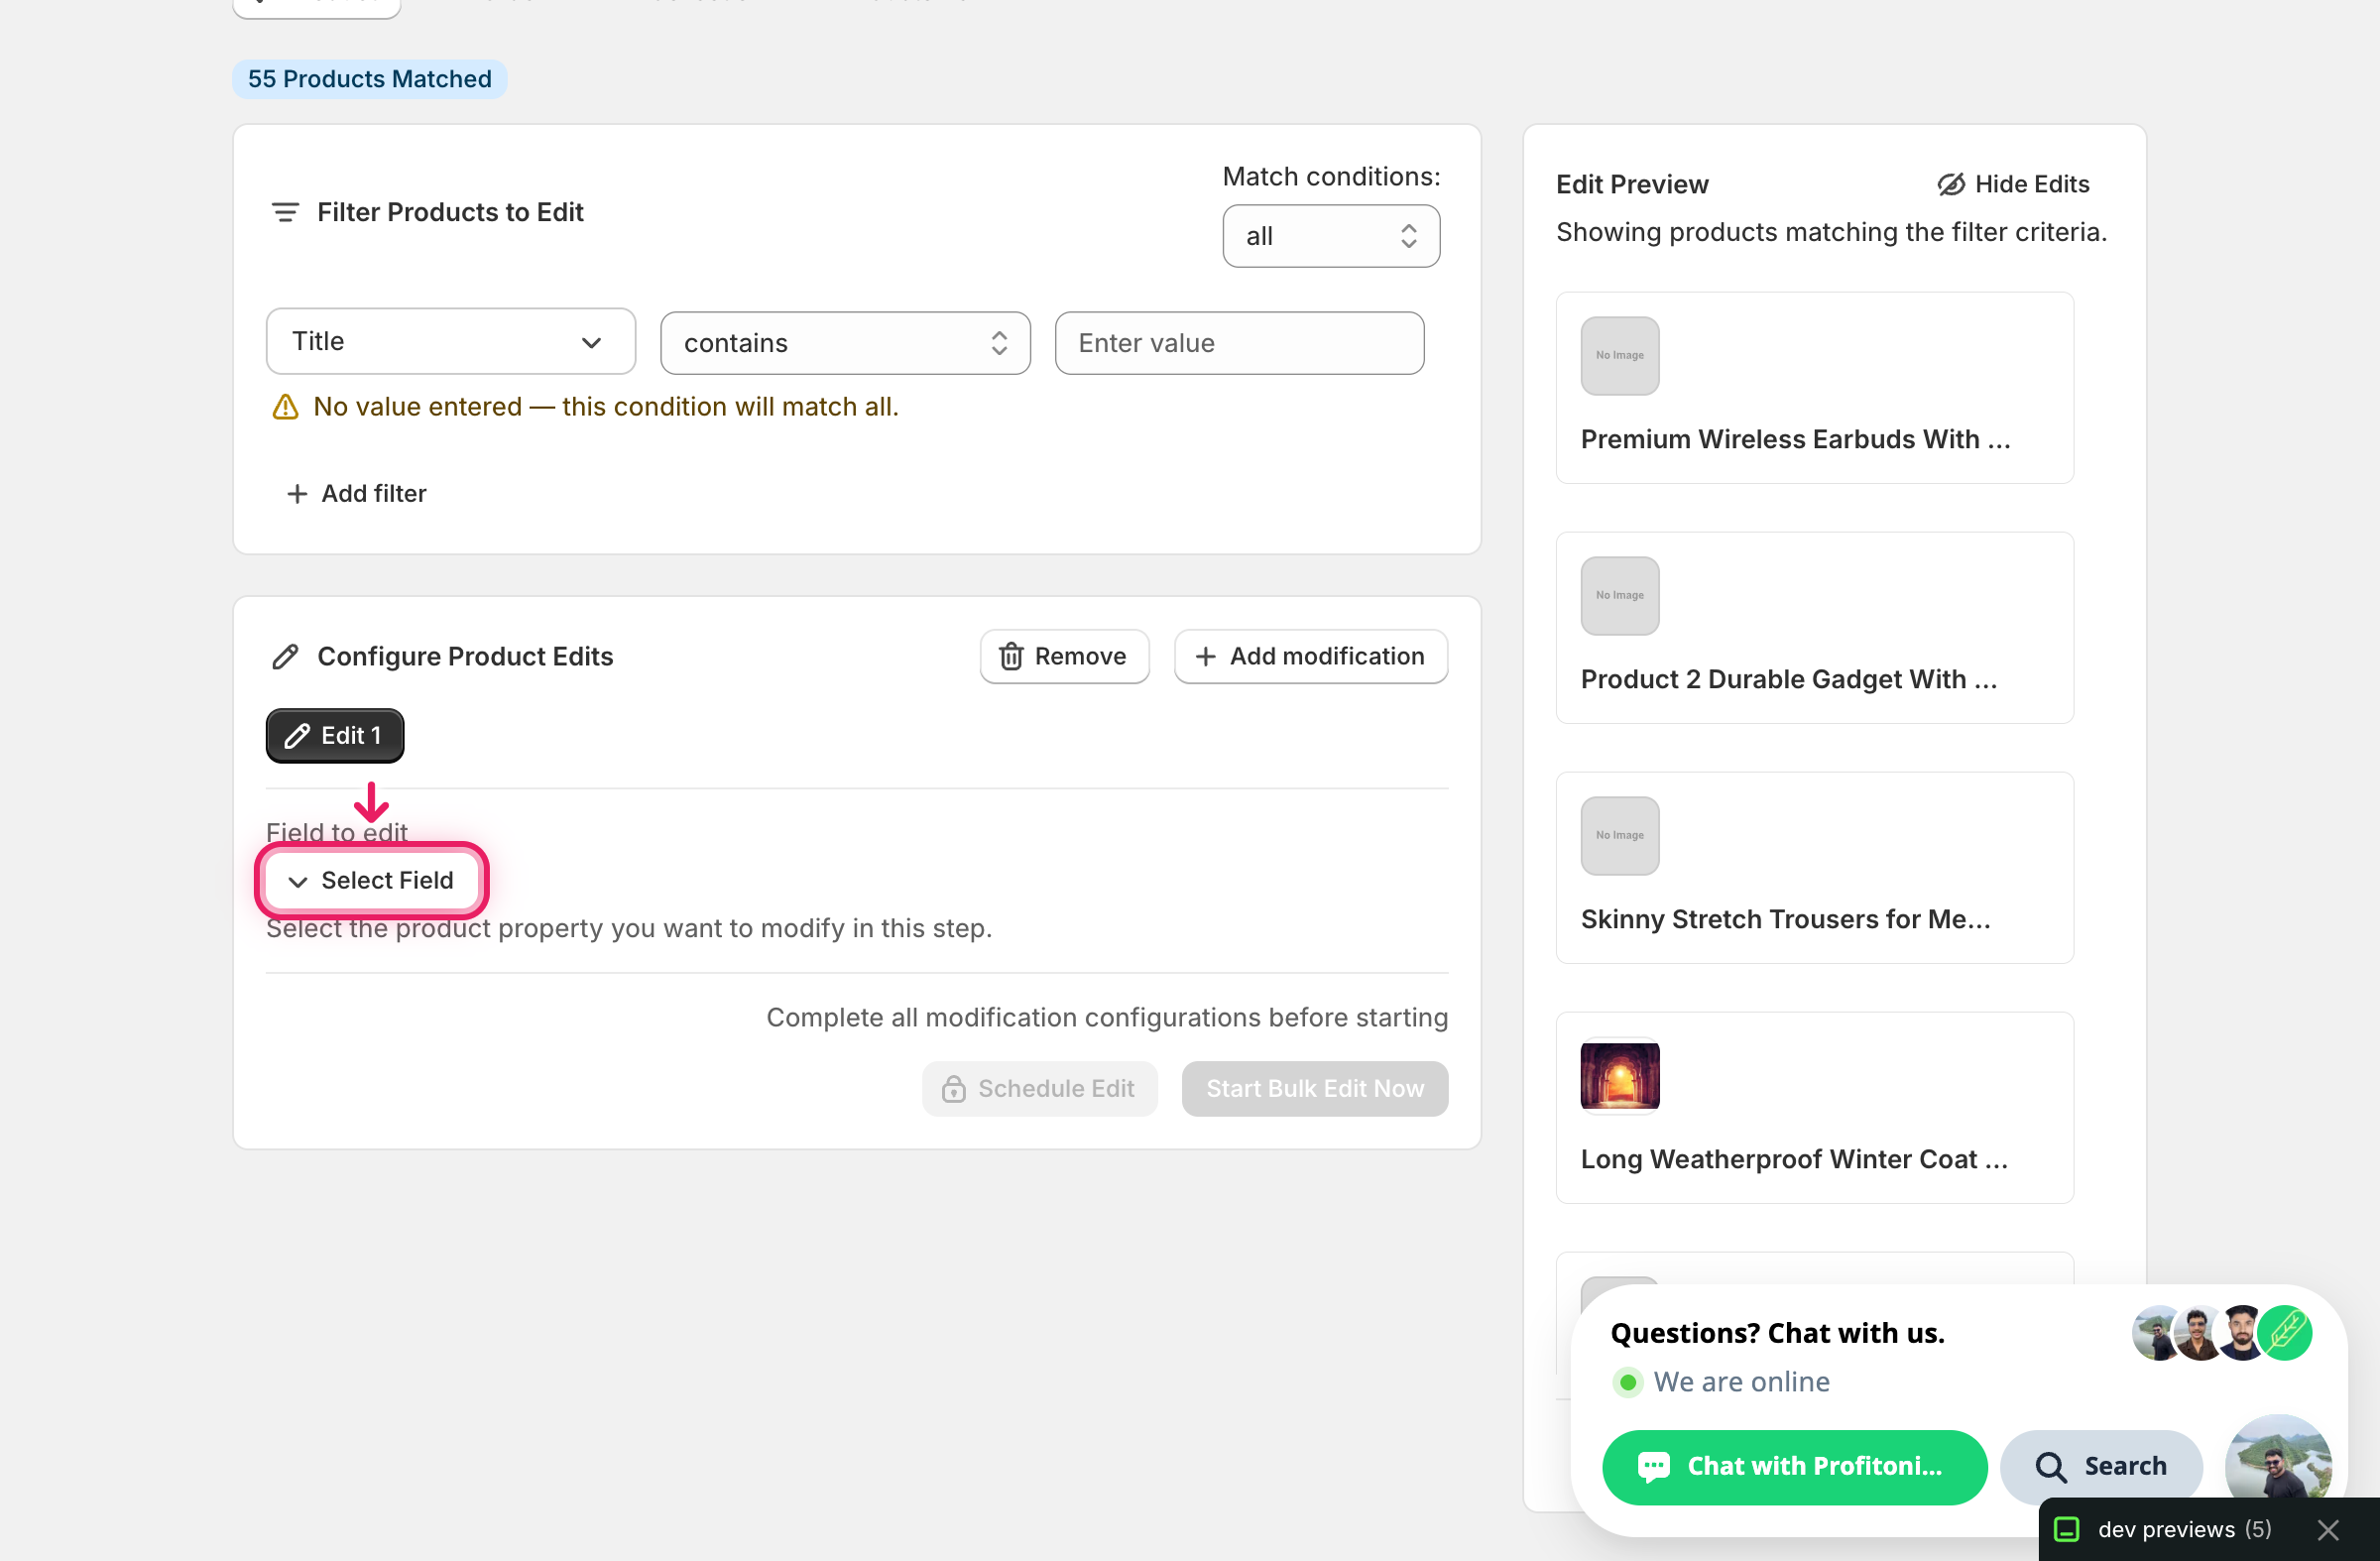
The Select Field modal opens. Tags lives under Product Fields.
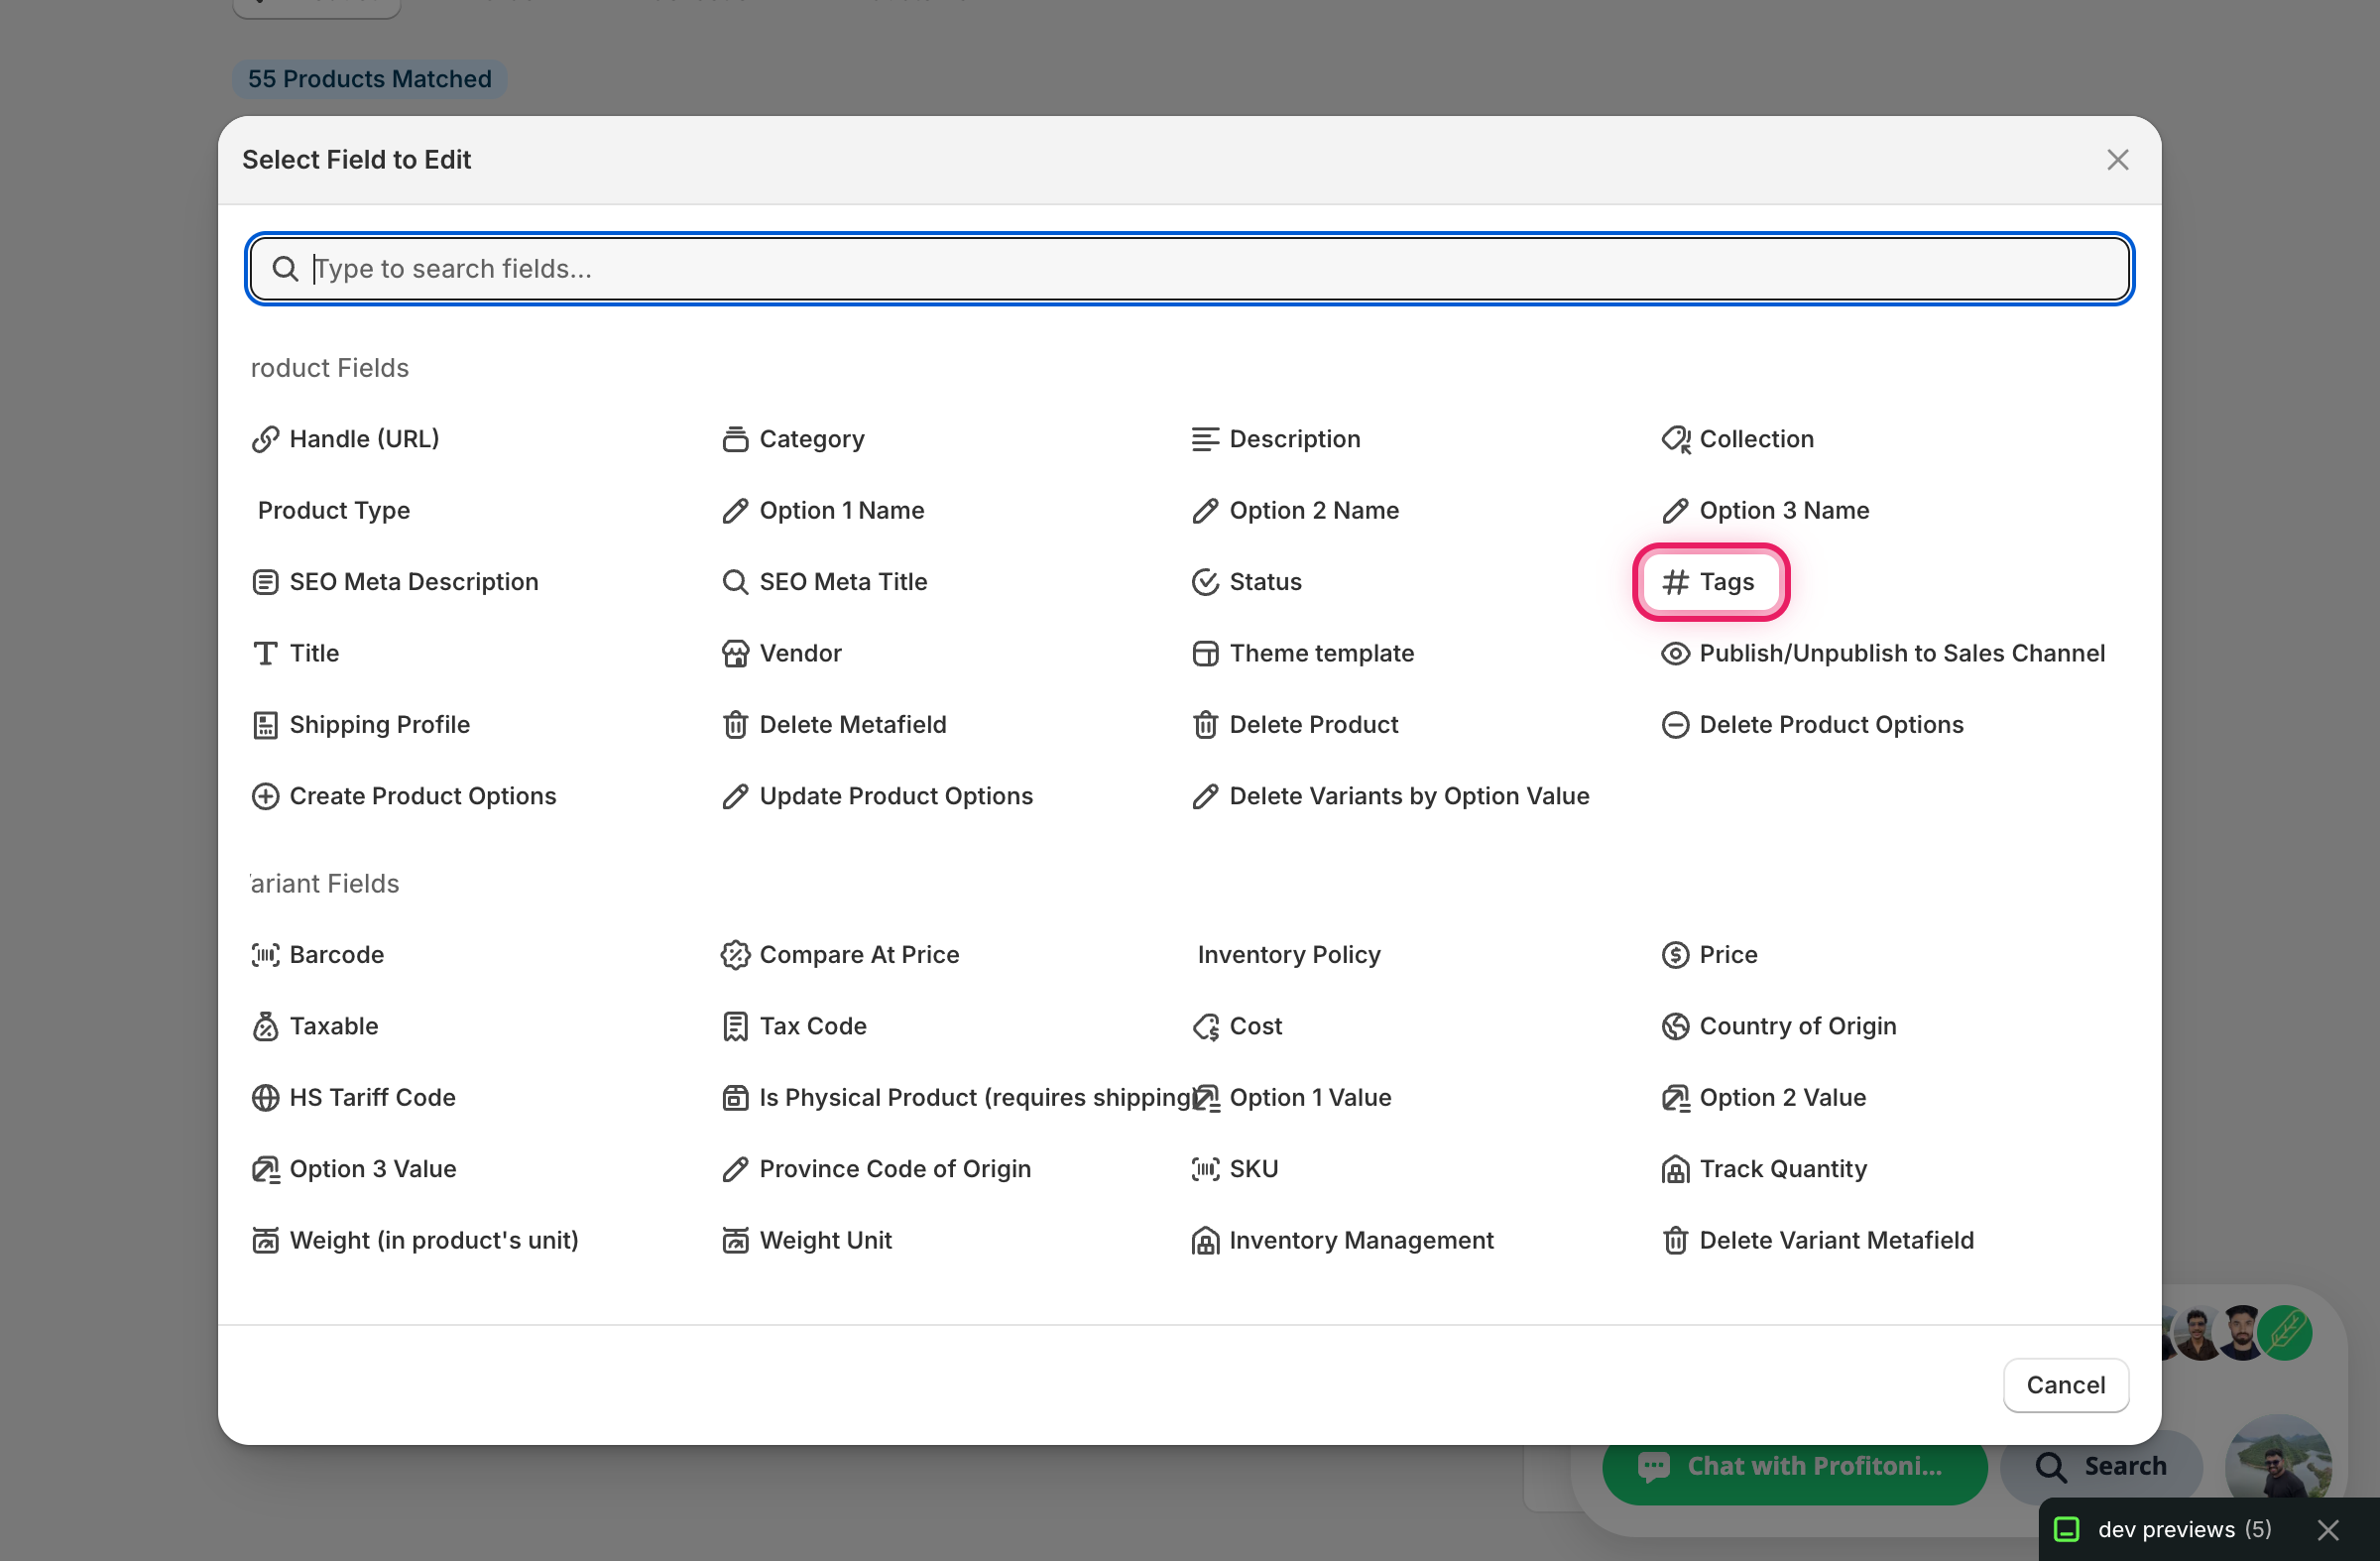
Click it. The configuration panel switches to a Tags field selector with an Action dropdown defaulting to Add tag(s) to product and a tag input below.
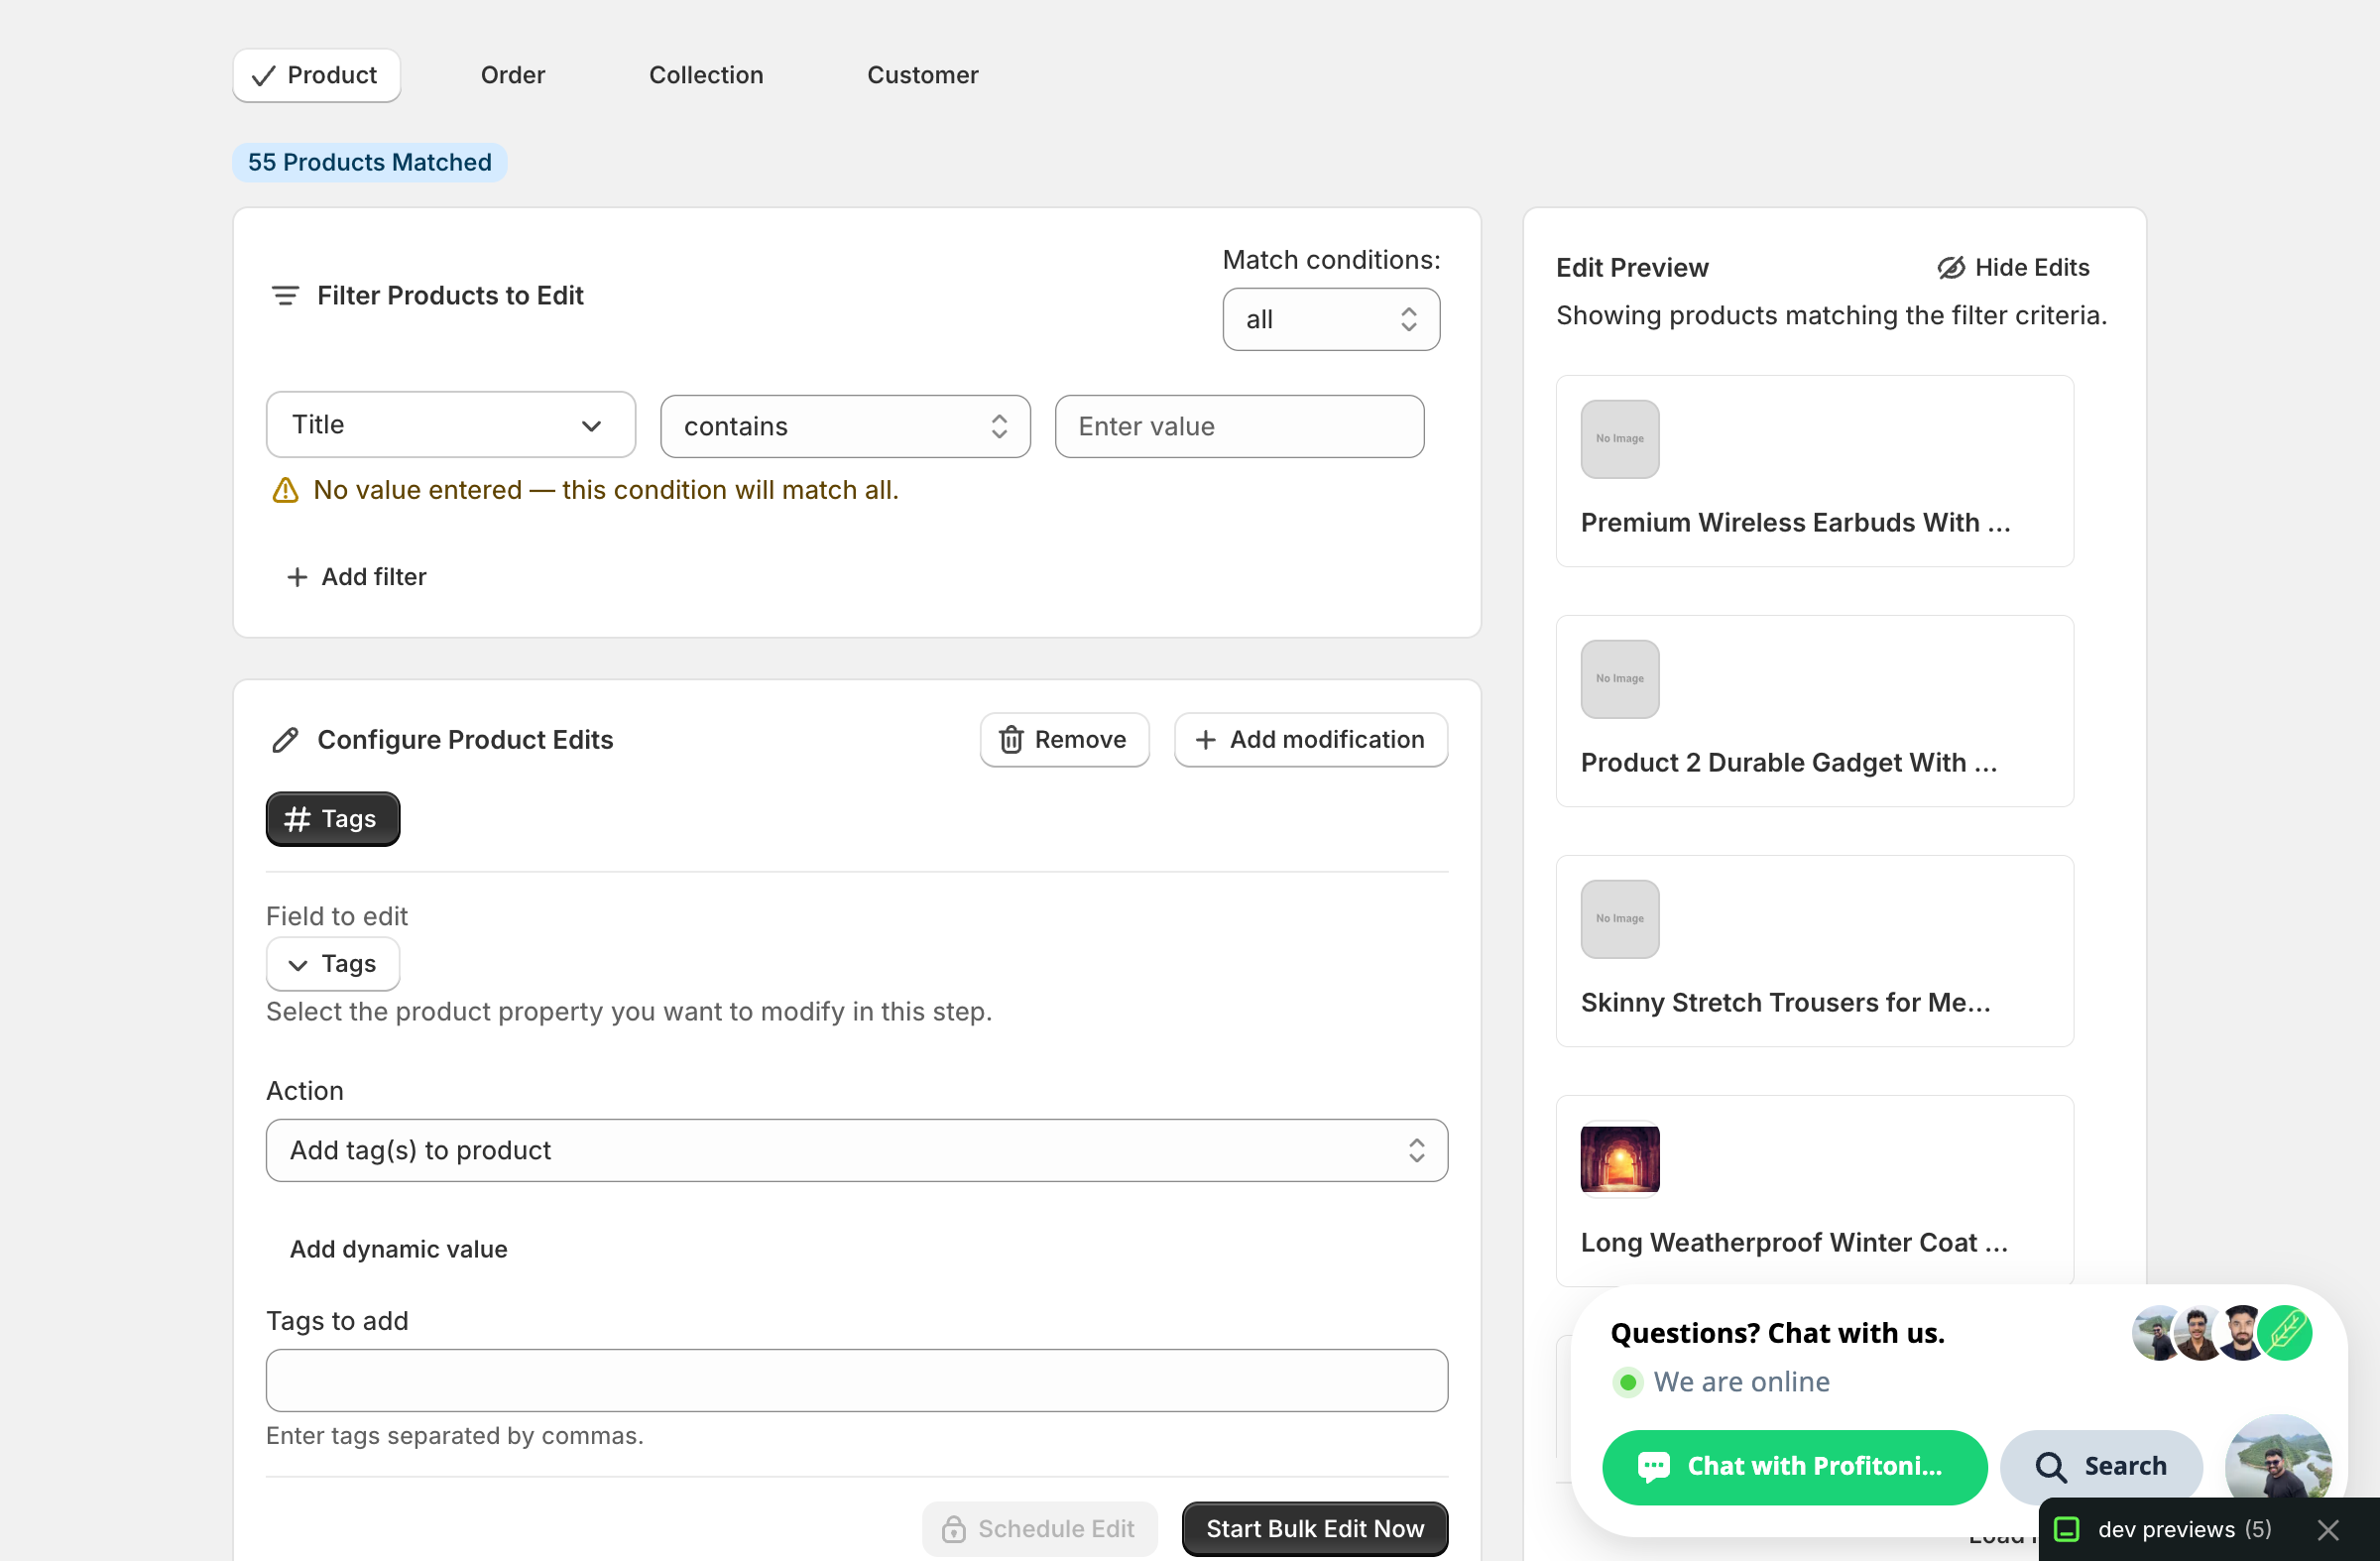
Step 2: Choose how to change the tags
Five actions are available.

- Add tag(s) to product — append one or more tags to whatever each product already has. Existing tags are kept.
- Remove tag(s) from product — strip specific tags by exact name. Tags that aren't on a product are ignored.
- Rename tag — find a tag by exact name and change it to a new name across every matched product.
- Search/replace within tag name — change a substring inside tag names (e.g. swap a brand spelling), with optional case-insensitive matching.
- Set tags (overwrites existing) — replace every product's tag list with the values you provide. Destructive — see the warning under that section.
The inputs change based on what you pick.
Step 3: Enter the tags
The tag input takes one tag per entry. Type a tag and either press Enter or type a comma to commit it as a chip. You can paste a comma-separated list to add several at once. Click the × on a chip to remove it.
Add tag(s) to product
Type each tag you want to append. The Edit Preview on the right shows the original tag list struck through and the new list with your additions on the end.
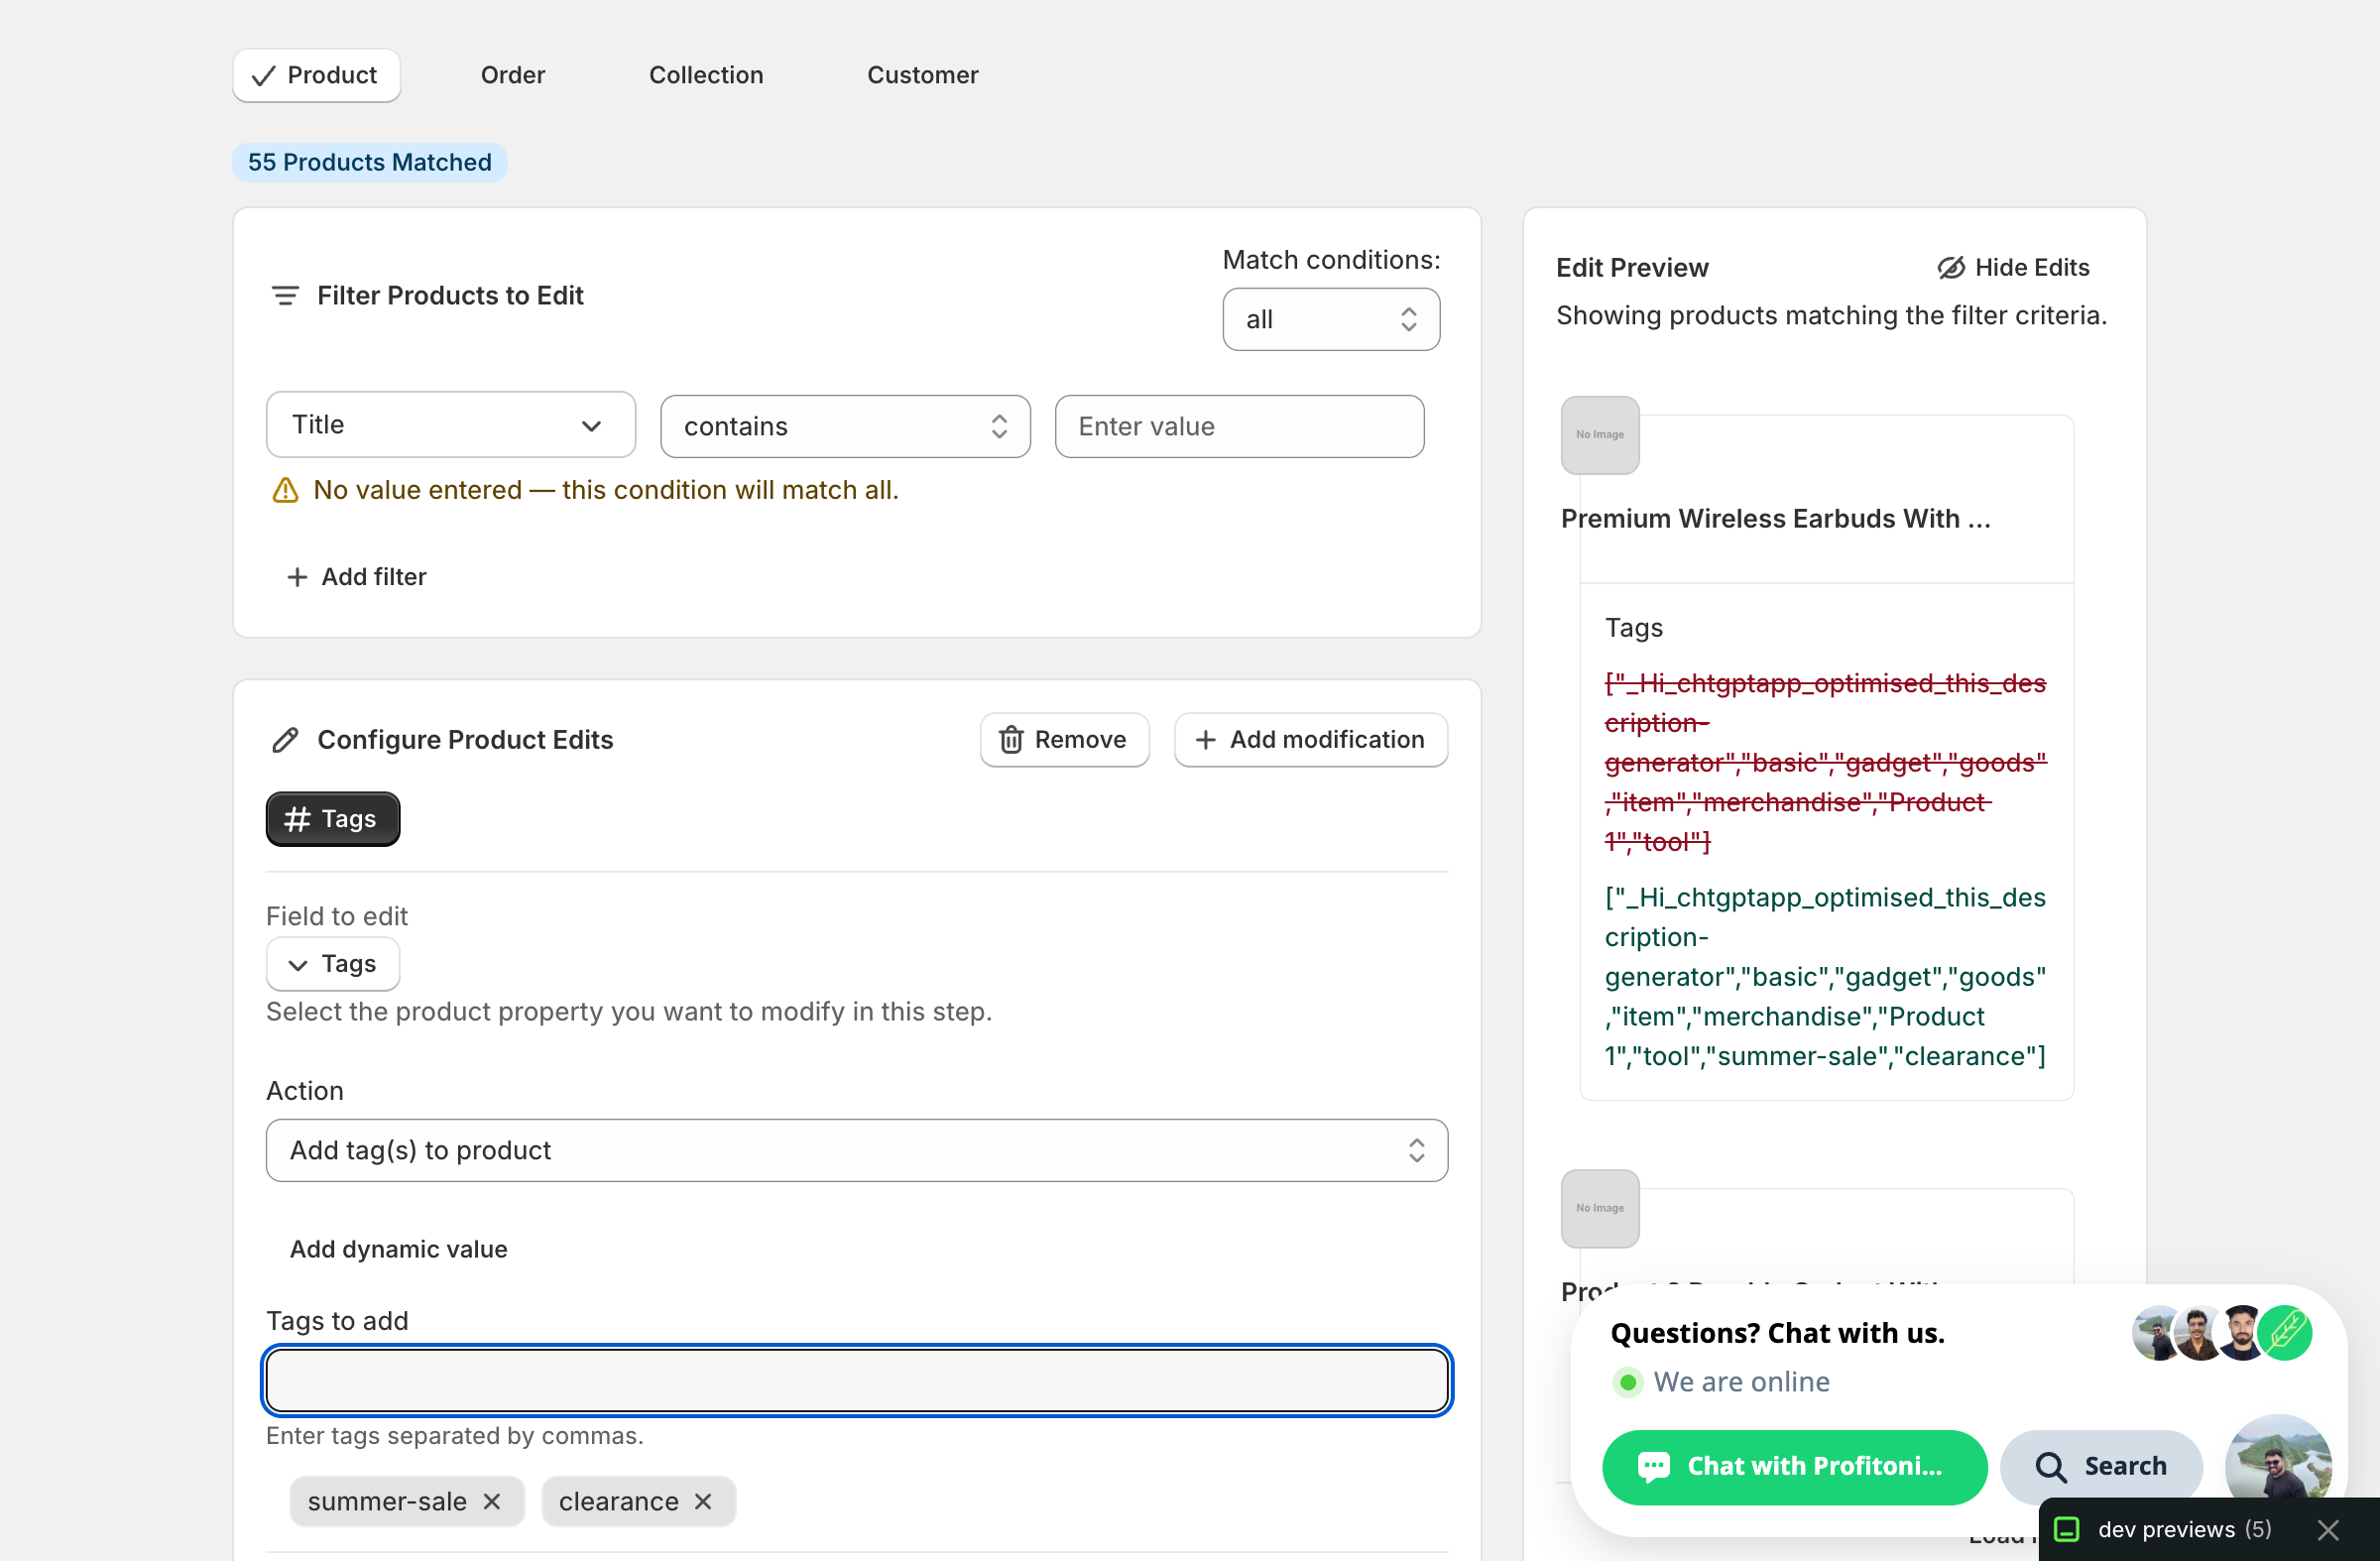
If a tag you're adding already exists on a product, Shopify keeps a single copy — no duplicates.
Remove tag(s) from product
Same chip input, but each entry is the exact name of a tag to strip. Casing doesn't matter for the match.

Use this to retire a season tag, clean up a typo'd duplicate, or pull a discontinued category off products in bulk.
Rename tag
Two text inputs — the exact tag to find, and the new name. Only products that actually carry the old tag are affected.
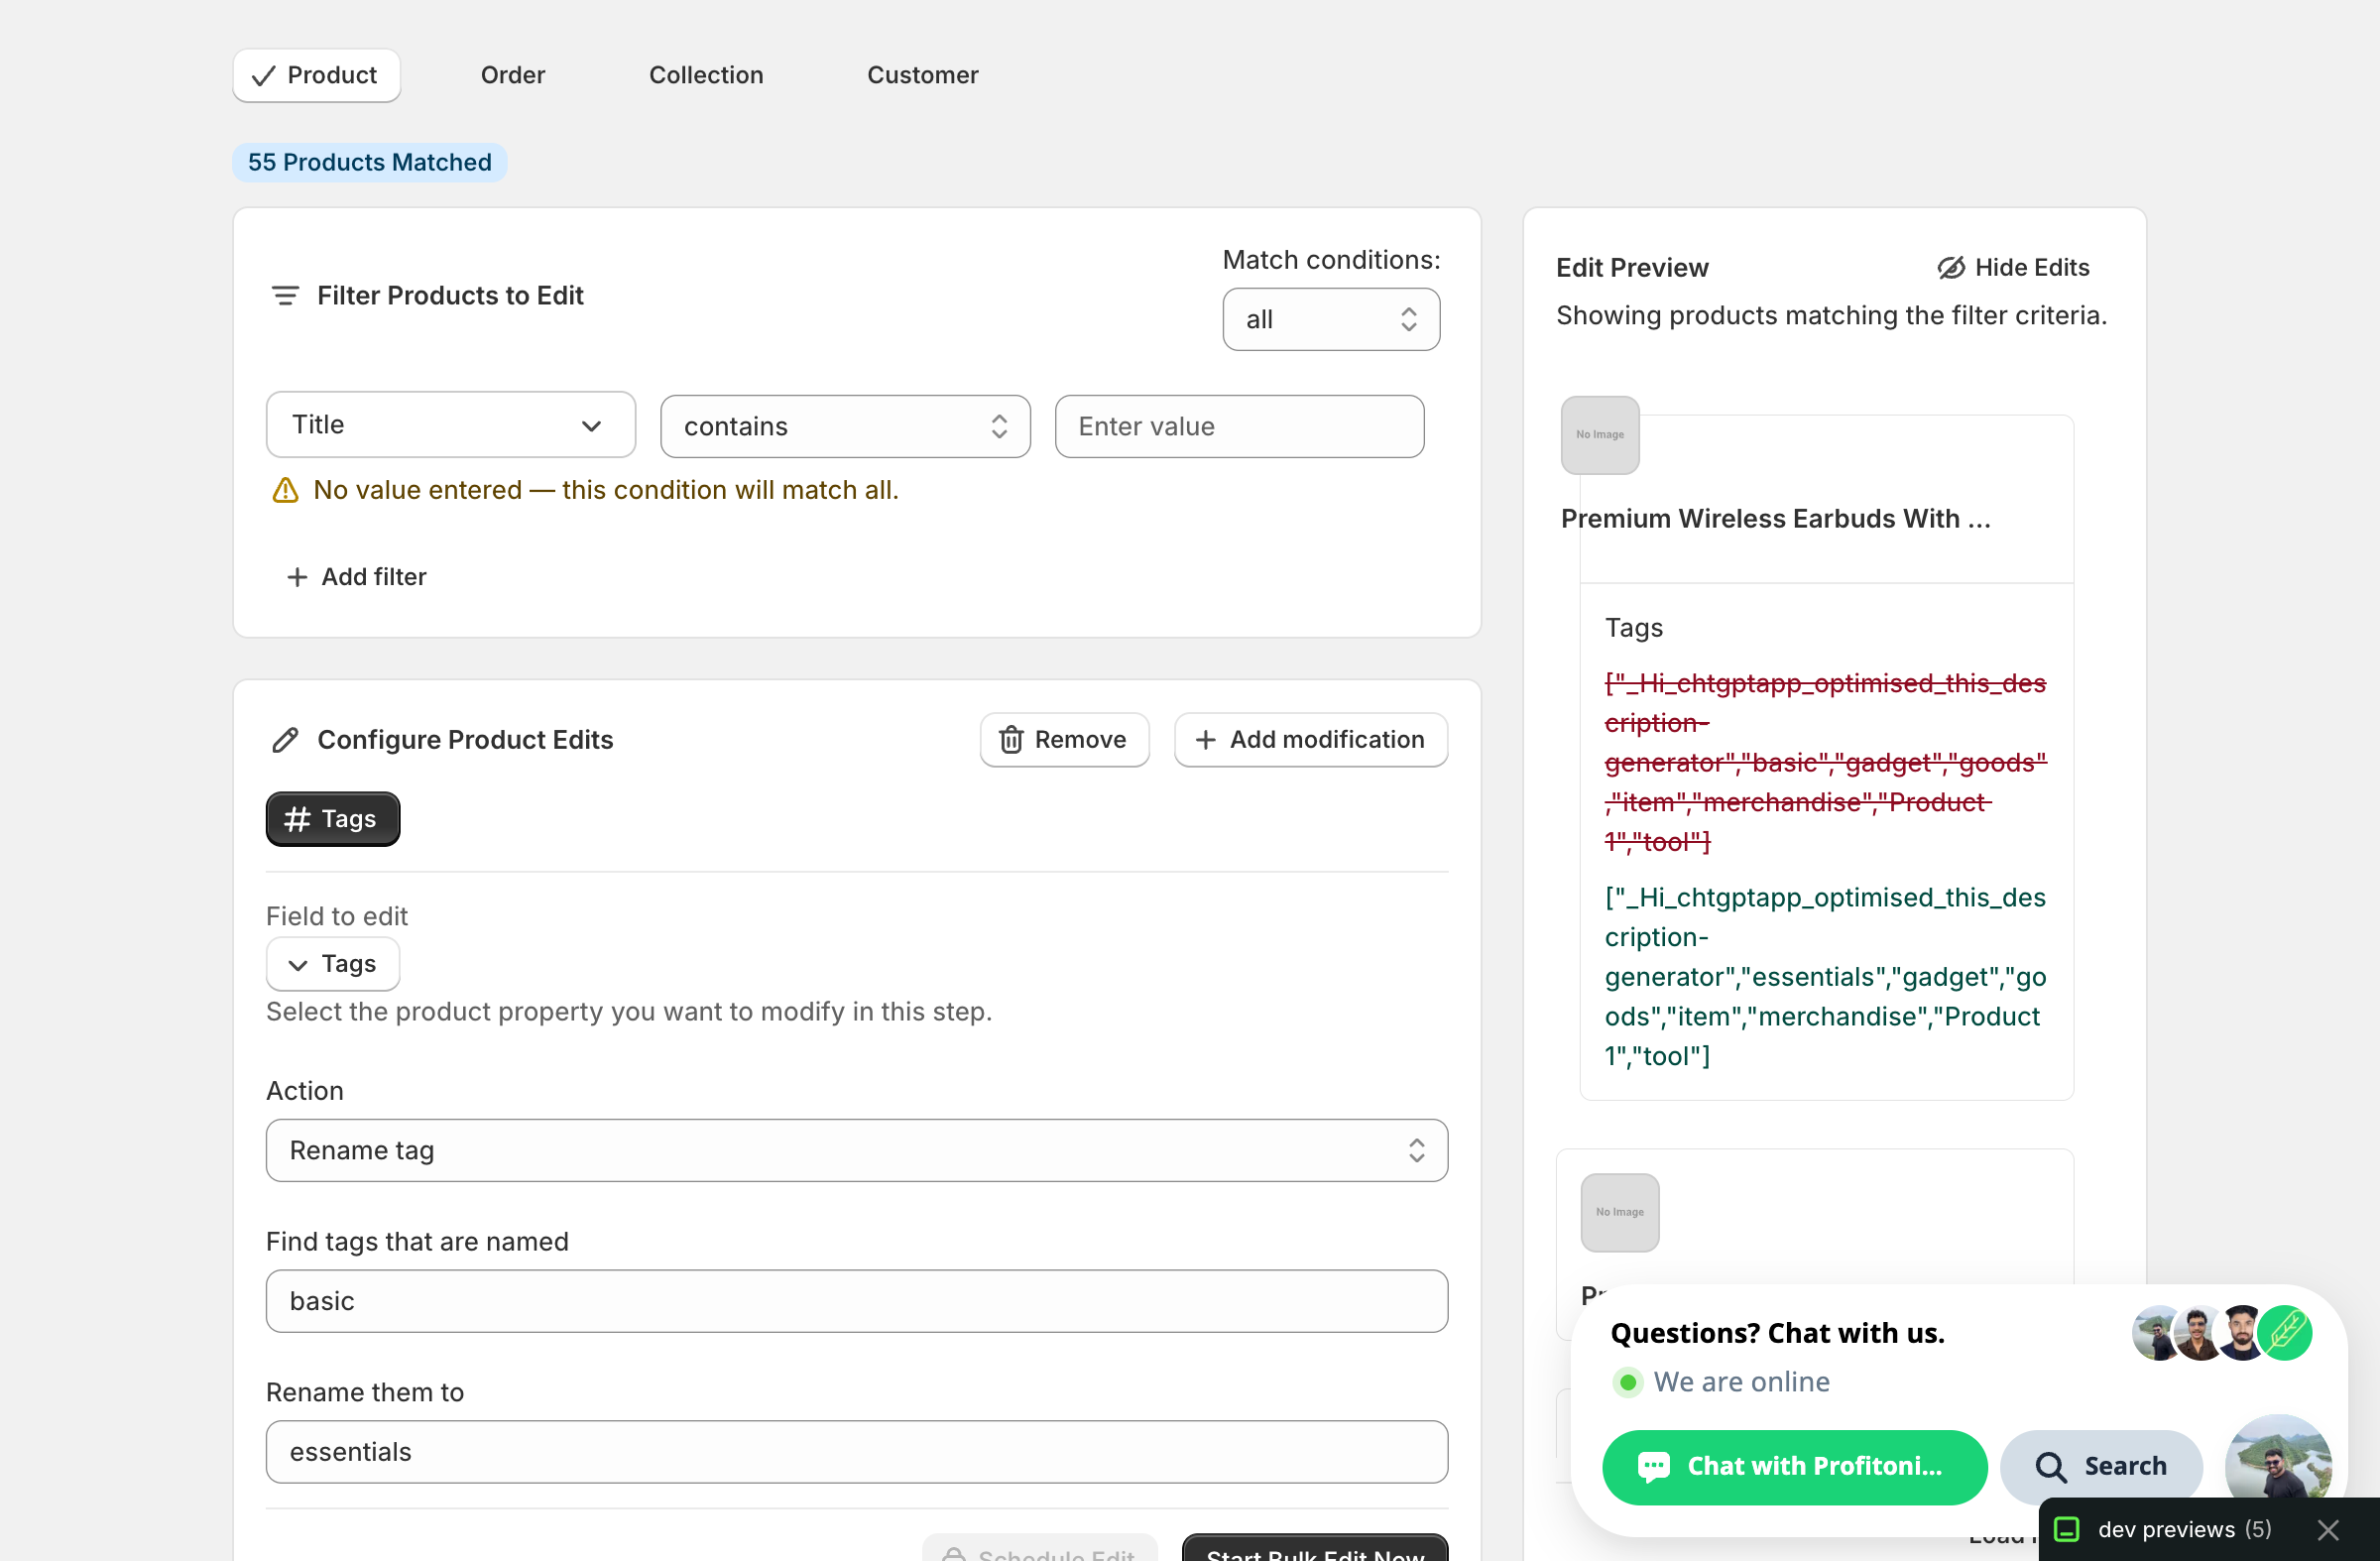
This is exact-match: basic will match the tag basic (case-insensitive) but won't touch basics or basic-tee.
Search/replace within tag name
When the change isn't a whole-tag rename — for example, normalising a brand spelling that appears as part of multiple tags — use search/replace. Two inputs plus a Case insensitive checkbox.
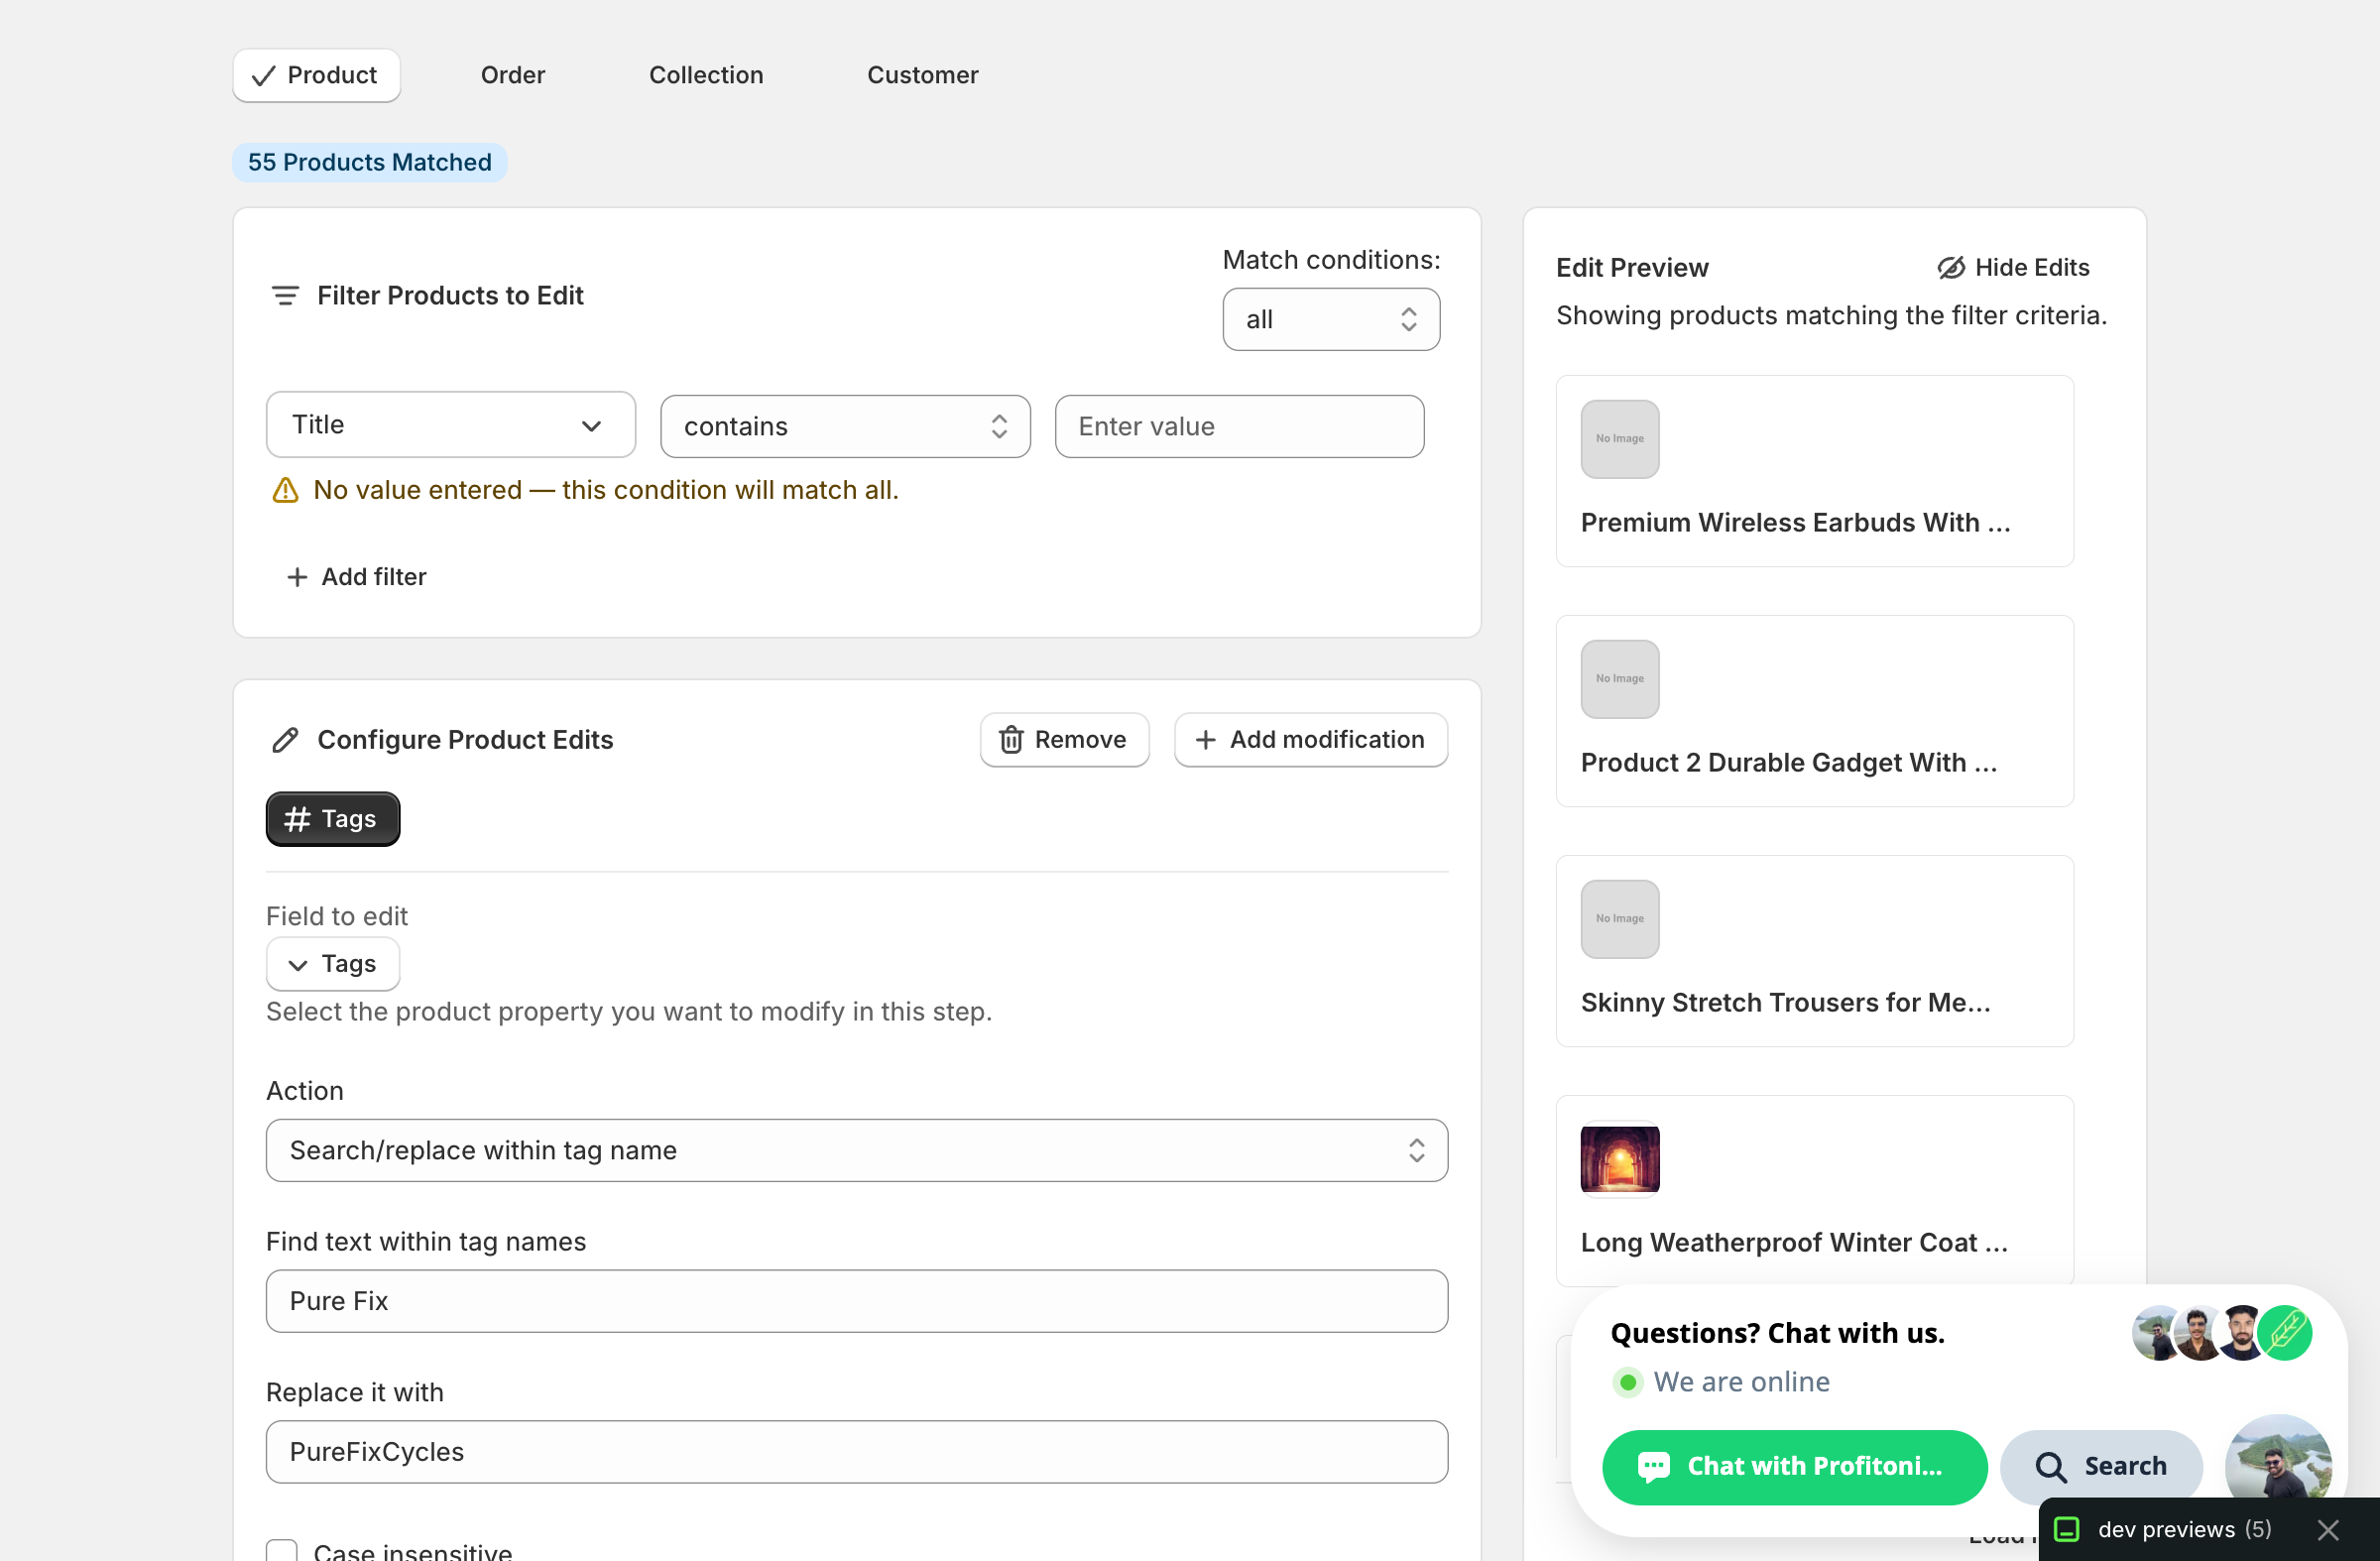
In this example, every tag containing Pure Fix becomes the same tag with PureFixCycles in place of that substring (pure fix → PureFixCycles, Pure Fix Cycles → PureFixCyclesCycles — watch out for that). Leave the replace field empty to delete the matched substring outright.
Set tags (overwrites existing)
A chip input identical to Add, but it replaces the whole tag list rather than appending.
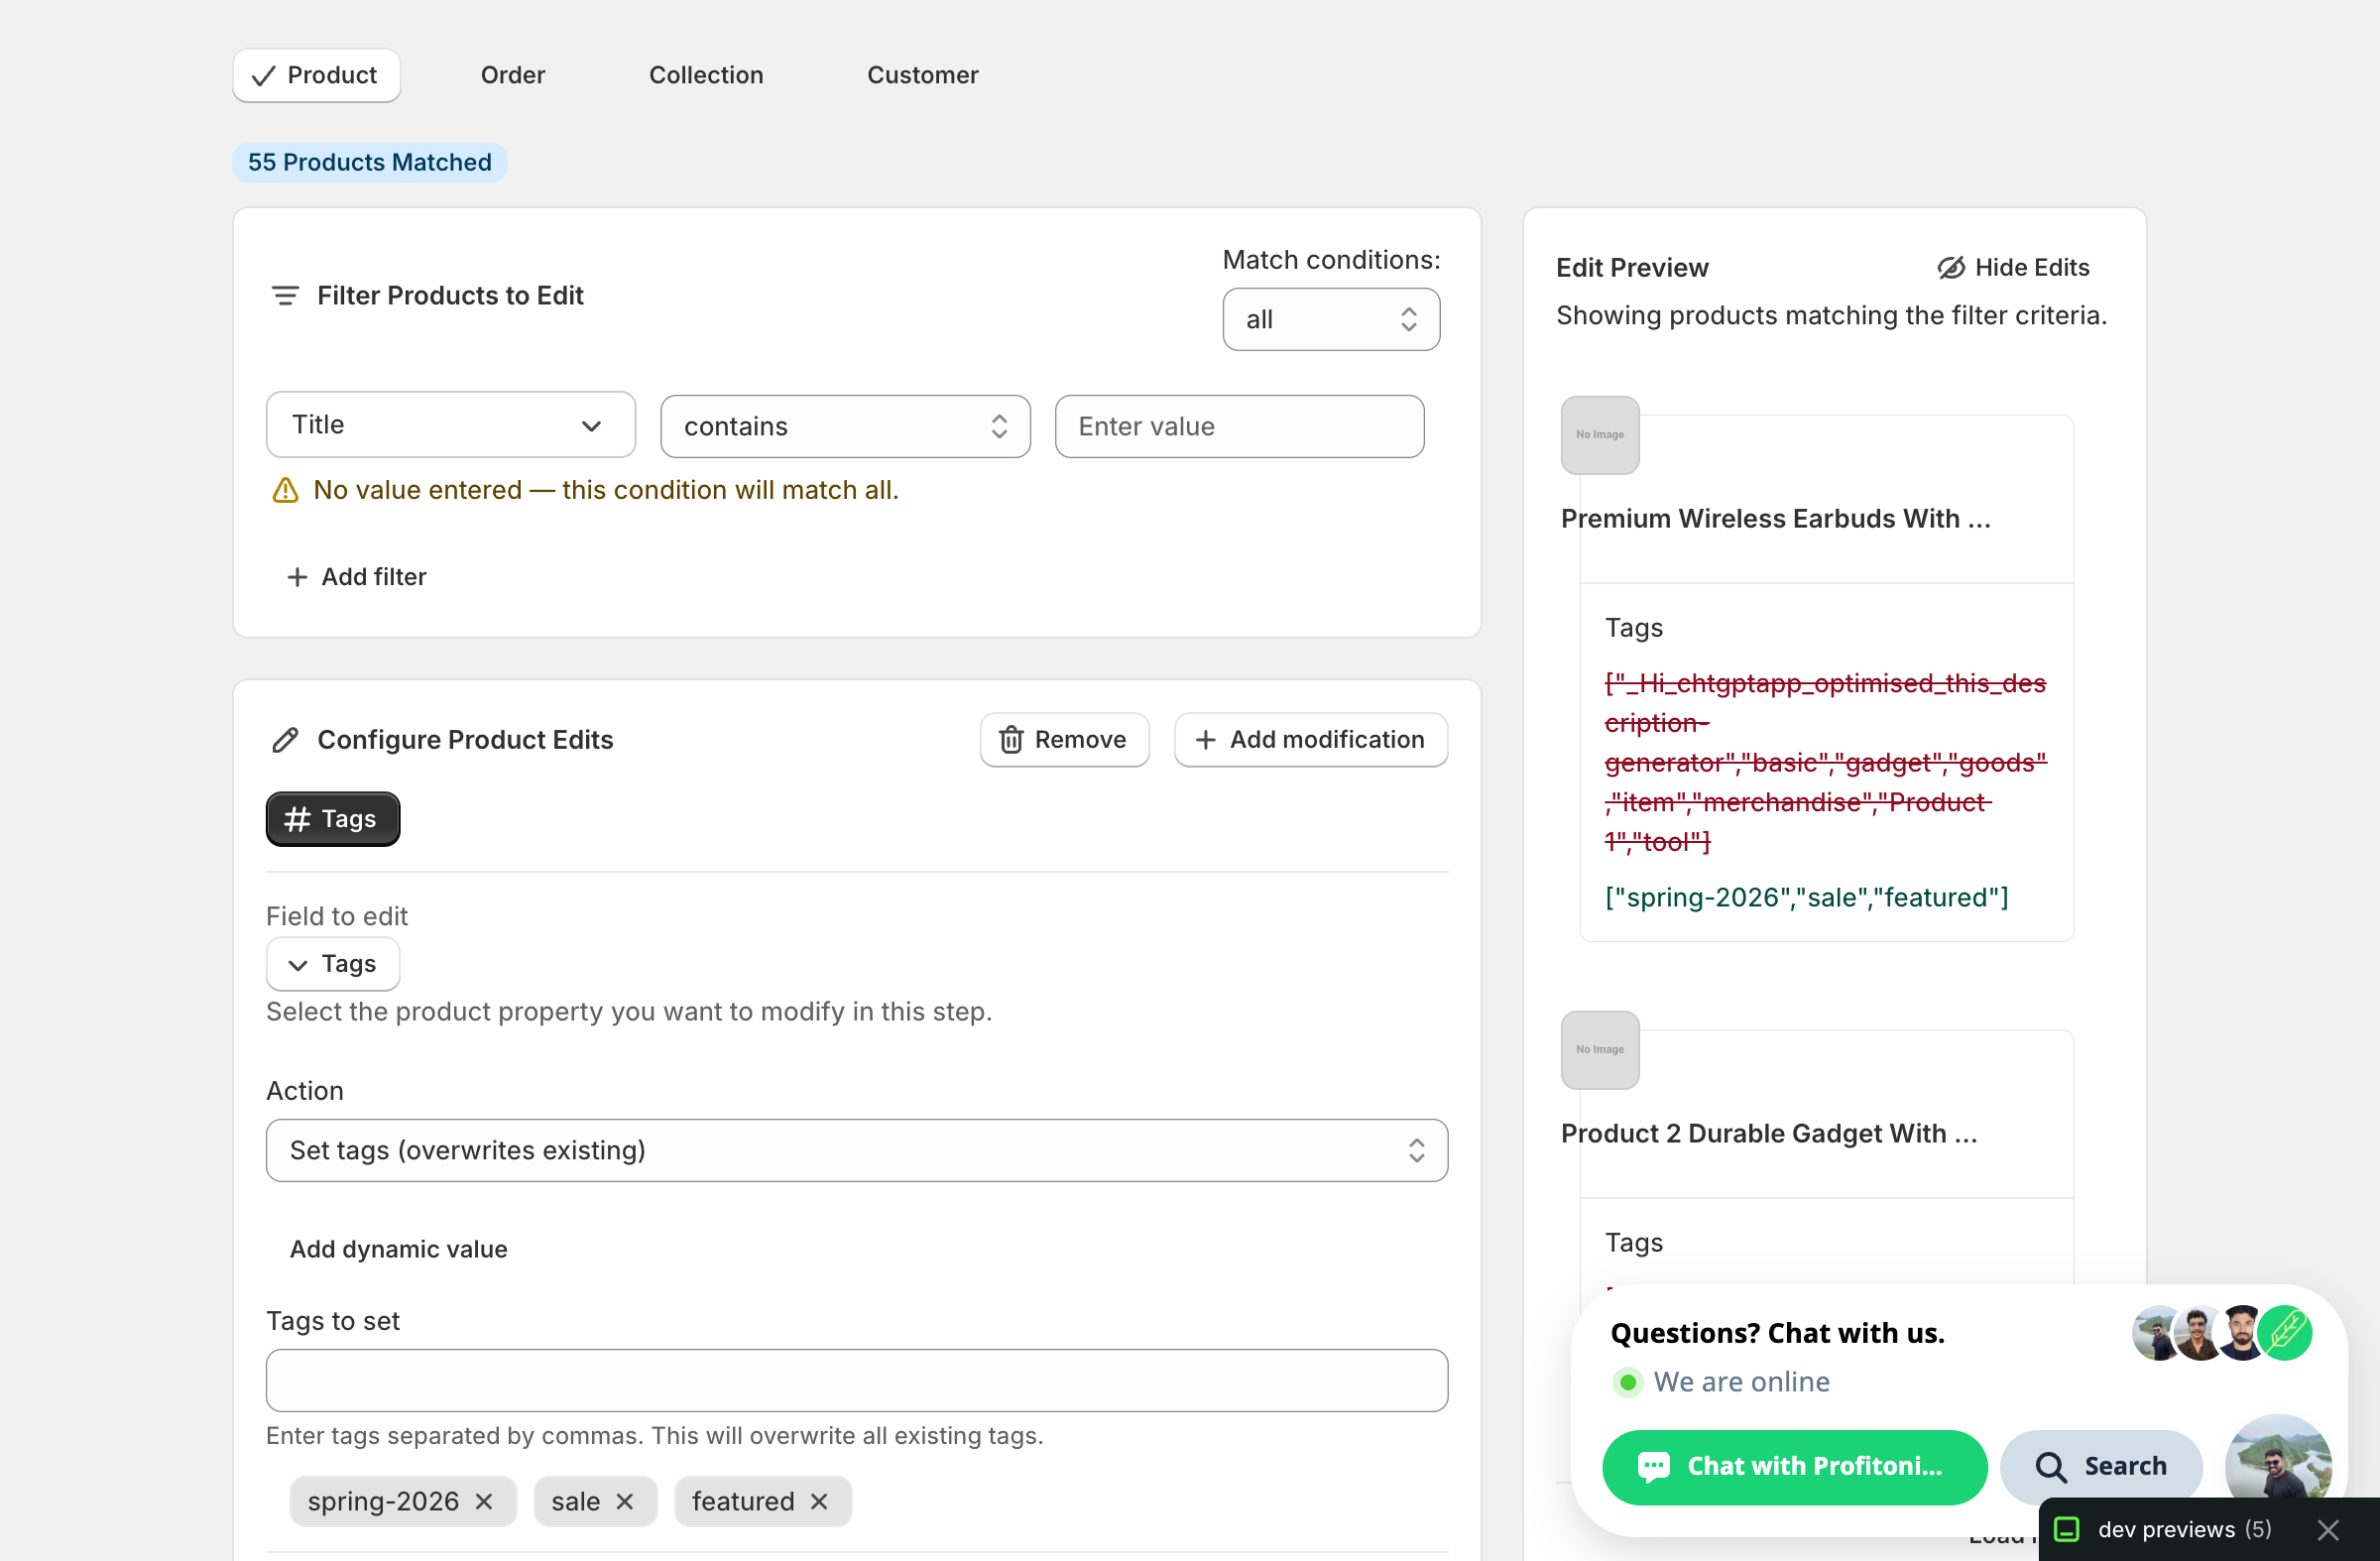
Warning — this wipes existing tags. Every tag a matched product carried is gone after the run. Tags drive collection rules, search facets, theme menus, and Shopify Flow triggers, so an unintended overwrite can break collection contents and storefront navigation. Only use Set tags when you genuinely want every matched product to end up with exactly the list you typed. For most "tweak the tags" jobs, Add or Remove is what you want.
Optional: pull a tag from another field with Add dynamic value
Above the chip input on the Add, Remove, and Set actions there's an Add dynamic value button. It lets you insert a placeholder that resolves per product — useful when each matched product needs a tag derived from its own data.
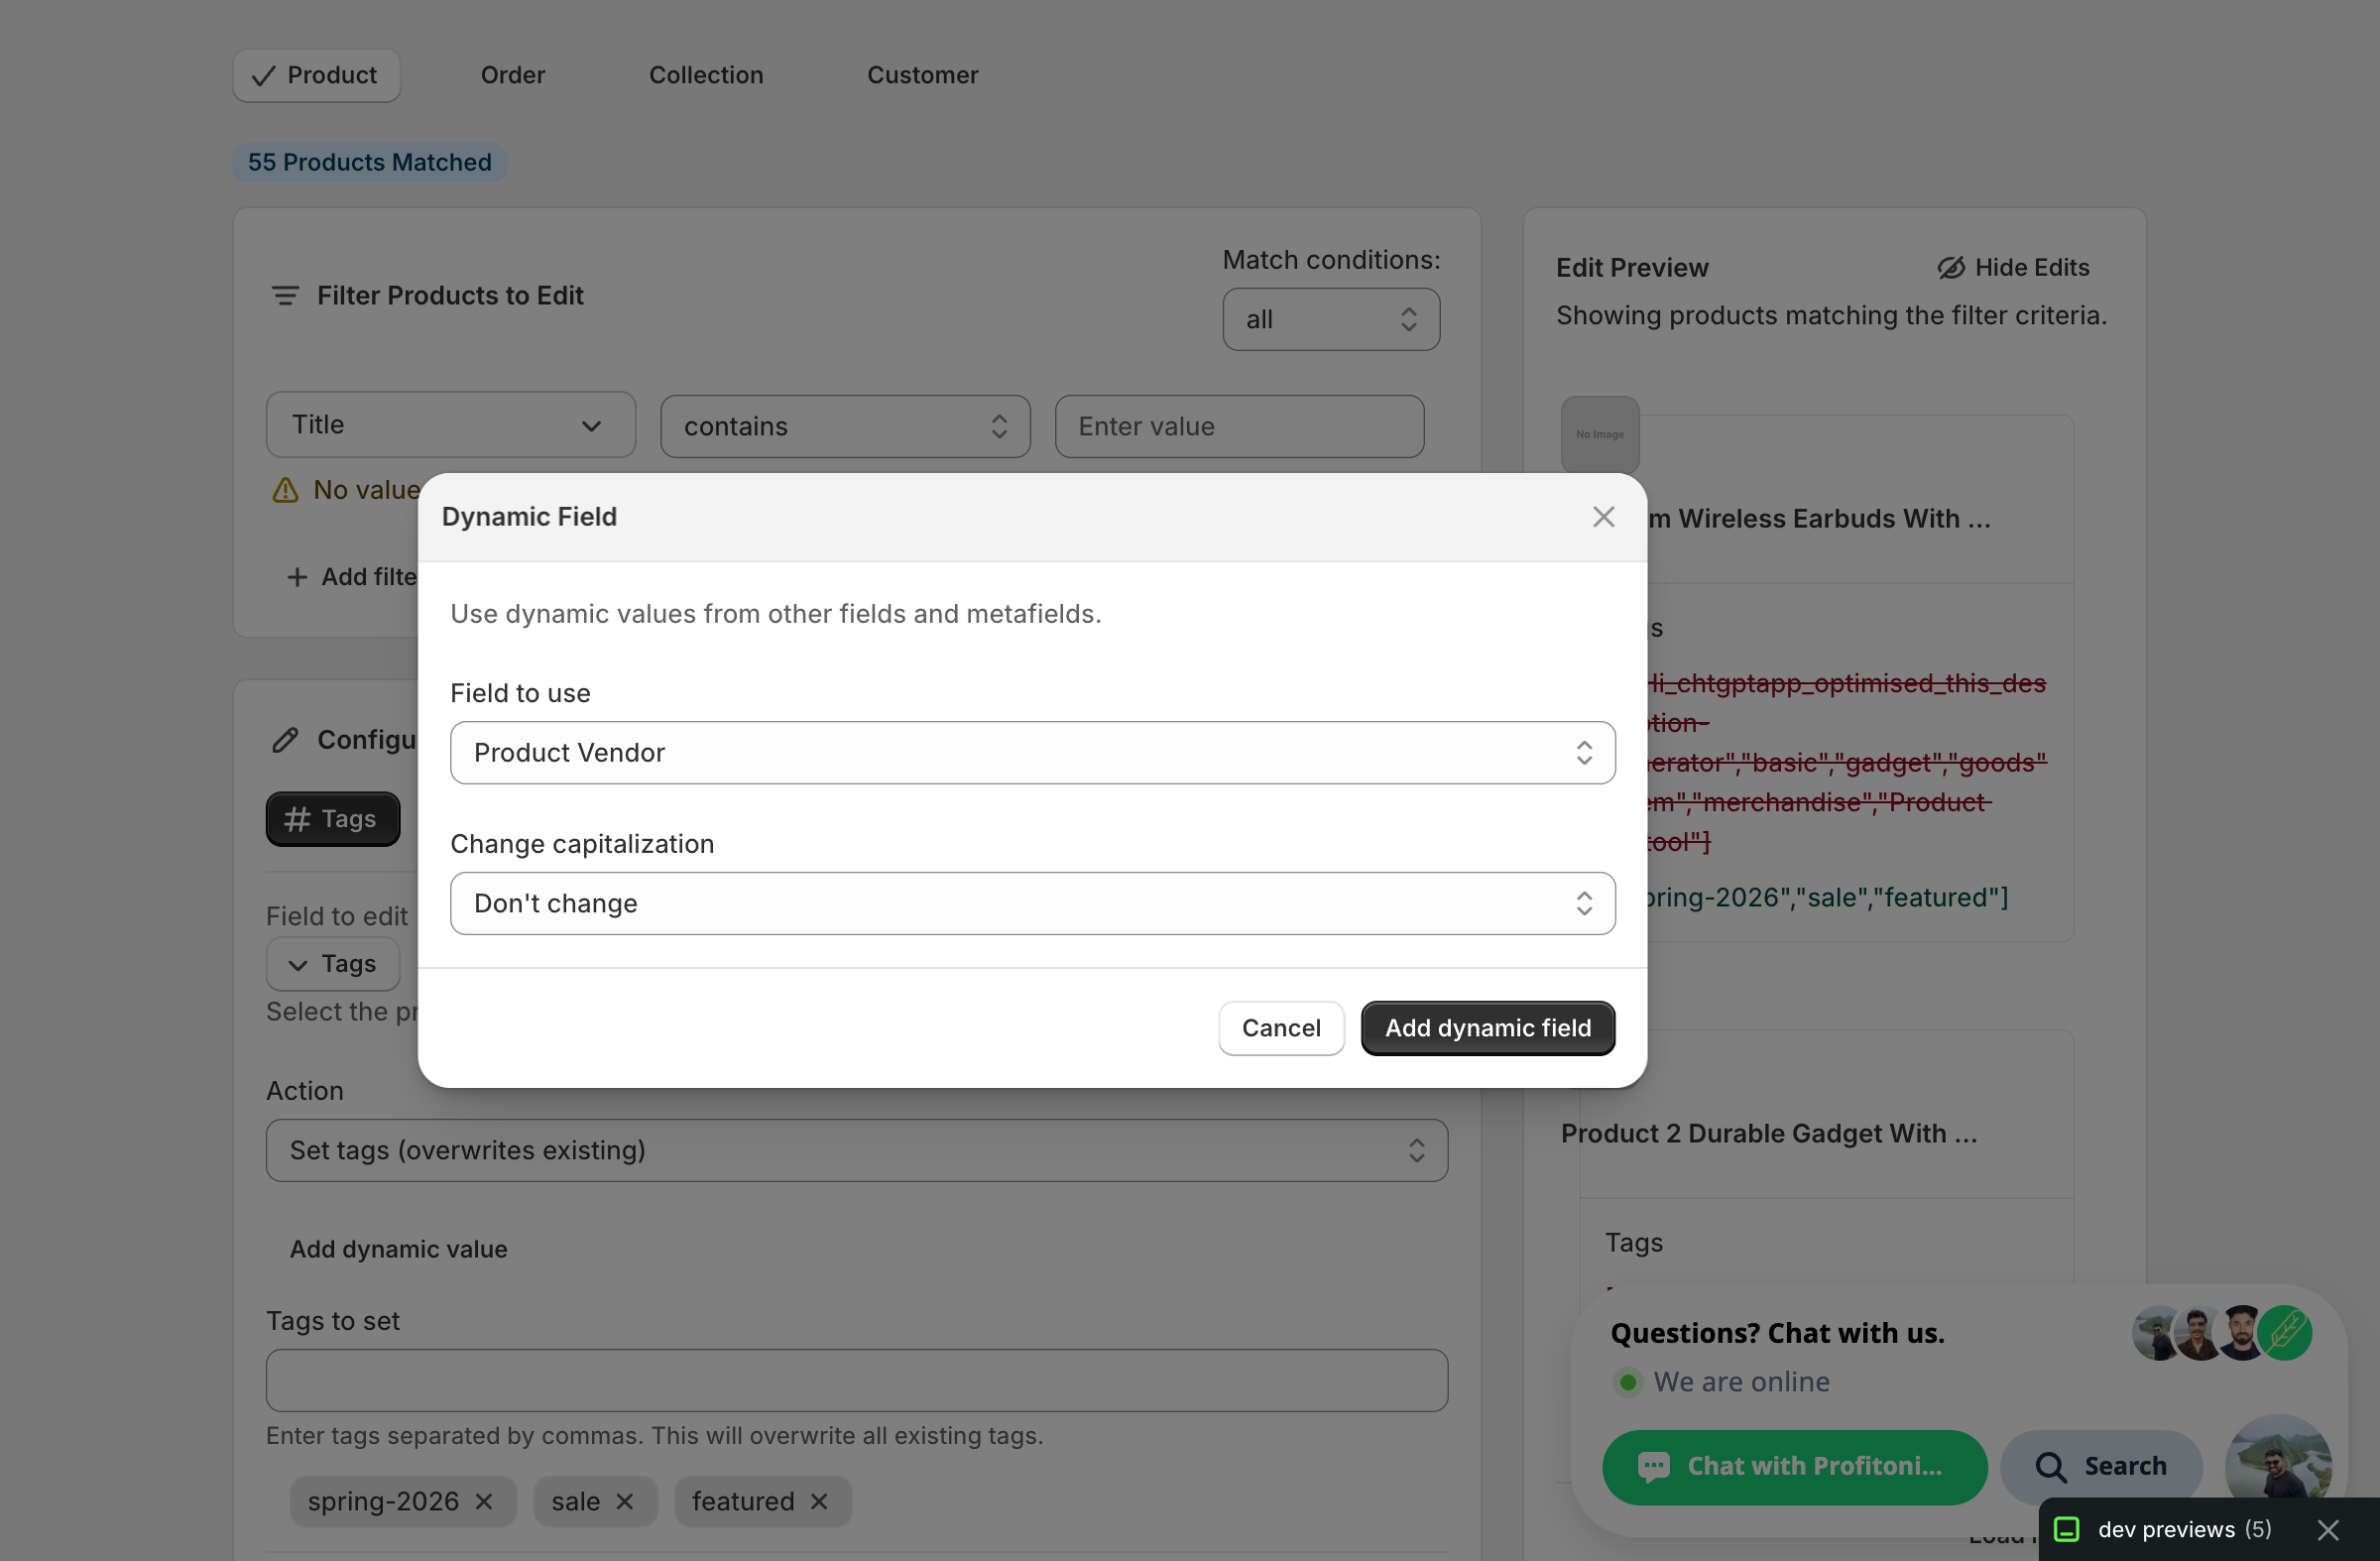
Pick a field (Product Vendor, Type, Handle, Title, a metafield, etc.), choose an optional capitalization (UPPER CASE, lower case, Title Case, or leave it), and click Add dynamic field. A token like {{product.vendor}} is added as a tag chip; on run, EditEngine substitutes each product's actual value before saving.
Common uses:
- Tag every product with its vendor: pick Product Vendor.
- Auto-tag by product type: pick Product Type.
- Mirror a metafield value into a searchable tag.
Run or schedule the edit
Use the filters above the configuration panel to narrow which products get touched, scan the Edit Preview on the right to confirm the resolved tags look right, then click Start Bulk Edit Now (or Schedule Edit to queue it for later).
After the run
- Tag changes are reversible from the History page using Undo.
- Add, Remove, and Set are idempotent — re-running with the same input produces the same result.
- Rename and Search/replace are not idempotent the moment the find/replace strings overlap. Re-running
Pure Fix → PureFixCycleswould turnPureFixCyclesintoPureFixCyclesCycles. Always look at the Edit Preview before re-running these. - Storefront filters, Smart Collection rules, and Shopify Flow triggers that key on tags pick up the new tags as soon as Shopify reindexes the product (usually within seconds, occasionally a few minutes).
Frequently asked questions
How do I add a tag to thousands of Shopify products at once?
In EditEngine, click Select Field, pick Tags under Product Fields, and keep the default action Add tag(s) to product. Type each tag and press Enter or a comma to commit it as a chip — you can also paste a comma-separated list. Existing tags are kept, and Shopify never creates duplicate copies of a tag.
Can I undo a bulk tag edit in Shopify if I make a mistake?
Yes. Tag changes are reversible from EditEngine's History page using Undo. Still, check the Edit Preview before running — especially with Set tags, which wipes every existing tag on matched products, and with Rename or Search/replace, which can keep rewriting values if re-run with overlapping find and replace strings.
How do I rename a Shopify tag across my whole catalog?
Choose the Rename tag action in EditEngine's Tags editor. Enter the exact tag to find and the new name; only products that actually carry the old tag are affected. The match is exact but case-insensitive — renaming basic won't touch basics or basic-tee. For partial changes inside tag names, use Search/replace within tag name instead.
Can I tag Shopify products automatically based on their vendor or product type?
Yes. On the Add, Remove, and Set actions, click Add dynamic value and pick a field like Product Vendor, Type, Handle, Title, or a metafield. EditEngine inserts a token such as {{product.vendor}} as a tag chip and substitutes each product's actual value when the edit runs.
Why does Shopify treat my Sale and sale tags as the same tag?
Shopify treats tags as case-insensitive and trims whitespace, so Sale and sale end up as the same stored tag. Casing in your existing tags is preserved on write, but duplicates that only differ by case won't be created — EditEngine's tag actions follow that same Shopify behavior.