Variants & options
How to Bulk Edit Option 3 Name
Last updated
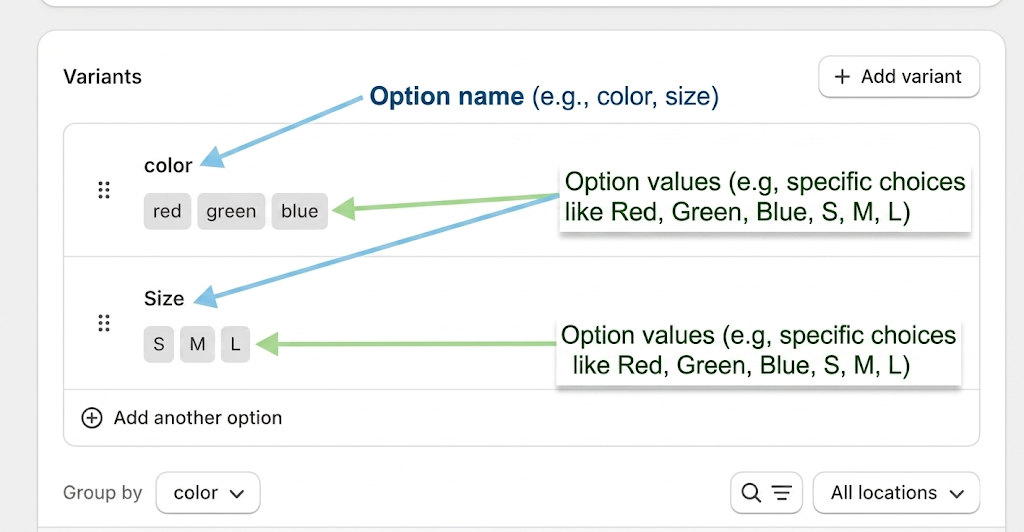
The Option 3 Name is the label on a product's third variant option — the word "Style" or "Material" that sits next to the first two option groups on the storefront variant picker. This guide shows how to set it across many products in one run.
Option 3 Name is a product field. It's the label of the third option group on a product (e.g.
Style), not the value of a particular variant (e.g.Slim Fit). One name per product, so each matched product gets a single update.
Only products that already have a third option are updated. EditEngine renames the existing Option 3 — it doesn't create a new option on products that have only one or two. Products without an Option 3 are skipped without error.
Step 1: Pick the Option 3 Name field
In the Configure Product Edits panel, click Select Field.
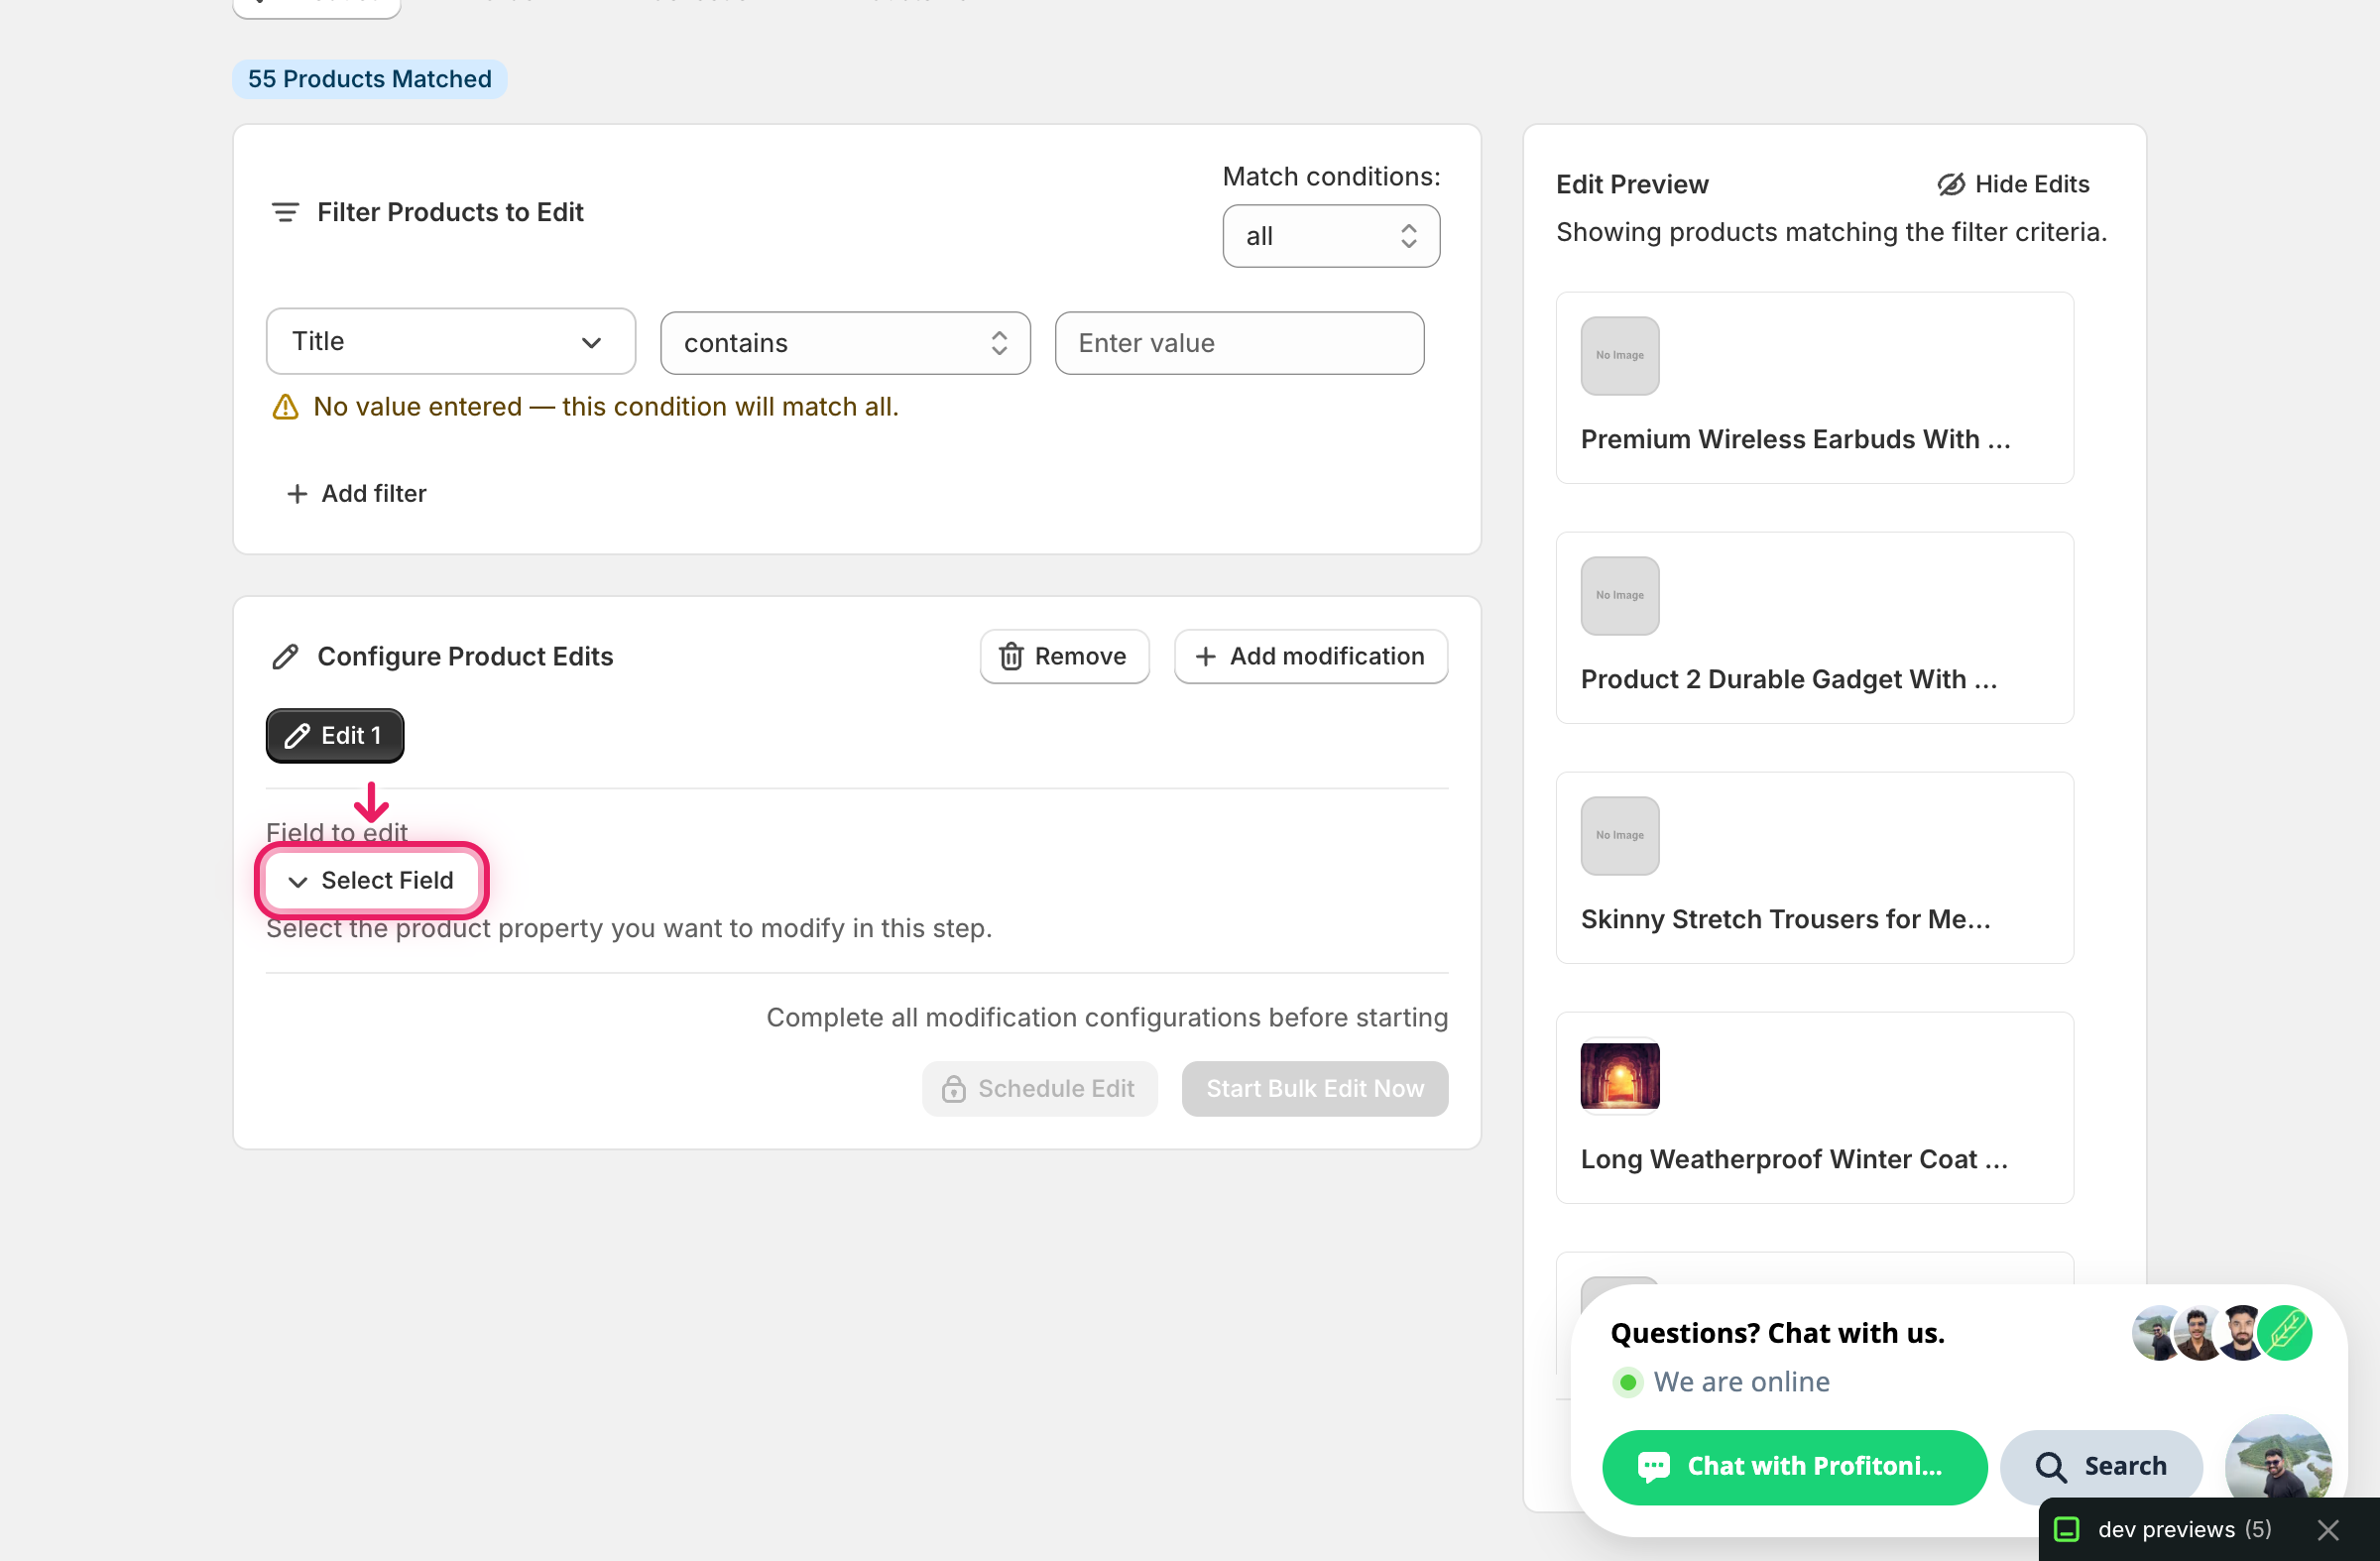
Option 3 Name lives under Product Fields.

Click it. The configuration panel switches to a How to edit Option 3 Name dropdown, with a value input below.
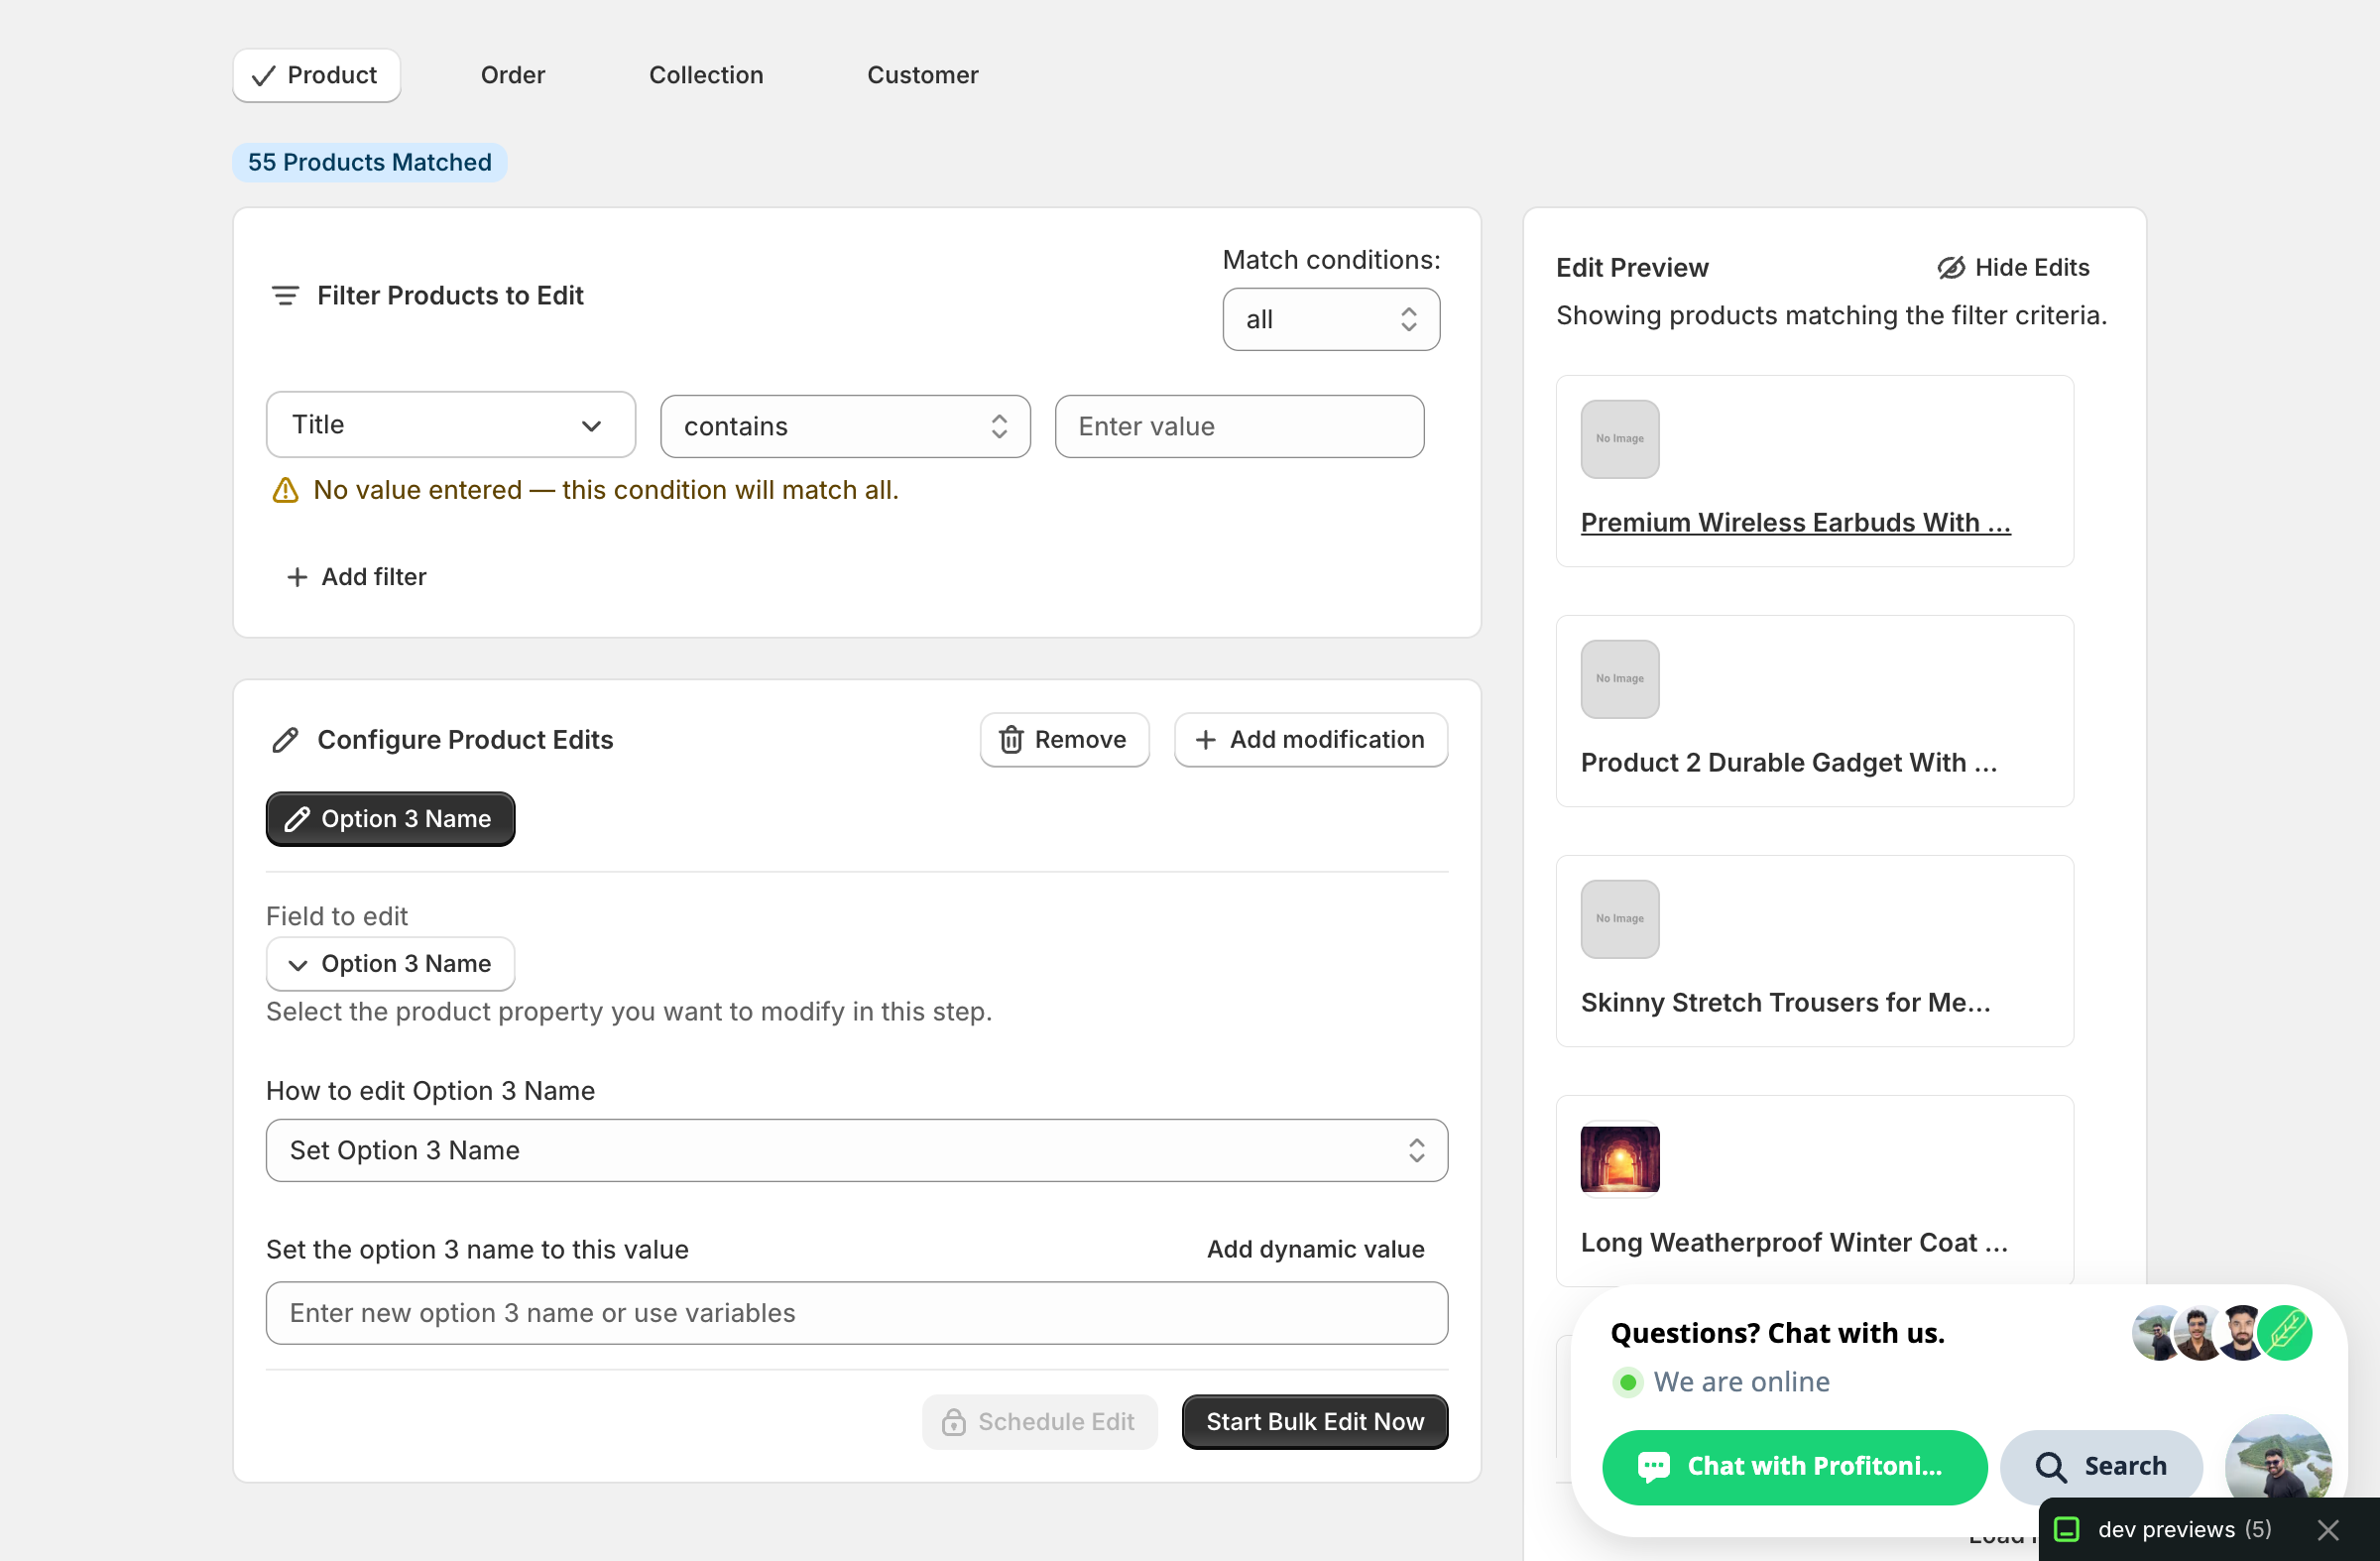
Step 2: Enter the new option name
Only one action is available: Set Option 3 Name. Type the new label into Set the option 3 name to this value.
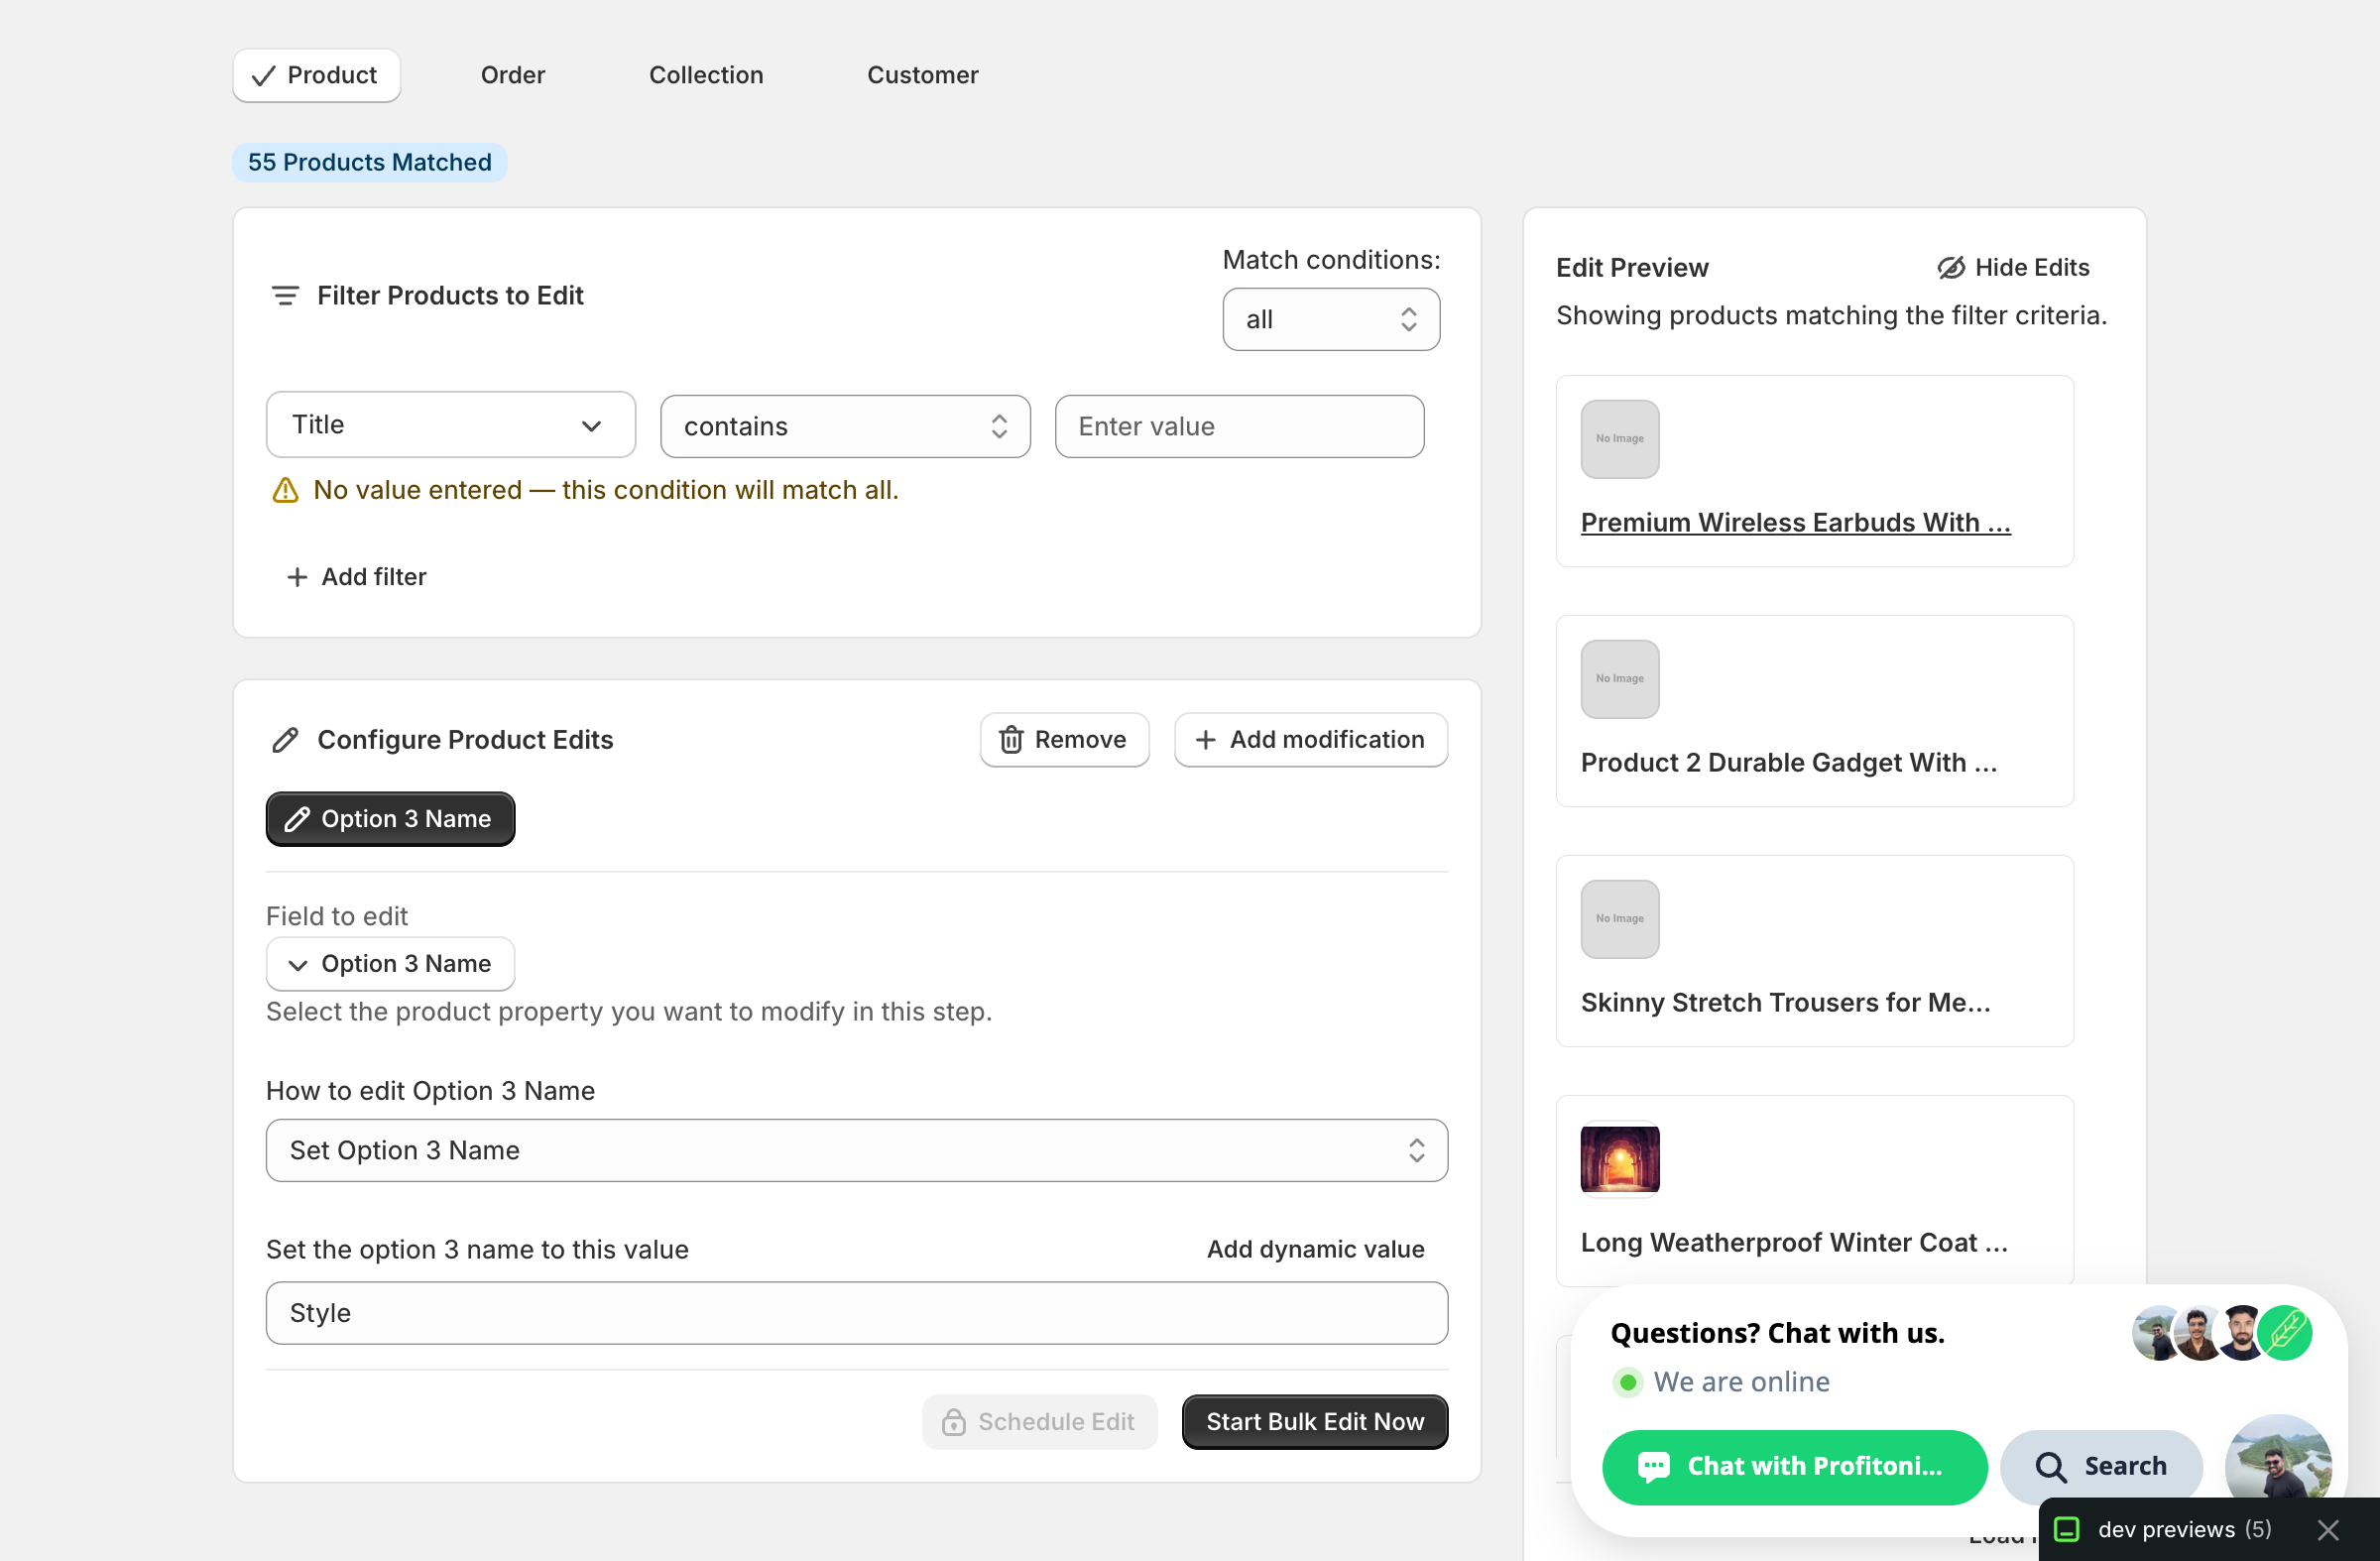
Realistic examples:
Style— when sizes and colours are already covered by Option 1 and 2 and the third option is fit or cut.Material— for products with size + colour + fabric variants.Length— for trousers or curtains varying by length once size and colour are set.
Pick a name that matches what the existing values actually represent. Renaming Option 3 from
StyletoMaterialdoesn't change the variants underneath — you'll end up with values likeSlim,Regular,Relaxedsitting under a header that saysMaterial. Use this when the current name is wrong, inconsistent across products, or you're standardising terminology.
No find/replace, no append/prepend, no dynamic tokens. This field is a straight set-to-value. If you need different new names for different product groups, run separate edits with a filter that targets each group.
Step 3: Filter so the right products get the rename
The edit applies to every product matched by your filter. Before running, narrow the filter so only the products whose Option 3 you actually want to rename are selected — Option 3 Name is a product field with no per-variant skip logic, so a too-broad filter will rename everything in scope.
Useful filter conditions:
- Option 3 Name
isstyle— catch products where the existing label is lowercase and standardise toStyle. - Title
containst-shirt— narrow by product type or naming convention. - Product type
isApparel— bulk-fix all apparel at once.
The Edit Preview on the right shows which products are in scope after filtering. Only products listed there will be touched.
Step 4: Run it
Once a value is entered and at least one product matches the filter, Start Bulk Edit Now activates. Click it to queue the edit, or Schedule Edit to run it later.
Each matched product issues a productOptionUpdate against its third option (position 3). Variant values stay exactly as they were — only the label above them changes.
After the run
- Option 3 Name changes are reversible from the History page using Undo.
- Products that don't have an Option 3 (one- or two-option products and no-option products) are silently skipped.
- The storefront option label updates immediately, but cached theme pages may take a few minutes to reflect the new name.
- This action does not rename Option 1 or Option 2 — those have their own fields (
Option 1 Name,Option 2 Name) with the same shape.
Frequently asked questions
How do I bulk rename the third option label like Style across Shopify products?
Select Option 3 Name under Product Fields in EditEngine, enter the new label — Style, Material, or Length — in Set the option 3 name to this value, then click Start Bulk Edit Now or Schedule Edit to run it later. It is a product field, so each matched product gets one update.
Is a bulk Option 3 name edit reversible in Shopify?
Yes. Option 3 Name changes are reversible from EditEngine's History page using Undo. The edit applies to every product matched by your filter, so narrow the filter first and confirm the scope in the Edit Preview — only products listed there get touched.
Will renaming Option 3 from Style to Material change the variant values in Shopify?
No. The variants underneath are untouched — values like Slim, Regular, and Relaxed would simply sit under a header that says Material. EditEngine's Set Option 3 Name is meant for when the current label is wrong, inconsistent across products, or you are standardising terminology, not for rewriting the values themselves.
What happens to Shopify products with only one or two options during an Option 3 rename?
They are silently skipped. EditEngine renames the existing third option — it never creates a new option on products that have only one or two. Matched products with a third option each issue a productOptionUpdate against position 3, and the variant values below the label stay exactly as they were.
How do I standardise a lowercase option label like style to Style in Shopify?
Filter with Option 3 Name is style to catch products where the existing label is lowercase, then set the new value to Style in EditEngine. You can also narrow by Title contains t-shirt or Product type is Apparel. Once a value is entered and at least one product matches, Start Bulk Edit Now activates.