Collections
How to Bulk Add Shopify Products to Collections
Last updated
Need to bulk add Shopify products to collections without clicking into every product page? With the EditEngine Bulk Product Editor, you export your catalog to a spreadsheet, type the collection title into the Custom Collections cell for each product, and import the file back. The default MERGE command adds the new membership without removing any existing collection links, so the change is additive and safe.
What you'll learn
- Export every product with the custom collections it already belongs to
- Add a collection name per row in a spreadsheet to grow each product's membership
- Import the updated file back to Shopify in one operation
What you'll need
- The EditEngine Bulk Product Editor app installed in your Shopify store
- At least one custom (manual) collection already created in your Shopify admin
- Products you want to add — they can already belong to other collections, or none yet
- A spreadsheet editor (Excel, Google Sheets, Numbers — anything that opens CSV)
A custom collection (also called a manual collection) lists products you choose by hand, in contrast to smart collections, which are rule-based. Shopify exposes a product's manual memberships through the Custom Collections field — a comma-separated list of collection titles. Editing that field in bulk is exactly what the spreadsheet workflow below is for.
Step 1 — Export your Shopify products
Open EditEngine and go to the Export page. This is where you choose which product fields land in your spreadsheet.
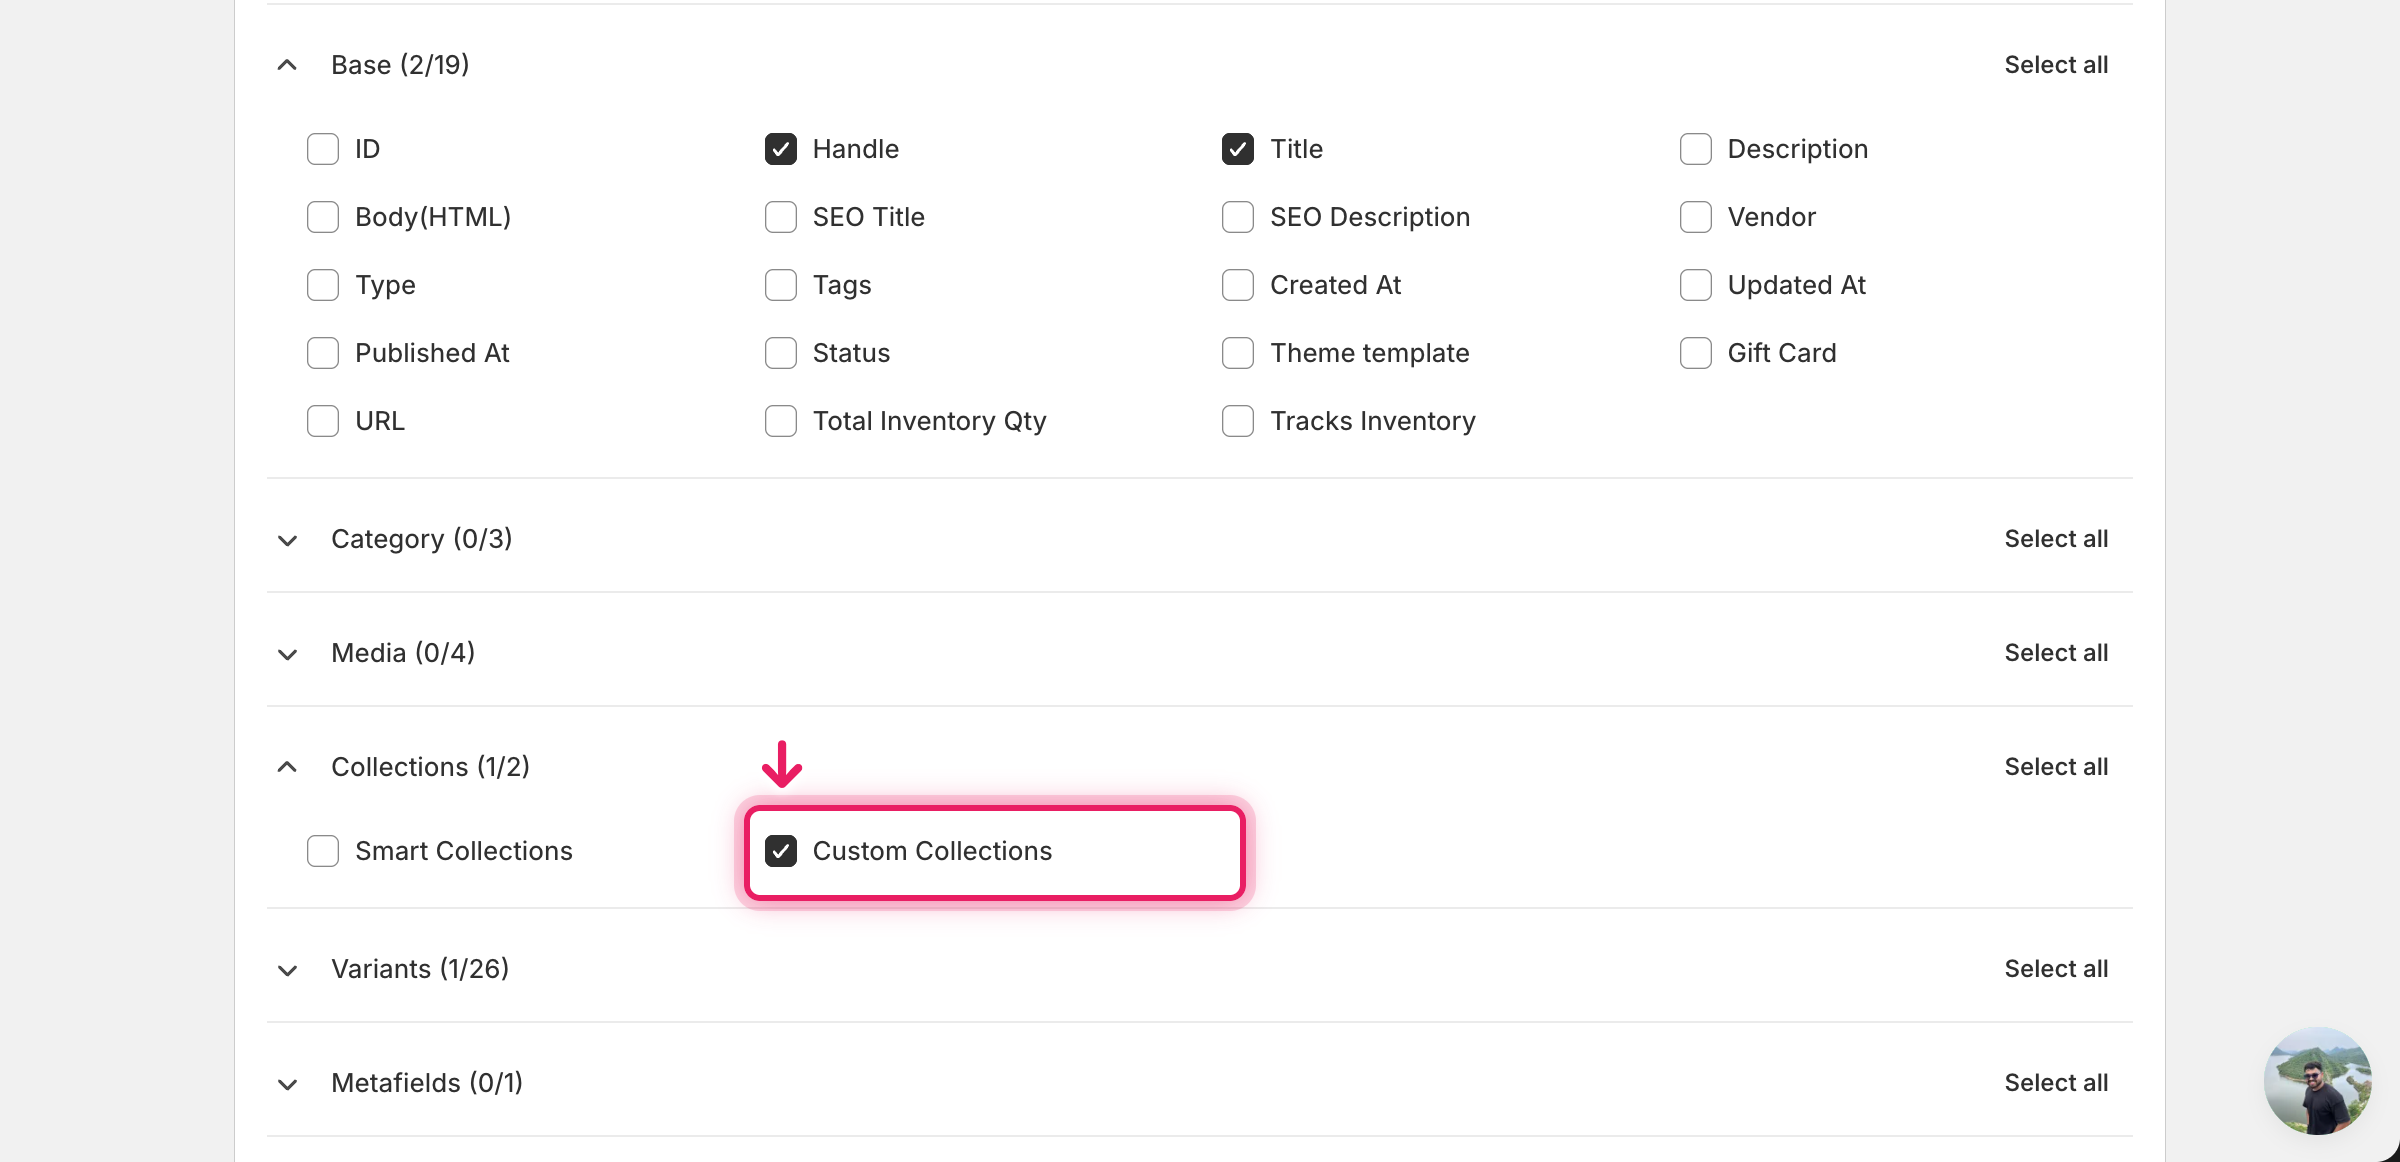
Pick the right columns
- Handle — the unique product identifier the importer uses to match each row back to the right product.
- Variant SKU — context only, so you can spot which variant a row belongs to while editing — collection membership itself is product-level.
- Custom Collections — the column you'll edit. It holds the comma-separated titles of every custom collection the product belongs to. Expand the Collections group and tick Custom Collections.
When the export completes, click Download. You'll get one row per variant: products with several variants repeat across rows, and the Custom Collections cell is filled only on the top (product-level) row — the variant rows below leave it blank, which is normal.
New to exporting? This guide assumes you know how to run an export and focuses only on the columns and edit unique to this workflow.
Step 2 — Bulk add Shopify products to collections in your spreadsheet
Open the downloaded CSV in Excel or Google Sheets. The Custom Collections column shows the comma-separated titles of every manual collection each product is already in — or it is blank if the product has none yet.
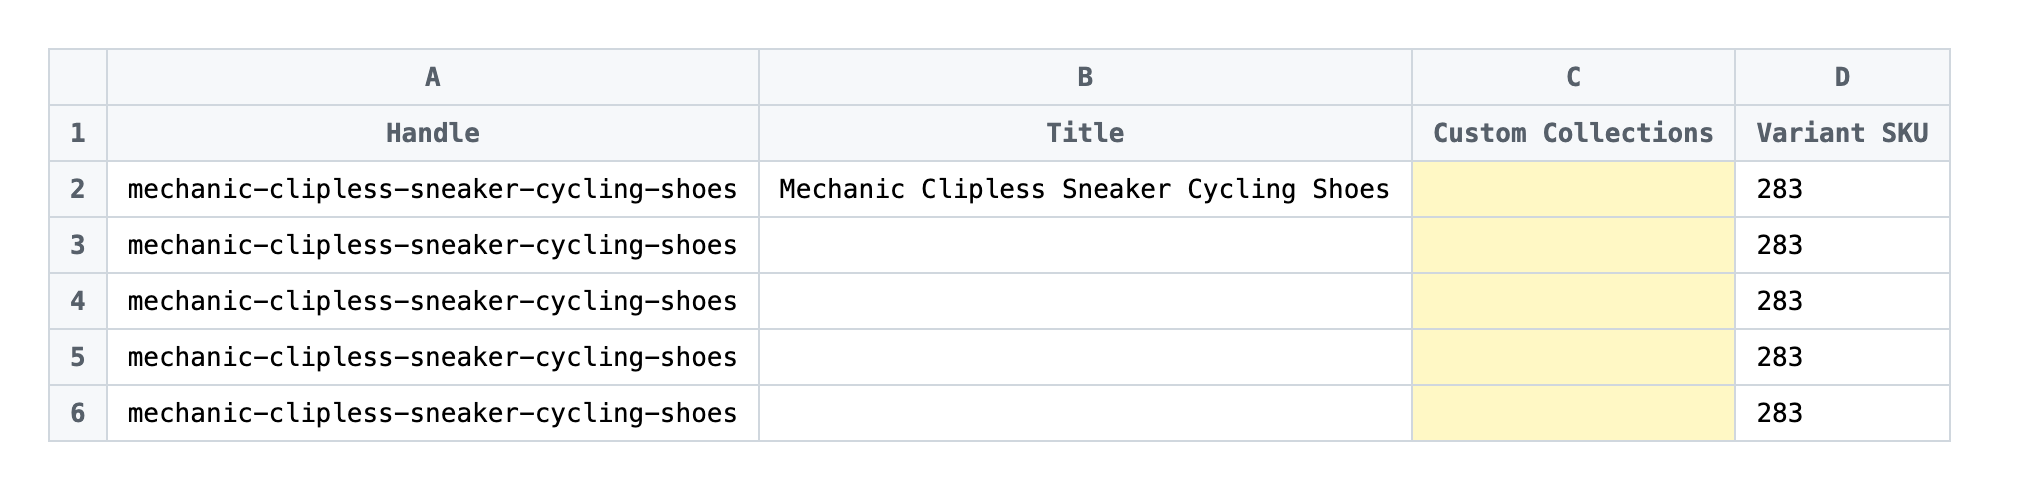
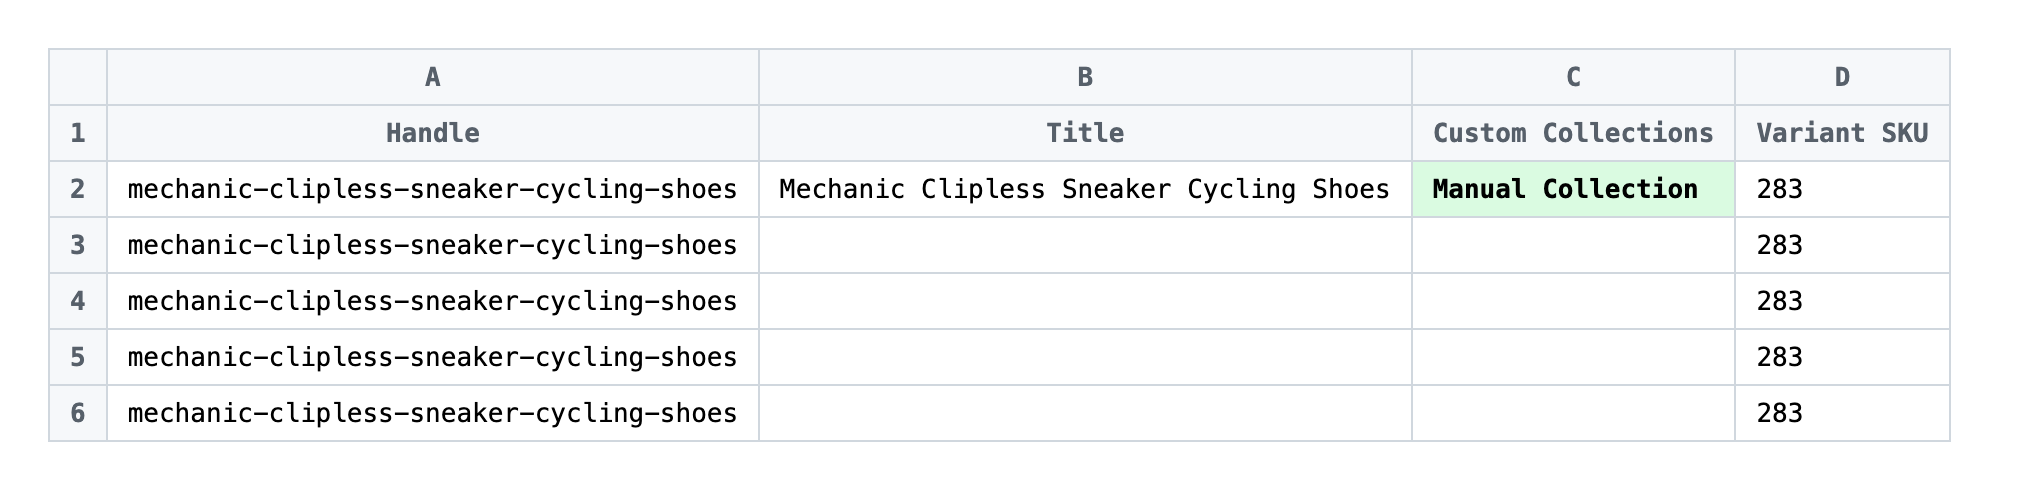
For each product you want to move, find the top row (the one with the Variant SKU on it, where Custom Collections is filled or empty) and append the target collection title to that cell. If the cell already lists other collections, separate them with a comma and a space. Leave the variant rows below blank — collection membership is set once per product, not per variant. The title you type must match an existing custom collection in your Shopify admin exactly, or the importer will create a new empty collection with that name.
- ✅
Summer Sale, Manual Collection - ❌
manual-collection (handle, not title) or summer sale,manual collection (lowercase, no space after comma)
Leave every other column exactly as exported. Do not edit Handle — that value is the matching key, so changing it points the row at a different product (or none at all). And do not retype the existing collection names with different casing or extra spaces; the importer treats Summer Sale and summer sale as different titles and will create a duplicate. If a product currently belongs to a smart (automated) collection, it will appear in the Smart Collections export column, not Custom Collections — those memberships are rule-based and cannot be edited from the CSV.
Save the file as CSV when you're done, and keep the original export handy in case you want to revert.
Tip: Custom Collections is a product attribute, not a variant one — even a product with thirty variants has just one cell to edit, on the top row. The variant rows below it should stay blank.
Step 3 — Import the edited file back to Shopify
Open EditEngine → Import and select Advanced import. Then upload the file you just edited.
EditEngine reads the file and shows a summary. Check the Headers panel: Custom Collections should appear with the COLLECTION badge, which confirms the importer recognized it as a membership column. Leave Match Products By on Auto-detect (Handle) and Default Command on Merge — merge is what makes this workflow additive instead of destructive.
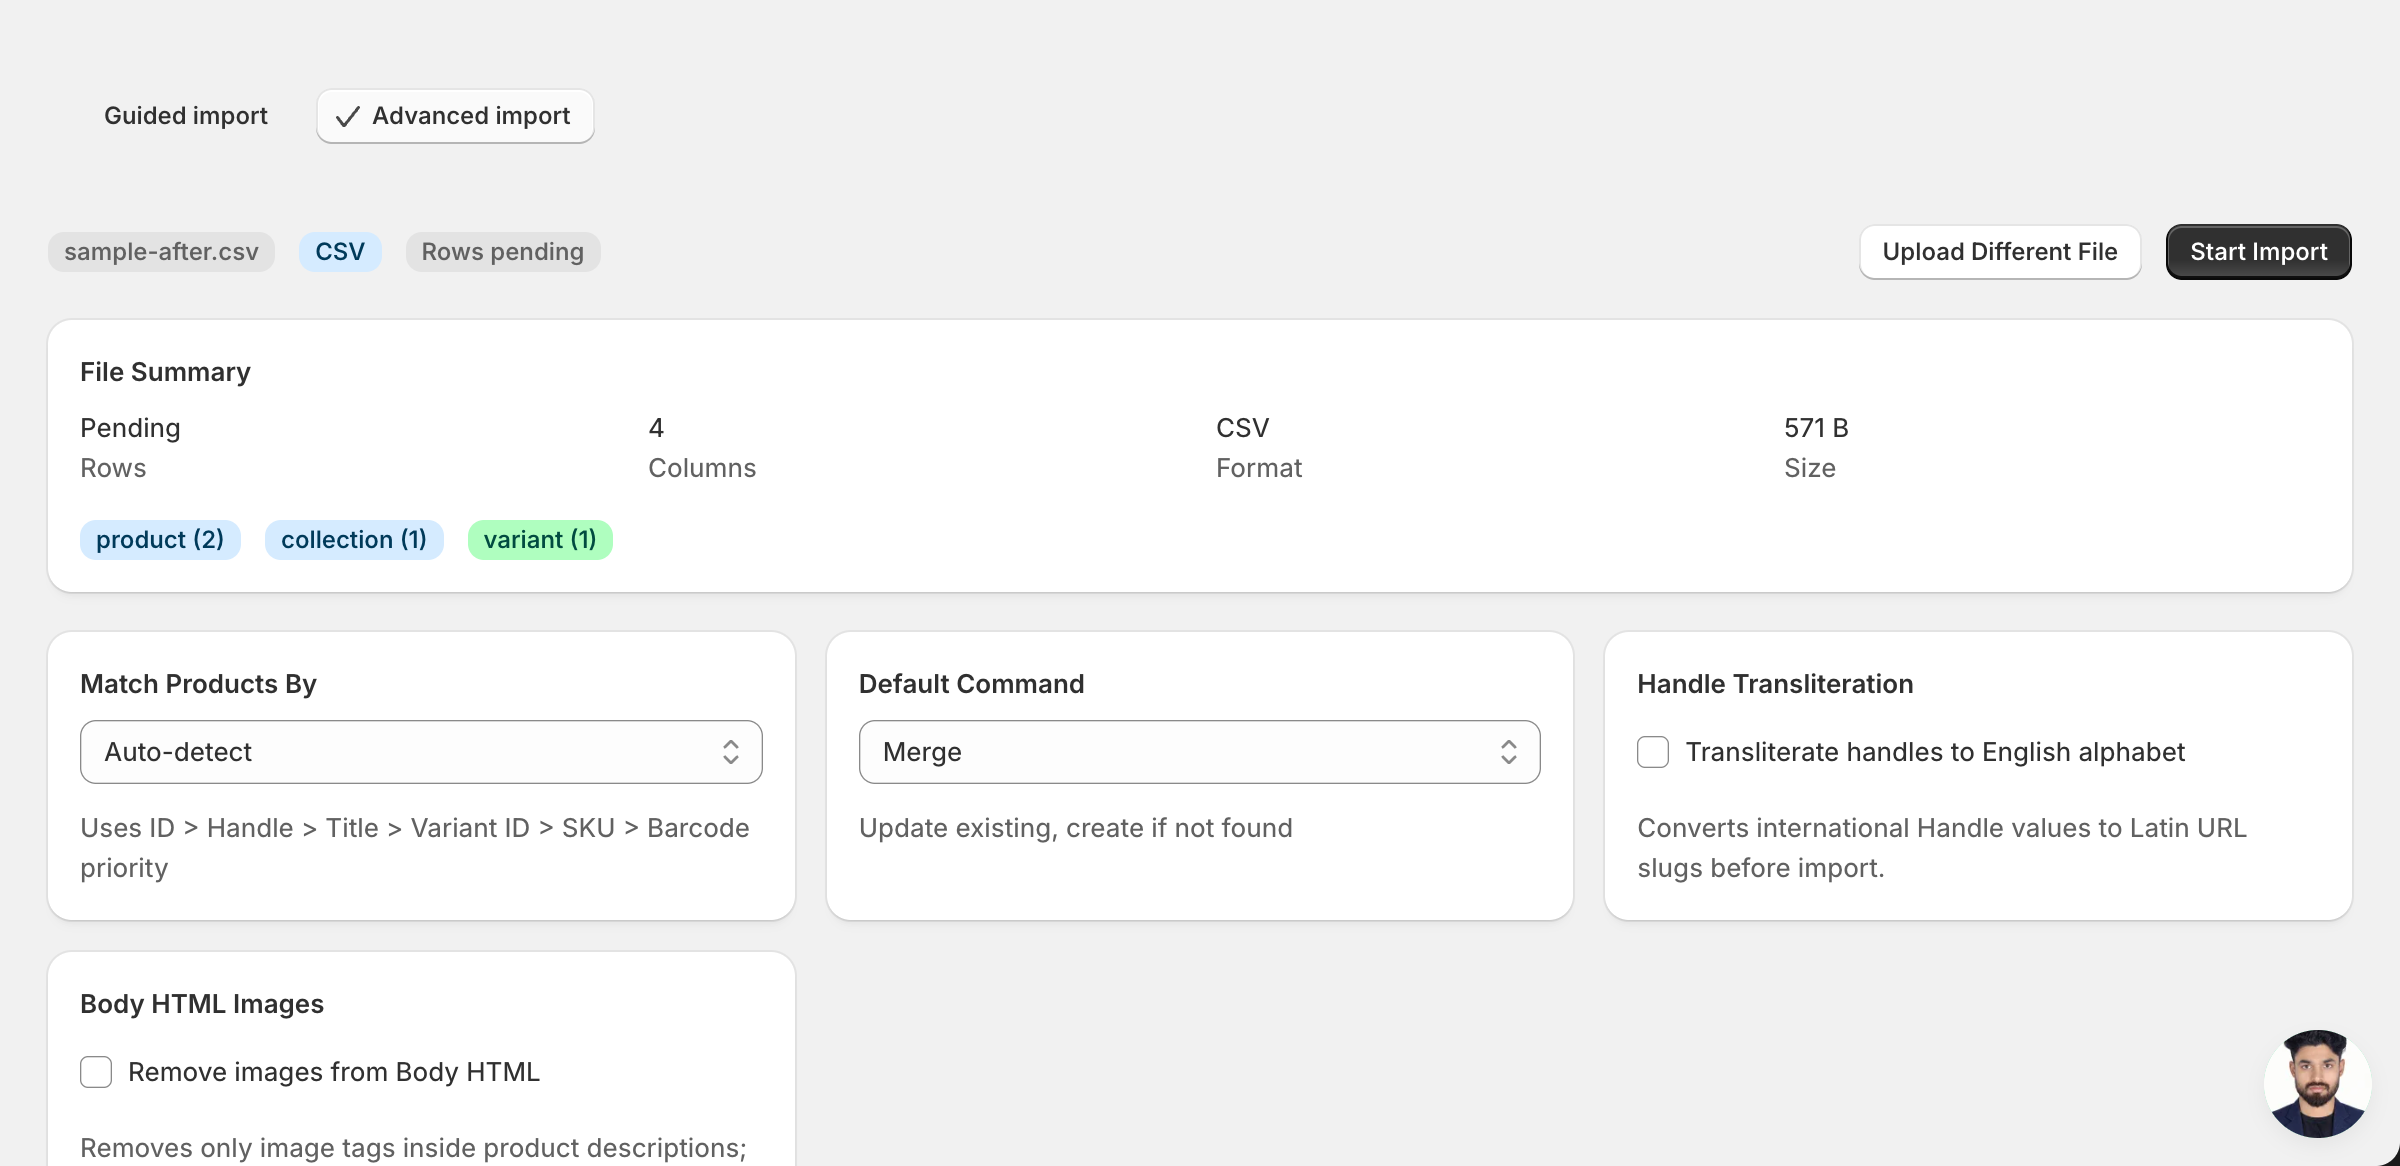
Note: This advanced import does not have a dry-run toggle. Because the default command is MERGE, adding a collection name is low-risk — no existing memberships are removed — but a typo in the title creates a brand-new empty collection. Run a first import with two or three rows, confirm the products appear in the right collection in your Shopify admin, then import the full file.
Click Start Import and wait for the job to finish — a small file takes seconds, larger catalogs a couple of minutes. When it completes, EditEngine shows a per-row summary.
Download the results CSV. It lists every row with a pass/fail status — that file is your proof the change went through, and the new values are now live in your Shopify admin.
Tips and troubleshooting
Append to Custom Collections; don't overwrite it. The Custom Collections cell is a comma-separated list of every manual collection the product belongs to today. If you replace the cell with a single new title, the import will MERGE that single membership in but — depending on your import settings — may leave the merchant confused about whether other links survived. The cleanest pattern is to keep the existing titles and add the new one on the end, separated by a comma and a space.
Merge adds membership; an unknown title is auto-created. The default MERGE command adds the collection name to the product without removing any other collections it belongs to. If the title you type does not match an existing custom collection, Shopify creates a new empty collection with that name on import — which is occasionally what you want, but more often a sign of a typo. Copy collection titles from your admin rather than retyping them.
Smart collections are off-limits from the CSV. Only custom (manual) collections accept membership through the Custom Collections column. Smart collections are rule-based: products land in them automatically based on tags, price, vendor, and so on. To put a product into a smart collection, edit the product's tags or the underlying field the rule uses — the Smart Collections export column is read-only.
Frequently asked questions
How do I bulk add products in Shopify?
Export the products from EditEngine with the Custom Collections column, append the target collection title to each row in a spreadsheet, then import the file back through the advanced import flow. That is how you bulk add Shopify products to collections without opening each product page in the admin.
Can I add Shopify products to collections from a spreadsheet?
Yes. EditEngine exports the product fields you select — including Custom Collections — into a CSV you can edit in Excel or Google Sheets and import back. Shopify's own admin does not offer a spreadsheet view for collection membership, which is why the round-trip is the right tool to bulk add Shopify products to collections.
How long does a bulk add-to-collection import take in Shopify?
A handful of rows imports in seconds, and a few hundred typically finishes in a minute or two. EditEngine streams the file, so a bulk add Shopify products to collections job on thousands of rows still completes without timing out, and the results CSV reports the exact duration.
What format does a Shopify add-to-collection import need?
A CSV (or XLSX) with a Handle column to match each product and a Custom Collections column with the collection titles you want it to belong to. EditEngine's advanced import reads this format directly, so the file you export is already the right shape to bulk add Shopify products to collections.
Can I undo a bulk add-to-collection update in Shopify?
There is no one-click undo, but keep the original export and you can re-import it to roll back. When you bulk add Shopify products to collections with the default MERGE command, the change only adds memberships — no products, variants, or other collection links are removed.
Related tutorials
- How to Bulk Auto Create New Collections From The CSV
- How to Bulk Reorganize Products Across Many Collections In One Import
About EditEngine: EditEngine Bulk Product Editor helps Shopify merchants bulk edit, bulk import, and bulk export their product catalog in minutes instead of days. Install on Shopify →