Collections
How to Bulk Reorganize Shopify Products Across Many Collections in One Import
Last updated
Need to bulk reorganize Shopify products across many collections in one import — say, after a seasonal refresh or a category cleanup? With the EditEngine Bulk Product Editor, you export your catalog to a spreadsheet, rewrite each product's collection list in one column, and import the file back in a single pass. One row per product, one Collection cell per row — no dragging products around the admin one at a time.
What you'll learn
- Export every product with its current manual collection memberships
- Rewrite the Collection column per product in a spreadsheet
- Import the updated file back to Shopify and confirm every product lands in the right collections
What you'll need
- The EditEngine Bulk Product Editor app installed in your Shopify store
- The manual collections you want to assign products to must already exist in Shopify — the importer attaches products to existing collections by title, it doesn't create new ones
- The Advanced import flow — collection membership is an advanced-import field
- An export of your current product-to-collection mapping so you can see today's state before you rewrite it
- A spreadsheet editor (Excel, Google Sheets, Numbers — anything that opens CSV)
Shopify has two kinds of collections: manual and smart. Smart collections fill themselves based on rules you set (price, tag, vendor), so they're not edited from a CSV — change the rule and Shopify recalculates. The workflow below moves products between manual collections only. If a product is also matched by a smart collection's rules it will still appear there too; the Collection column doesn't override that.
Step 1 — Export your Shopify products
Open EditEngine and go to the Export page. This is where you pick which product fields land in your spreadsheet.
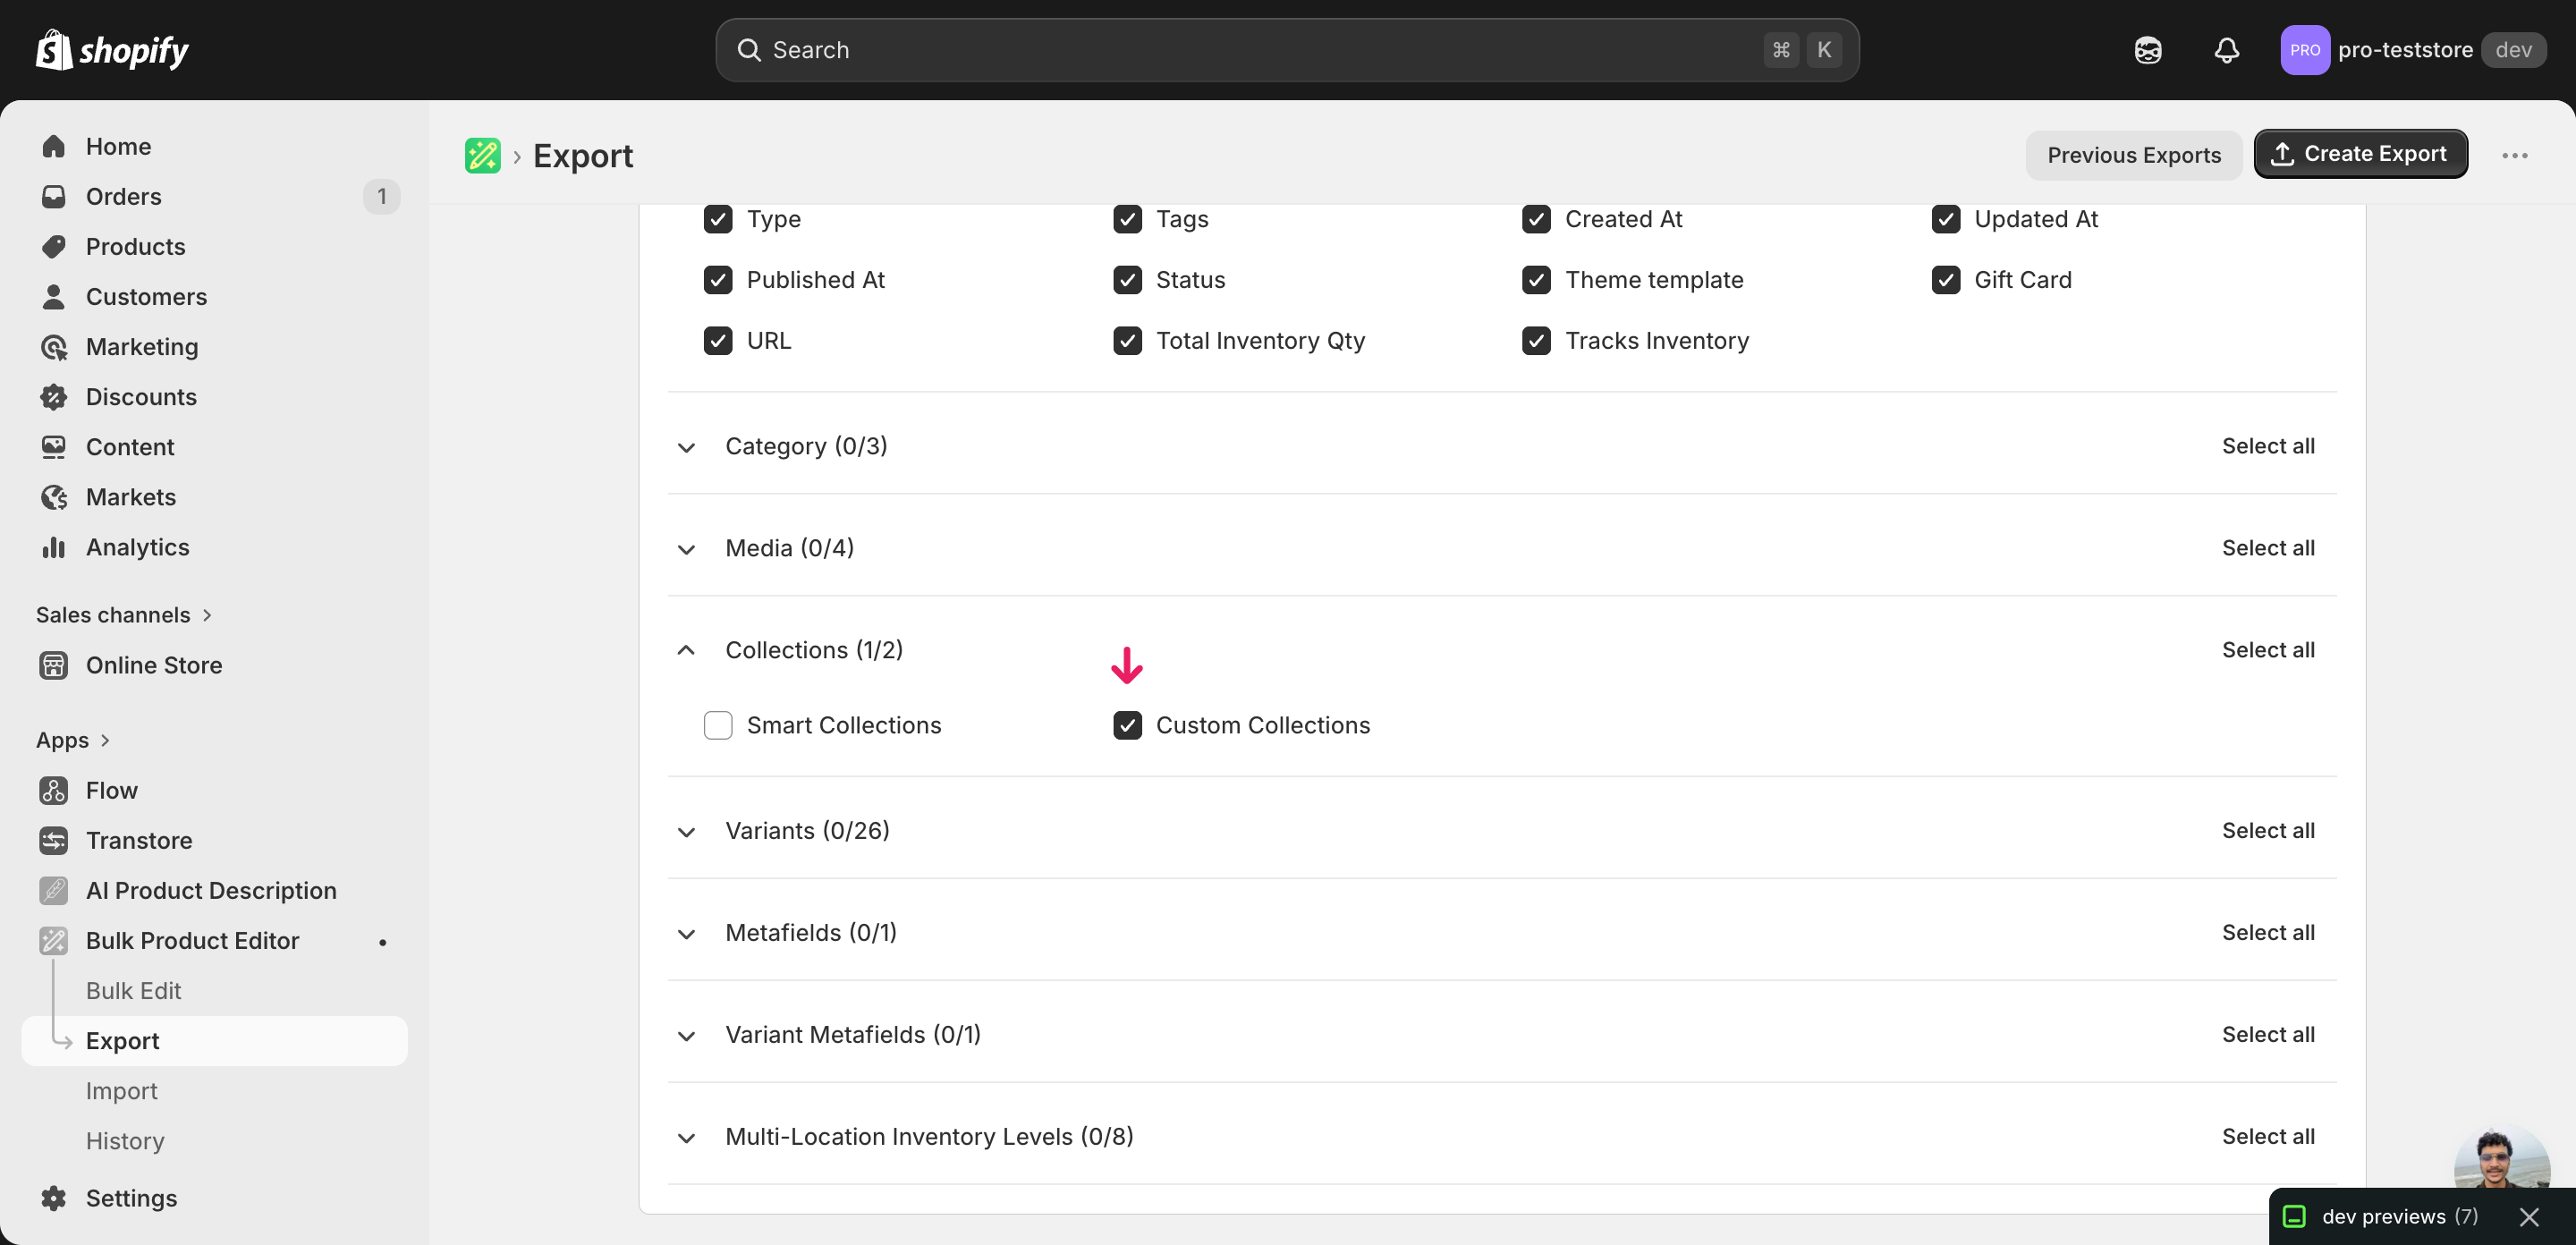
Pick the right columns
- Handle — the unique product identifier the importer uses to match each row back to the right product.
- Title — context only, so you can see which product a row belongs to while you're shuffling its collections.
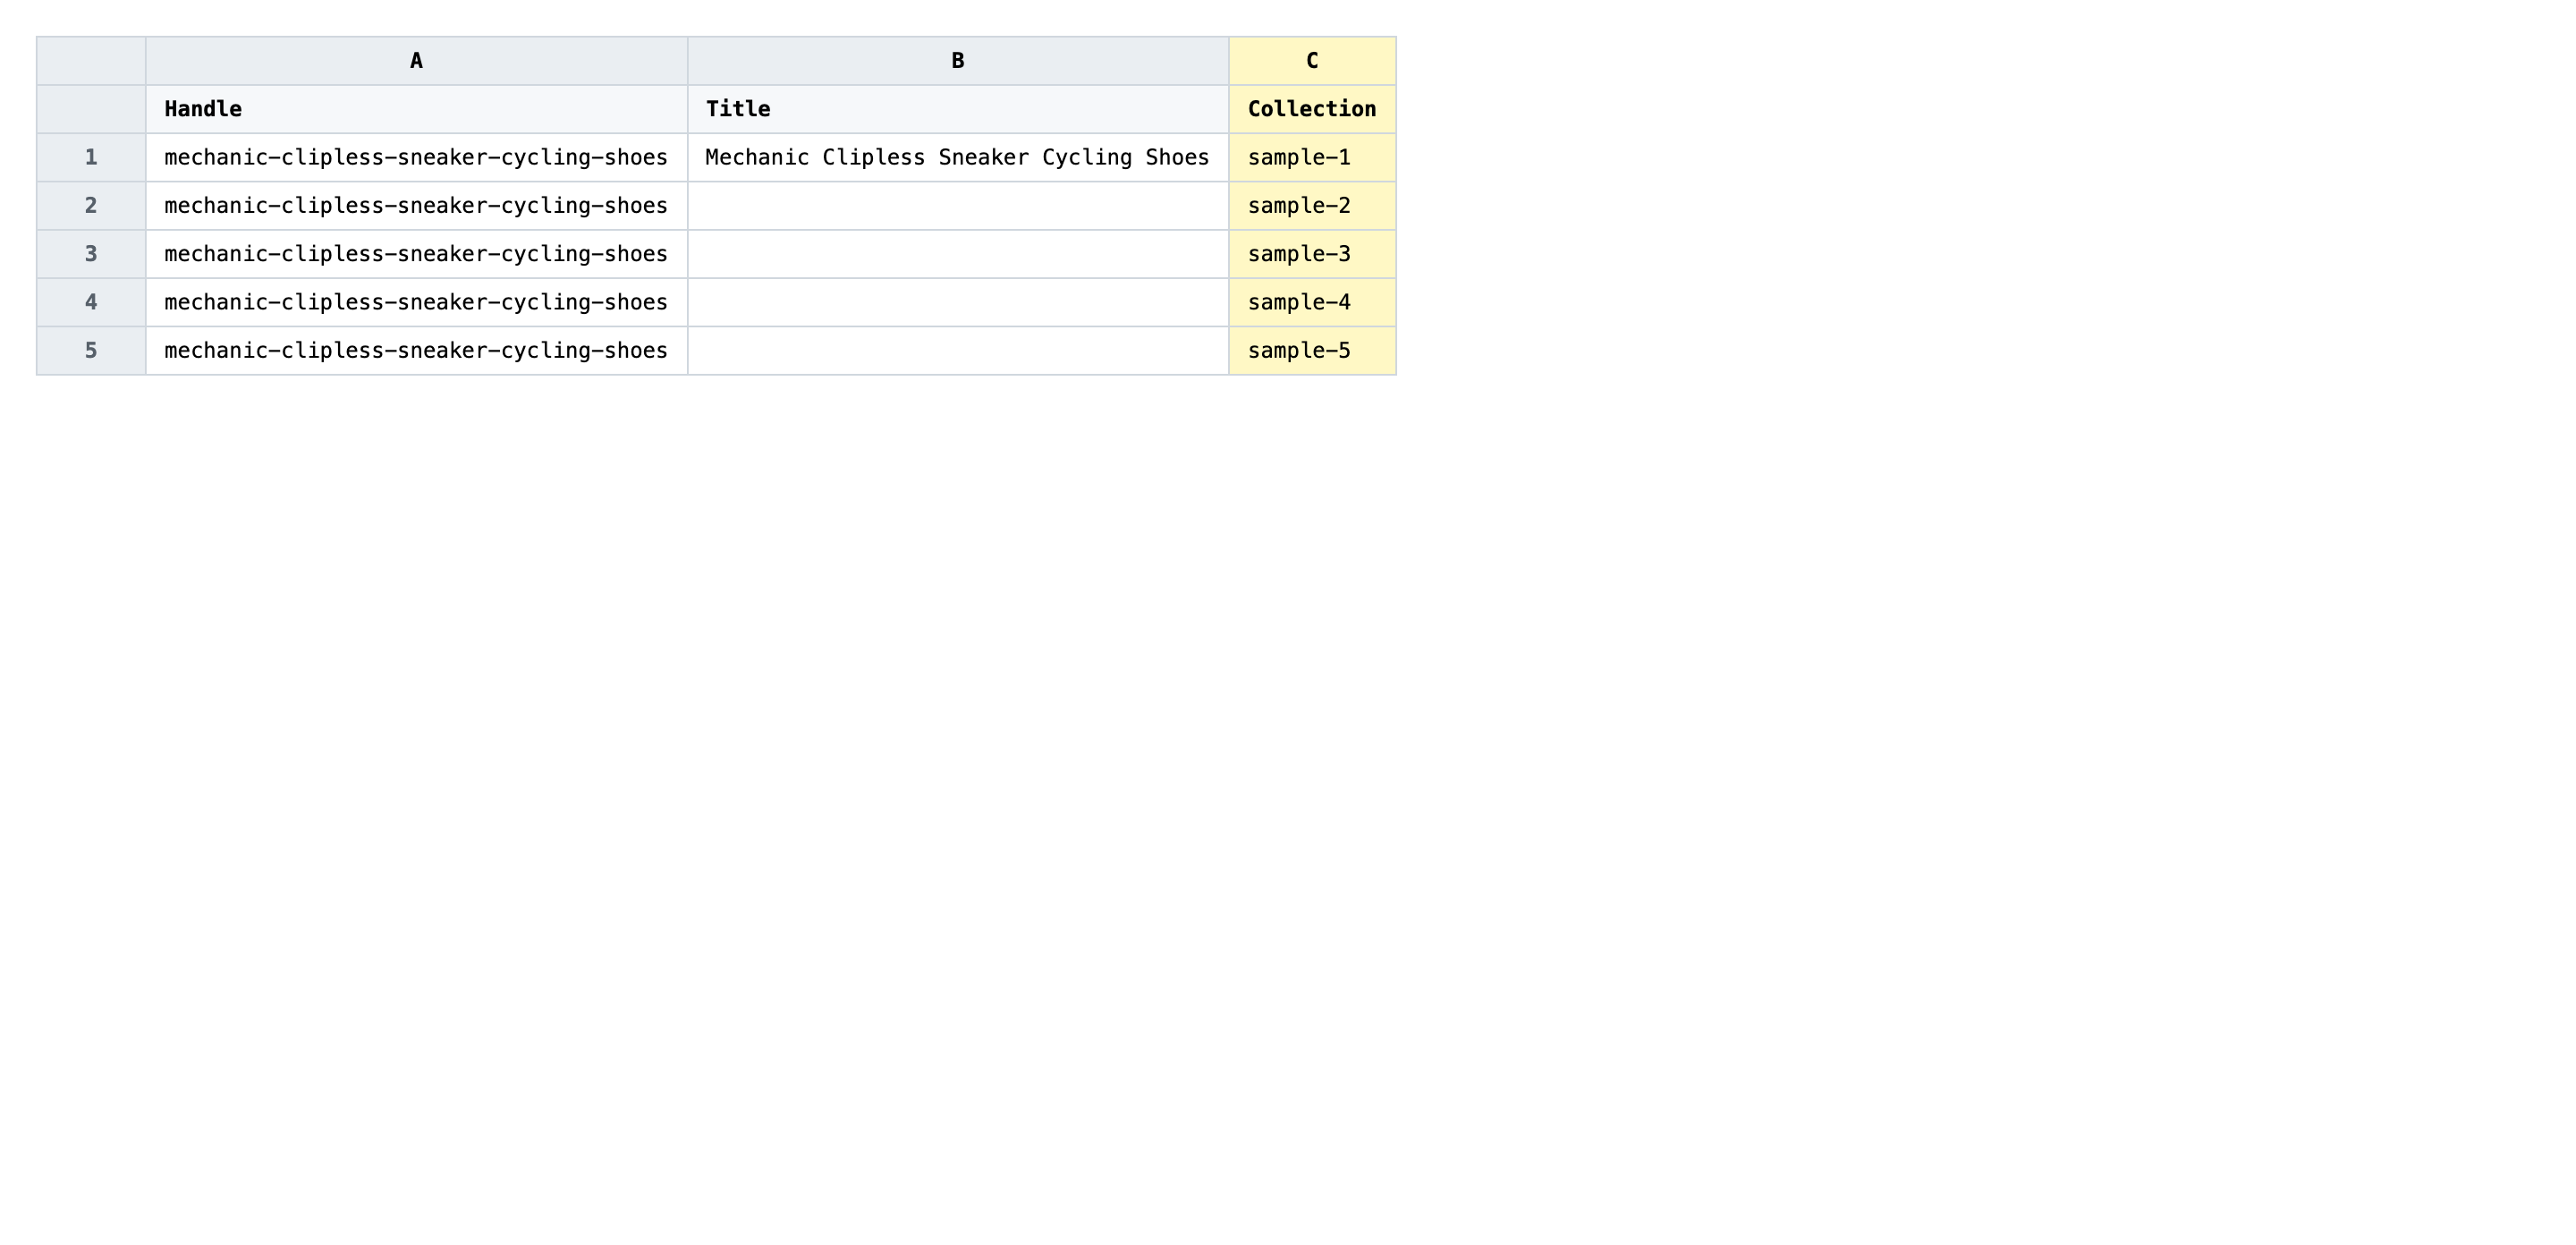
- Collection — the column you'll edit. It holds a semicolon-separated list of every manual collection the product currently belongs to — rewriting this cell replaces those memberships on import.
When the export completes, click Download. You'll get one row per product with the Collection cell pre-filled with that product's current manual collection memberships, joined by semicolons — a product in three collections shows all three in a single cell.
New to exporting? This guide assumes you know how to run an export and focuses only on the columns and edit unique to this workflow.
Step 2 — Bulk reorganize Shopify products across many collections in one import in your spreadsheet
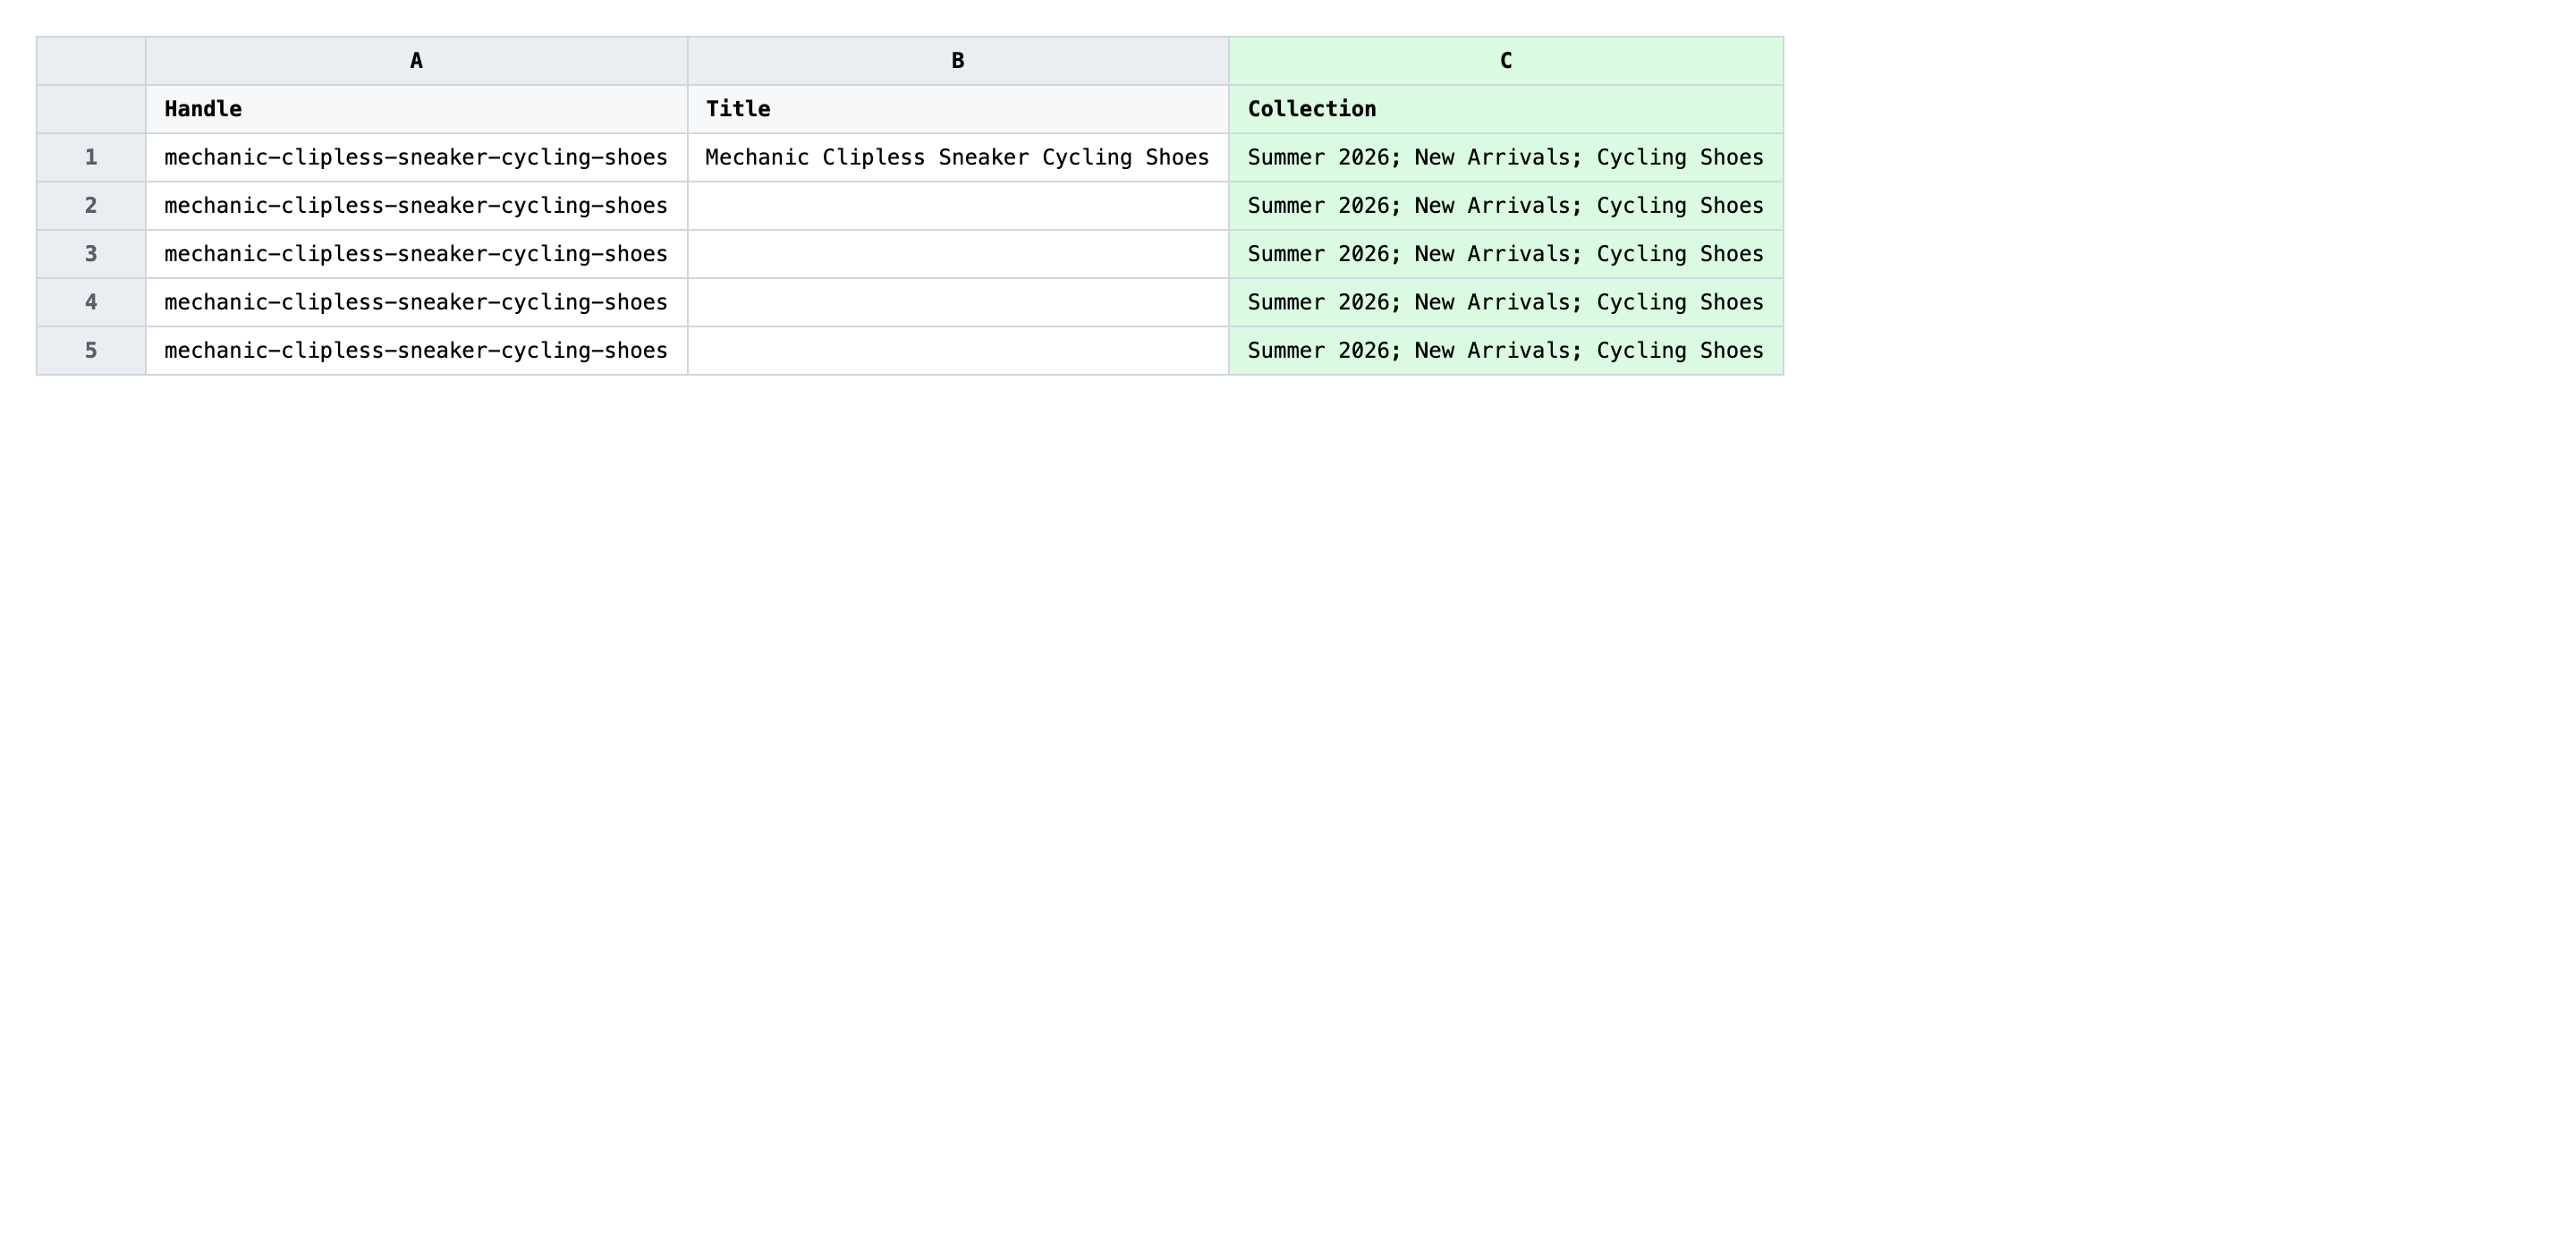
Open the downloaded CSV in Excel or Google Sheets. The Collection column shows each product's current manual collection memberships as a semicolon-separated list — that's the one cell you rewrite per row.
For each product, rewrite the Collection cell with the full list of manual collections that product should belong to after the import, joined by ; (semicolon-space). Whatever you type replaces the current memberships — leave a collection out and the product is removed from it; add a new collection title and the product is added. Match collection titles exactly as they appear in Shopify admin (case and punctuation), because the importer matches by title.
- ✅
Summer 2026; New Arrivals; Cycling Shoes - ❌
summer 2026, new-arrivals, cycling shoes (commas instead of semicolons, lowercase titles, slug-style names)
Leave Handle alone — it's the matching key, and editing it will either point the row at the wrong product or fail to match anything. Smart collections won't appear in this column even if the product is in them, because they're rule-driven; don't try to add them here. An empty Collection cell on import means "remove this product from every manual collection," so if you want to leave a product's memberships untouched, delete the whole row before importing.
Save the file as CSV when you're done, and keep the original export handy in case you want to revert.
Tip: If you're moving the same set of products into the same new collections, edit one row, then use your spreadsheet's fill-down to copy that Collection cell across the rest — much faster than retyping.
Step 3 — Import the edited file back to Shopify
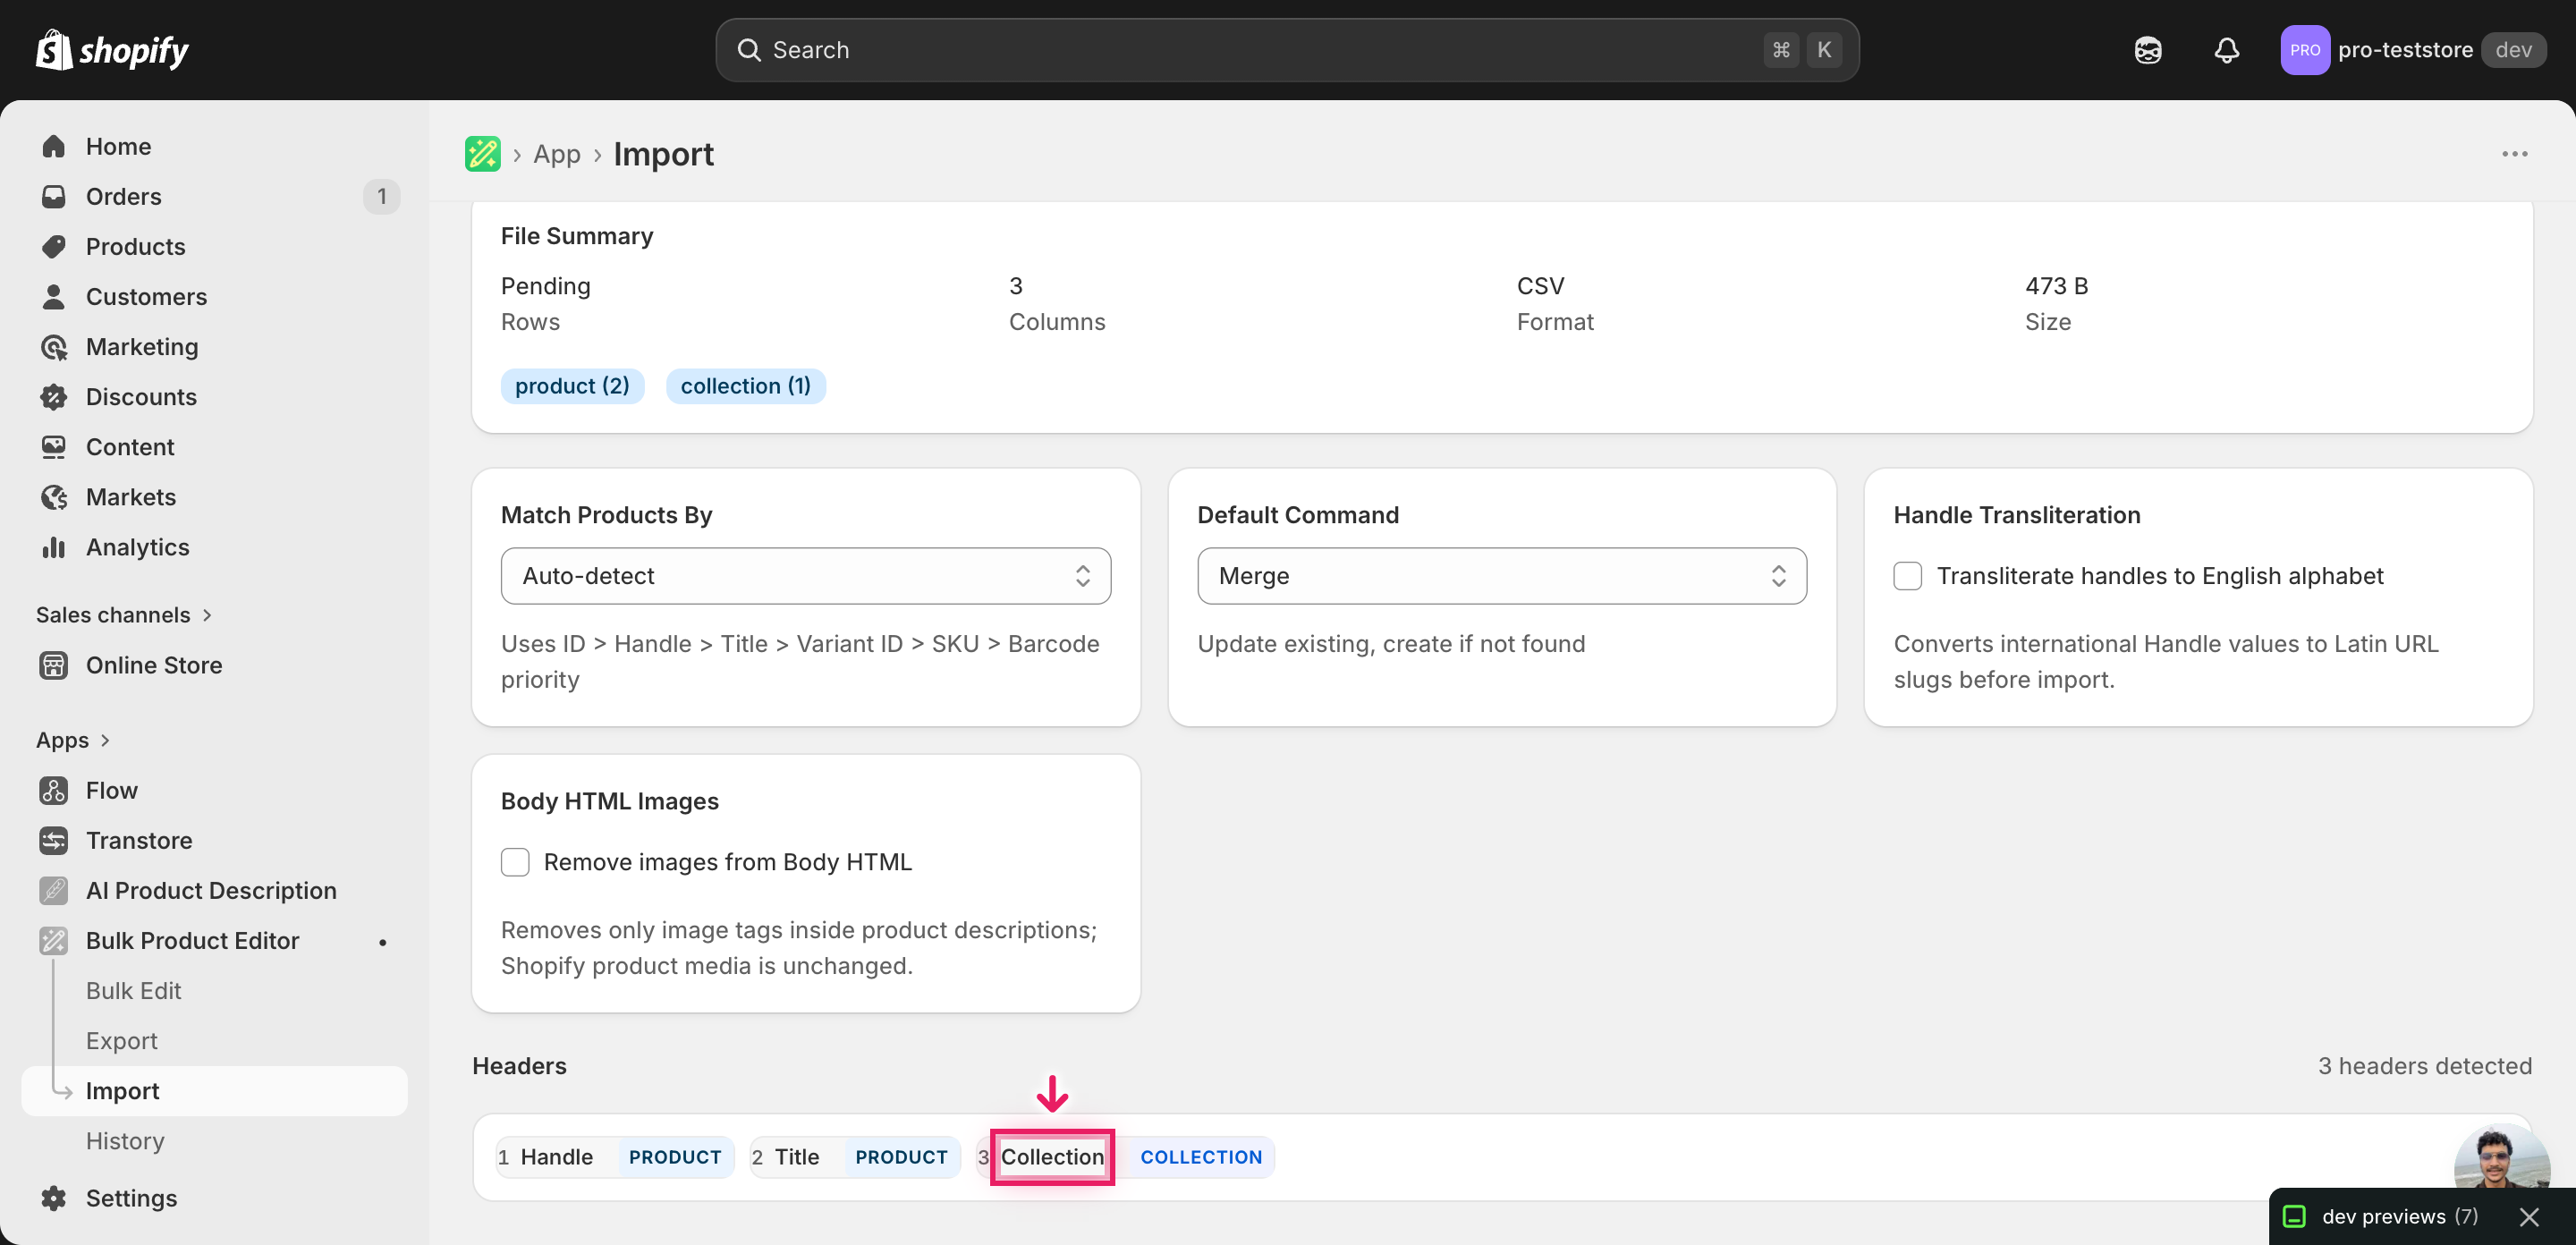
Open EditEngine → Import and select Advanced import. Then upload the file you just edited.
EditEngine reads the file and shows a summary. Check the Headers panel: Handle should be detected as the identifier and Collection should map as a collection-membership column. Leave Match Products By on Auto-detect and Default Command on Merge so existing product fields aren't disturbed — only the Collection column is rewritten.
Note: This workflow rewrites collection memberships in place, which means a typo can pull a product out of every manual collection it was in. Before importing the full file, run a test with two or three rows — verify those products land in exactly the collections you listed and nowhere else, then import the rest. A two-row dry pass catches a swapped delimiter or a renamed collection long before it touches the catalog.
Click Start Import and wait for the job to finish — a small file takes seconds, larger catalogs a couple of minutes. When it completes, EditEngine shows a per-row summary.
Download the results CSV. It lists every row with a pass/fail status — that file is your proof the change went through, and the new values are now live in your Shopify admin.
Tips and troubleshooting
Match collection titles exactly as Shopify stores them. The importer attaches products to manual collections by title, character-for-character. Summer 2026 and summer 2026 are two different lookups; the second will either silently skip the row or, depending on settings, create a duplicate collection with the wrong casing. Copy titles straight from your Shopify admin into the spreadsheet rather than retyping them.
Smart collections aren't editable from this column. If a product belongs to a smart collection because it matches the collection's rules, you'll see that membership in the Shopify admin but not in the exported Collection cell — and rewriting the cell won't change it. To move a product out of a smart collection, change the product attribute the rule is checking (tag, vendor, price), not the Collection column.
Use semicolons, not commas, to separate collections. Collection titles often contain commas (e.g., Shoes, Boots & Sandals). Comma-separating the list would split that one title into three phantom collections. EditEngine uses ; as the multi-value separator across every list-shaped column, including Collection — stick with it.
Run a two-row test before the full import. Because this flow replaces memberships rather than appending to them, a wrong delimiter or a typo in one collection title can detach a product from every collection it was in. Import two rows first, open those products in the Shopify admin, confirm the collection lists look right, then come back and import the rest of the file.
Frequently asked questions
How do I bulk reorganize products in Shopify?
Export your products from EditEngine with the Handle and Collection columns, rewrite each row's collection list in a spreadsheet, and import the file back through the advanced import flow. That lets you bulk reorganize Shopify products across many collections in one import instead of dragging products one by one in the admin.
Can I reorganize Shopify collections from a spreadsheet?
Yes. EditEngine exports one row per product with its current manual collection memberships in the Collection column. Edit that column in Excel, Google Sheets, or any CSV editor and import the file back — Shopify's own admin only lets you move products between collections one at a time.
How long does a bulk collection reorganization import take in Shopify?
A few dozen products import in seconds. A catalog of a few thousand products typically finishes in a couple of minutes, and EditEngine streams larger files so you can bulk reorganize Shopify products across many collections in one import without timing out. The results CSV reports the exact duration.
What format does a Shopify collection reorganization import need?
A CSV or XLSX file with a Handle column to match each product and a Collection column listing the manual collections it should belong to, separated by semicolons. EditEngine's advanced import reads that shape directly, the same one it exports.
Can I undo a bulk Shopify collection reorganization?
There's no one-click undo, but the workflow is its own backup: keep the original export, and to revert just re-import that unedited file. Because the Collection column overwrites memberships rather than touching the products themselves, no titles, prices, or inventory are affected.
Related tutorials
About EditEngine: EditEngine Bulk Product Editor helps Shopify merchants bulk edit, bulk import, and bulk export their product catalog in minutes instead of days. Install on Shopify →