Inventory
How to Bulk Adjust Shopify Inventory Deltas Across Locations
Last updated
Want to bulk adjust Shopify inventory deltas across locations after a cycle count, a transfer, or a returns batch? With EditEngine Bulk Product Editor, you export every variant with one column per location, type the signed +/- delta into each cell that needs to move, and import the file back. EditEngine applies the delta on top of the current available count at each location, so one CSV moves stock at every warehouse at once.
What you'll learn
- Export every product with its current inventory deltas
- Edit inventory deltas per row in a spreadsheet
- Import the updated file back to Shopify
What you'll need
- The EditEngine Bulk Product Editor app installed in your Shopify store
- Two or more active Shopify locations stocking the variants you plan to adjust
- The Advanced import flow — multi-location inventory deltas are advanced-import only
- A current export so the deltas you write apply on top of today's available count, not last week's
- A spreadsheet editor (Excel, Google Sheets, Numbers — anything that opens CSV)
A Shopify inventory delta is the signed change applied to a variant's available stock at one location — +5 means "add five units," -3 means "subtract three." Deltas are how you reconcile a physical count or record a transfer without overwriting whatever value Shopify currently shows. Across a catalog with several locations, doing this one screen at a time in the admin takes hours; the spreadsheet round-trip below collapses it into a single import.
Step 1 — Export your Shopify inventory deltas
Open EditEngine and go to the Export page. This is where you pick the variant identifiers and one inventory column per location.
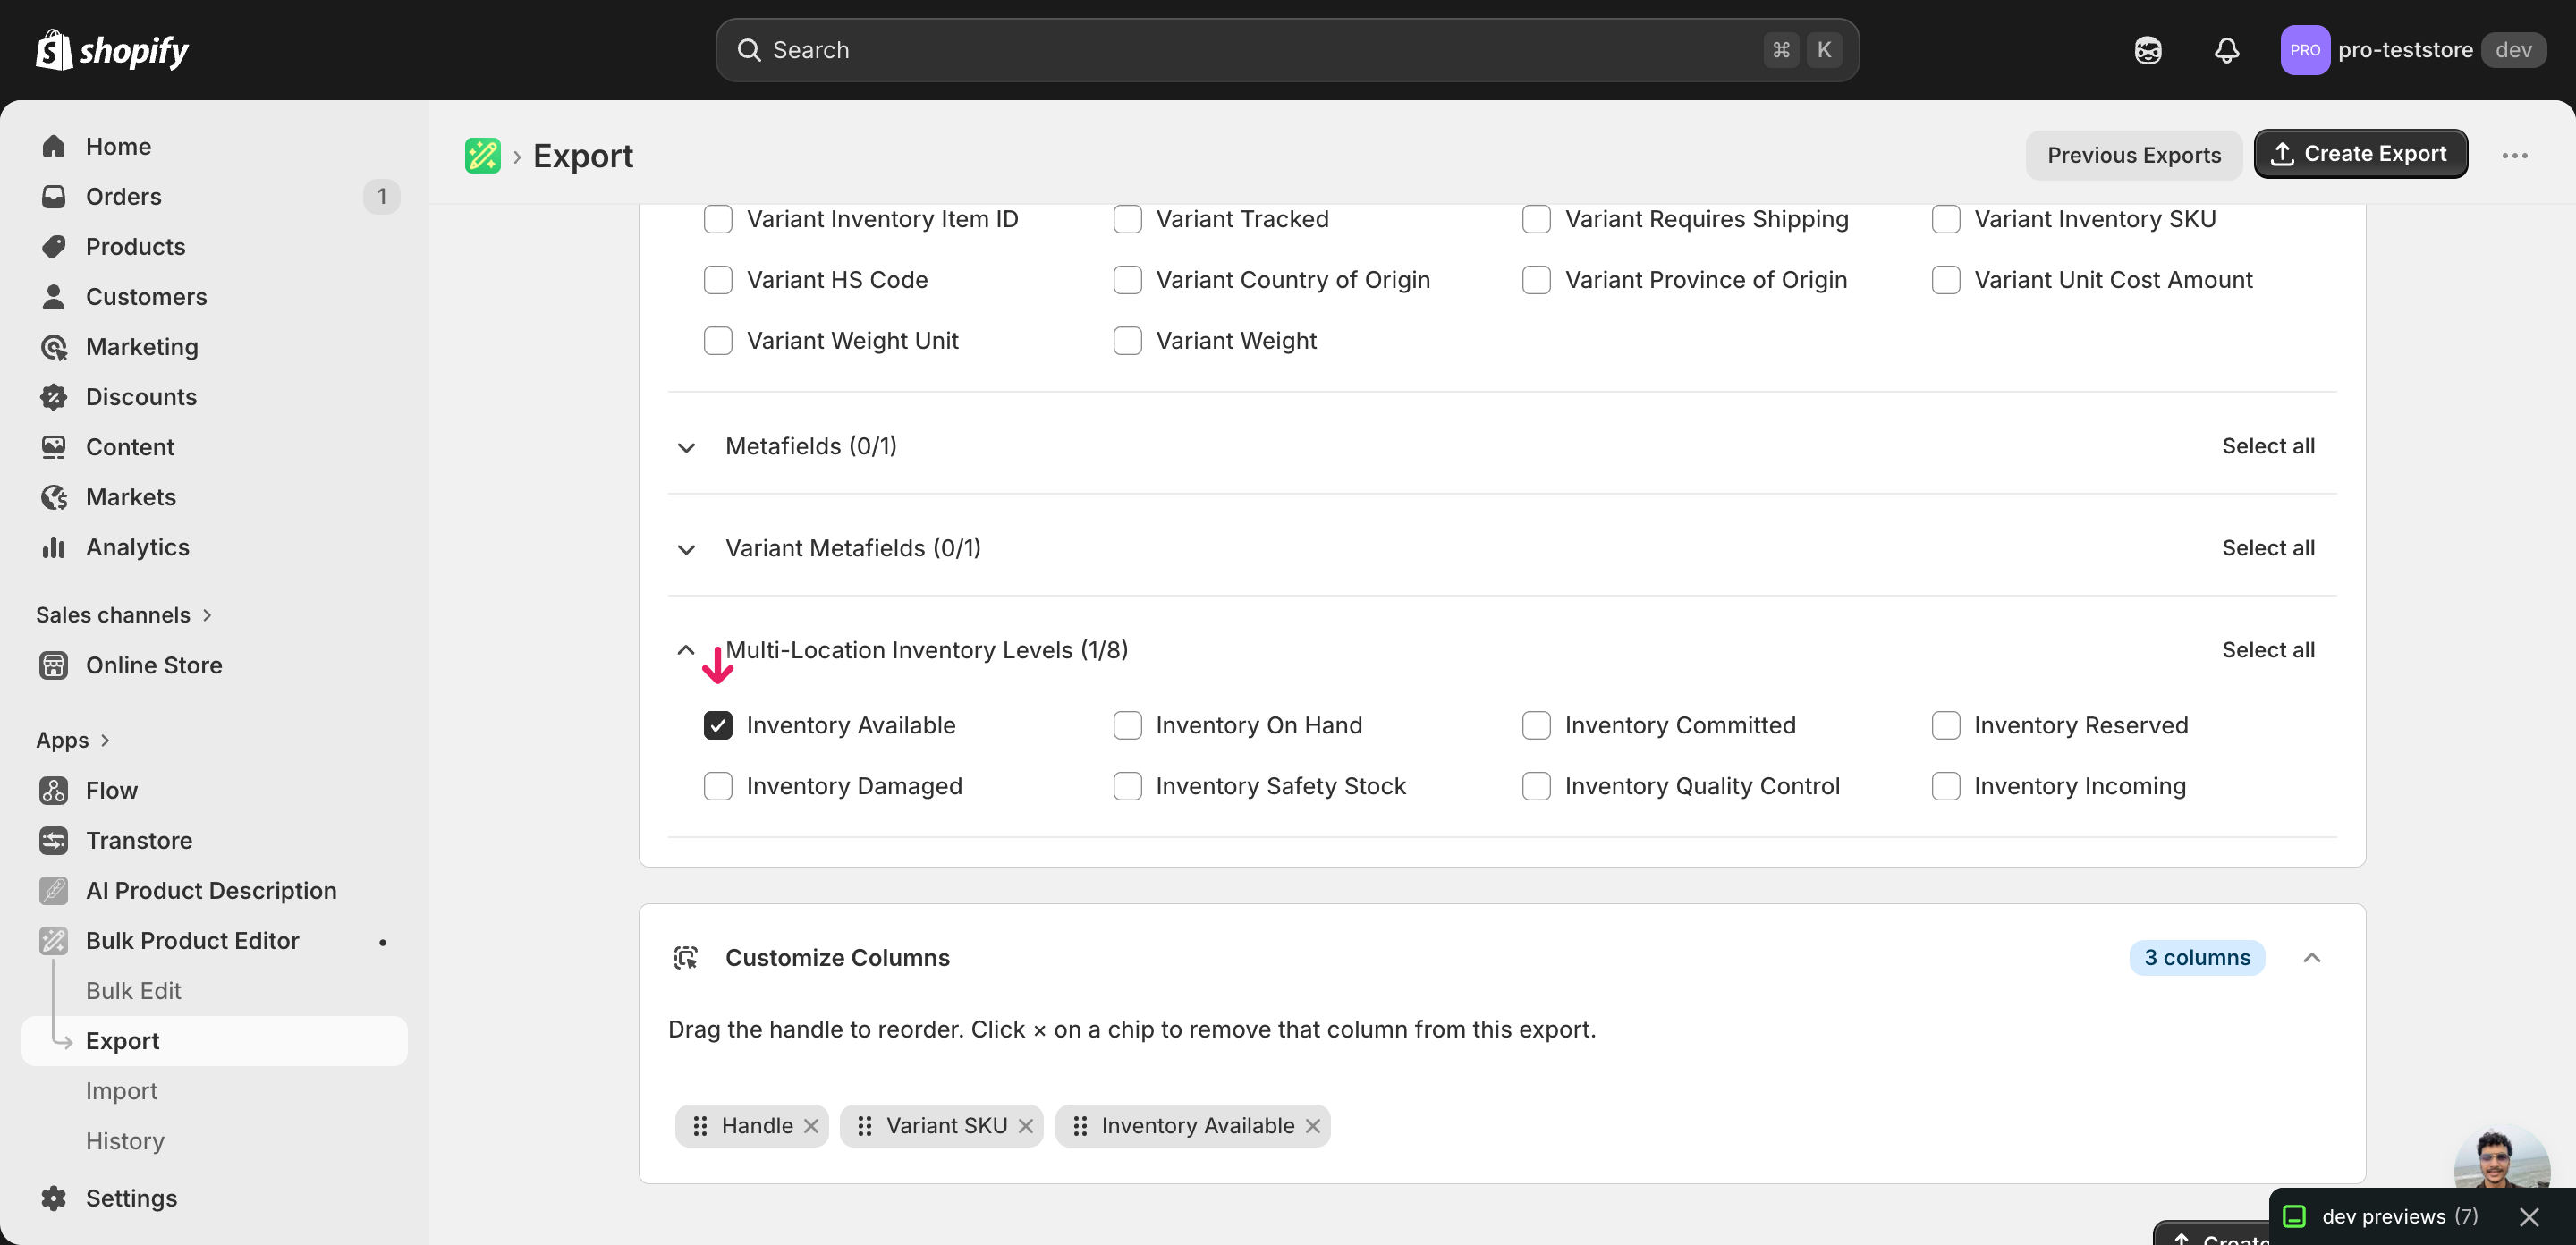
Pick the right columns
- Handle — the unique product identifier the importer uses to match each row back to the right product.
- Variant SKU — the variant-level matching key. Inventory lives on variants, so this is the column that ties each delta to a specific size, color, or SKU rather than the parent product.
- Inventory Available: Shop Location — the column you'll edit. Expand the Inventory group and tick one
Inventory Available: <Location>column for every location you want to adjust — the headerShop Locationbecomes the actual name of your Shopify location.
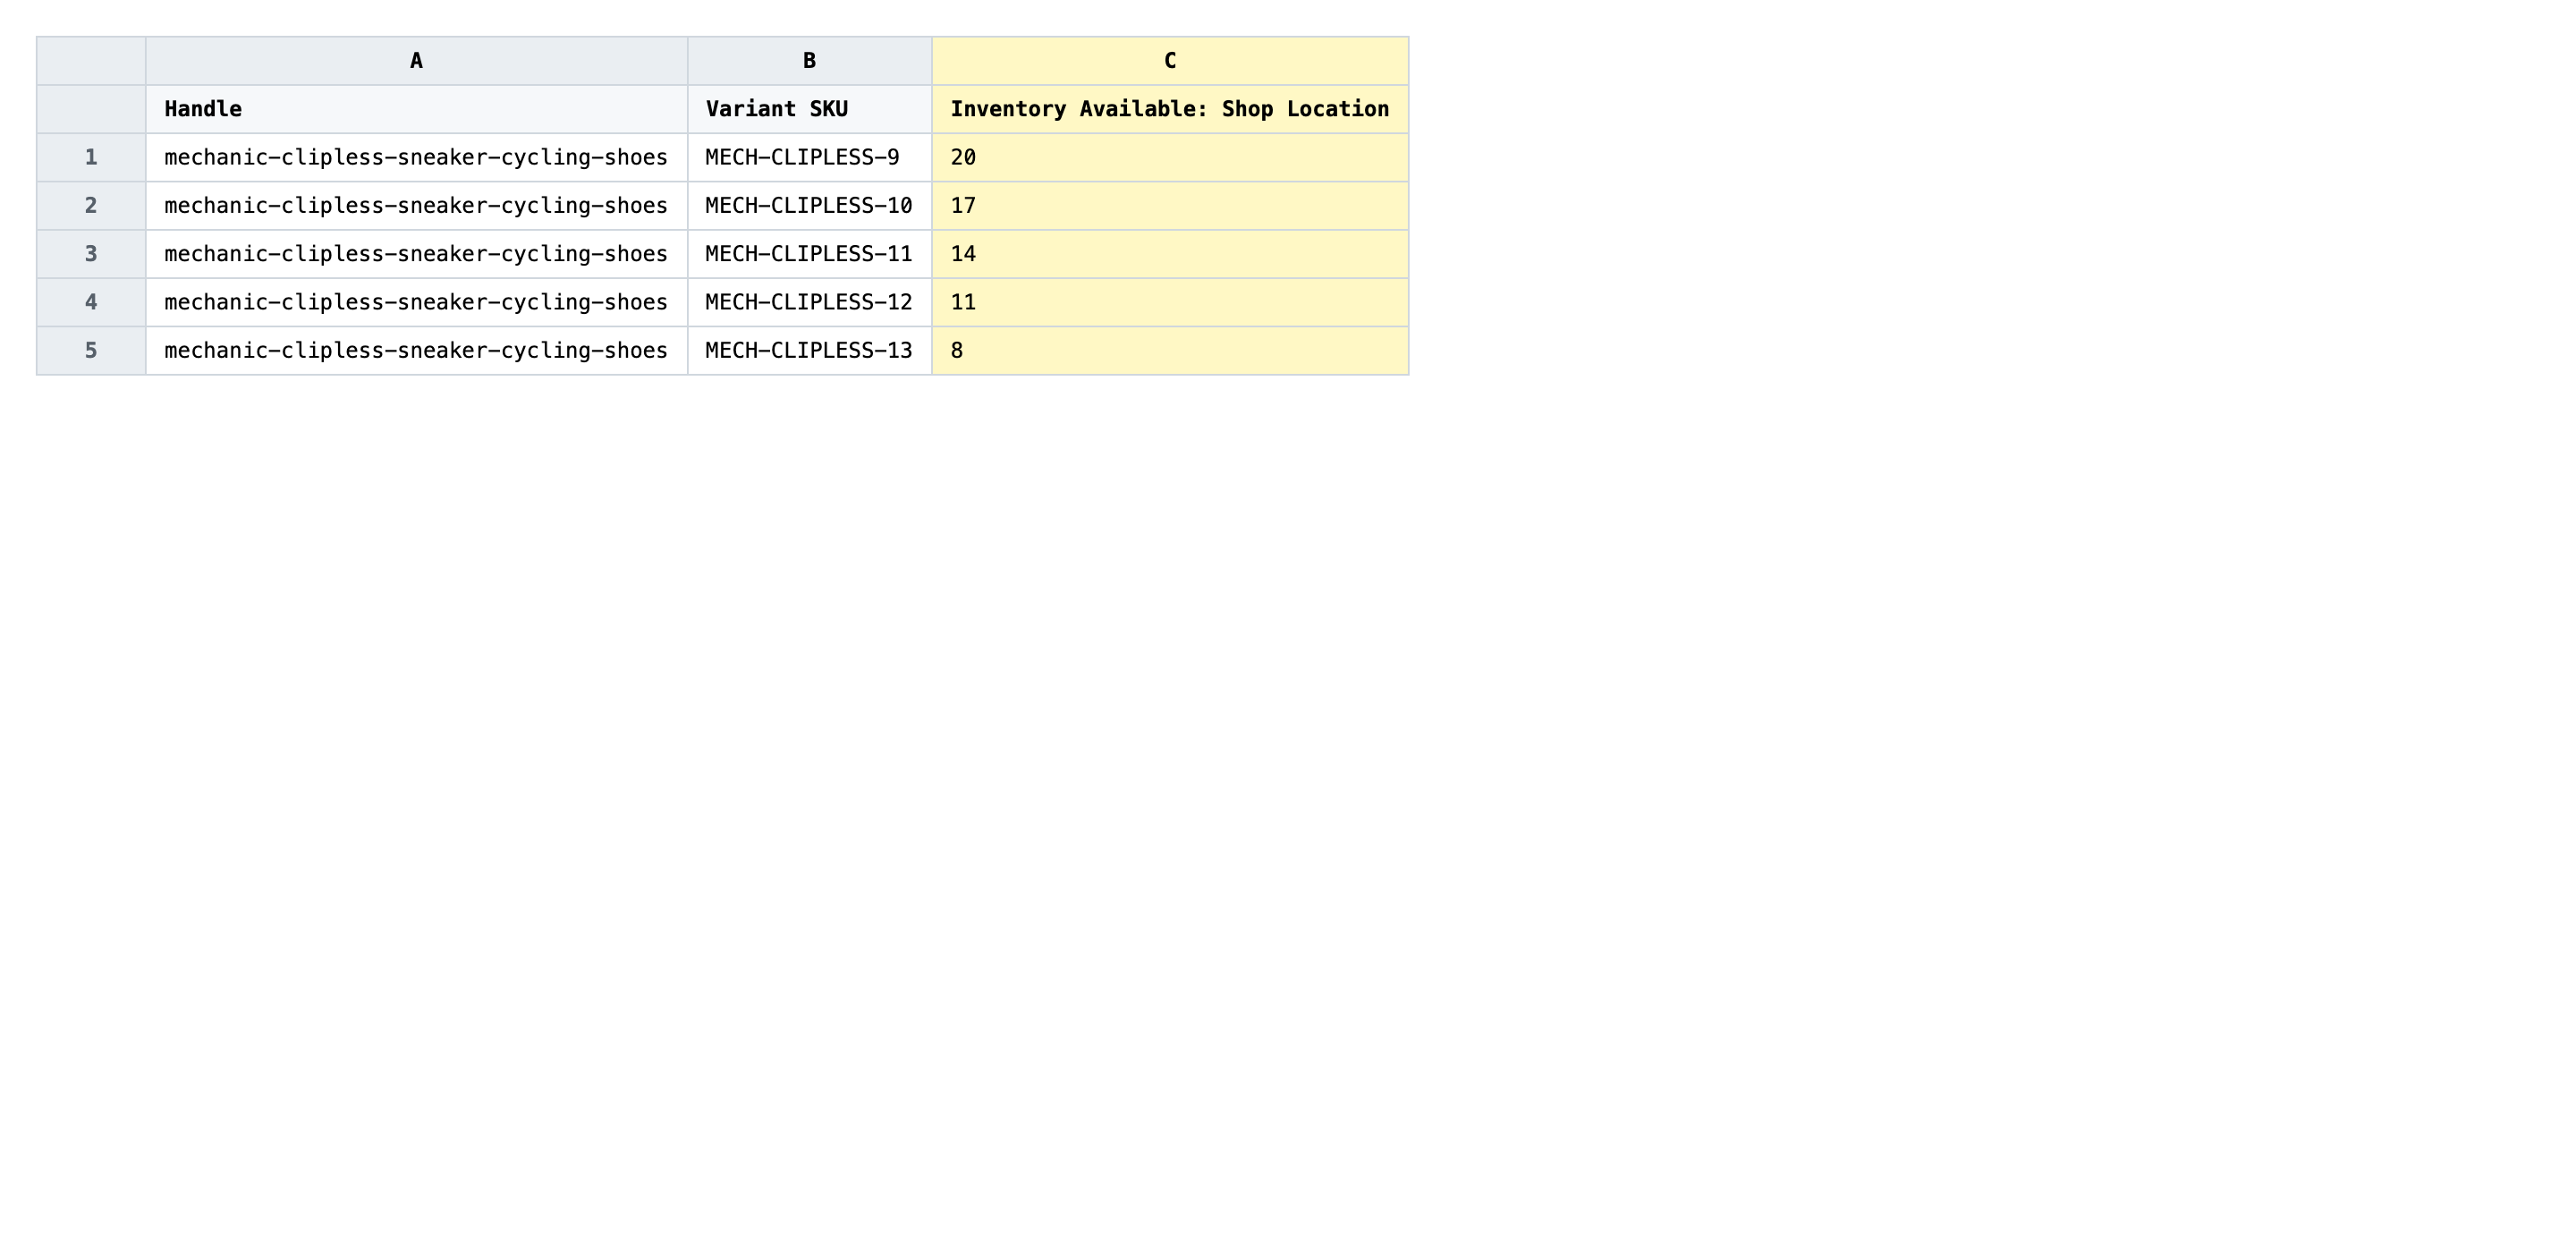
When the export completes, click Download. You'll get one row per variant, with a separate Inventory Available: <Location> column per location showing today's available count — those current values are your reference; the deltas you write in Step 2 are applied on top of them.
New to exporting? This guide assumes you know how to run an export and focuses only on the columns and edit unique to this workflow.
Step 2 — Bulk adjust Shopify inventory deltas across locations in your spreadsheet
Open the downloaded CSV in Excel or Google Sheets. Each Inventory Available: <Location> column shows the current available count at that location — you'll replace those values with signed deltas, not new totals.
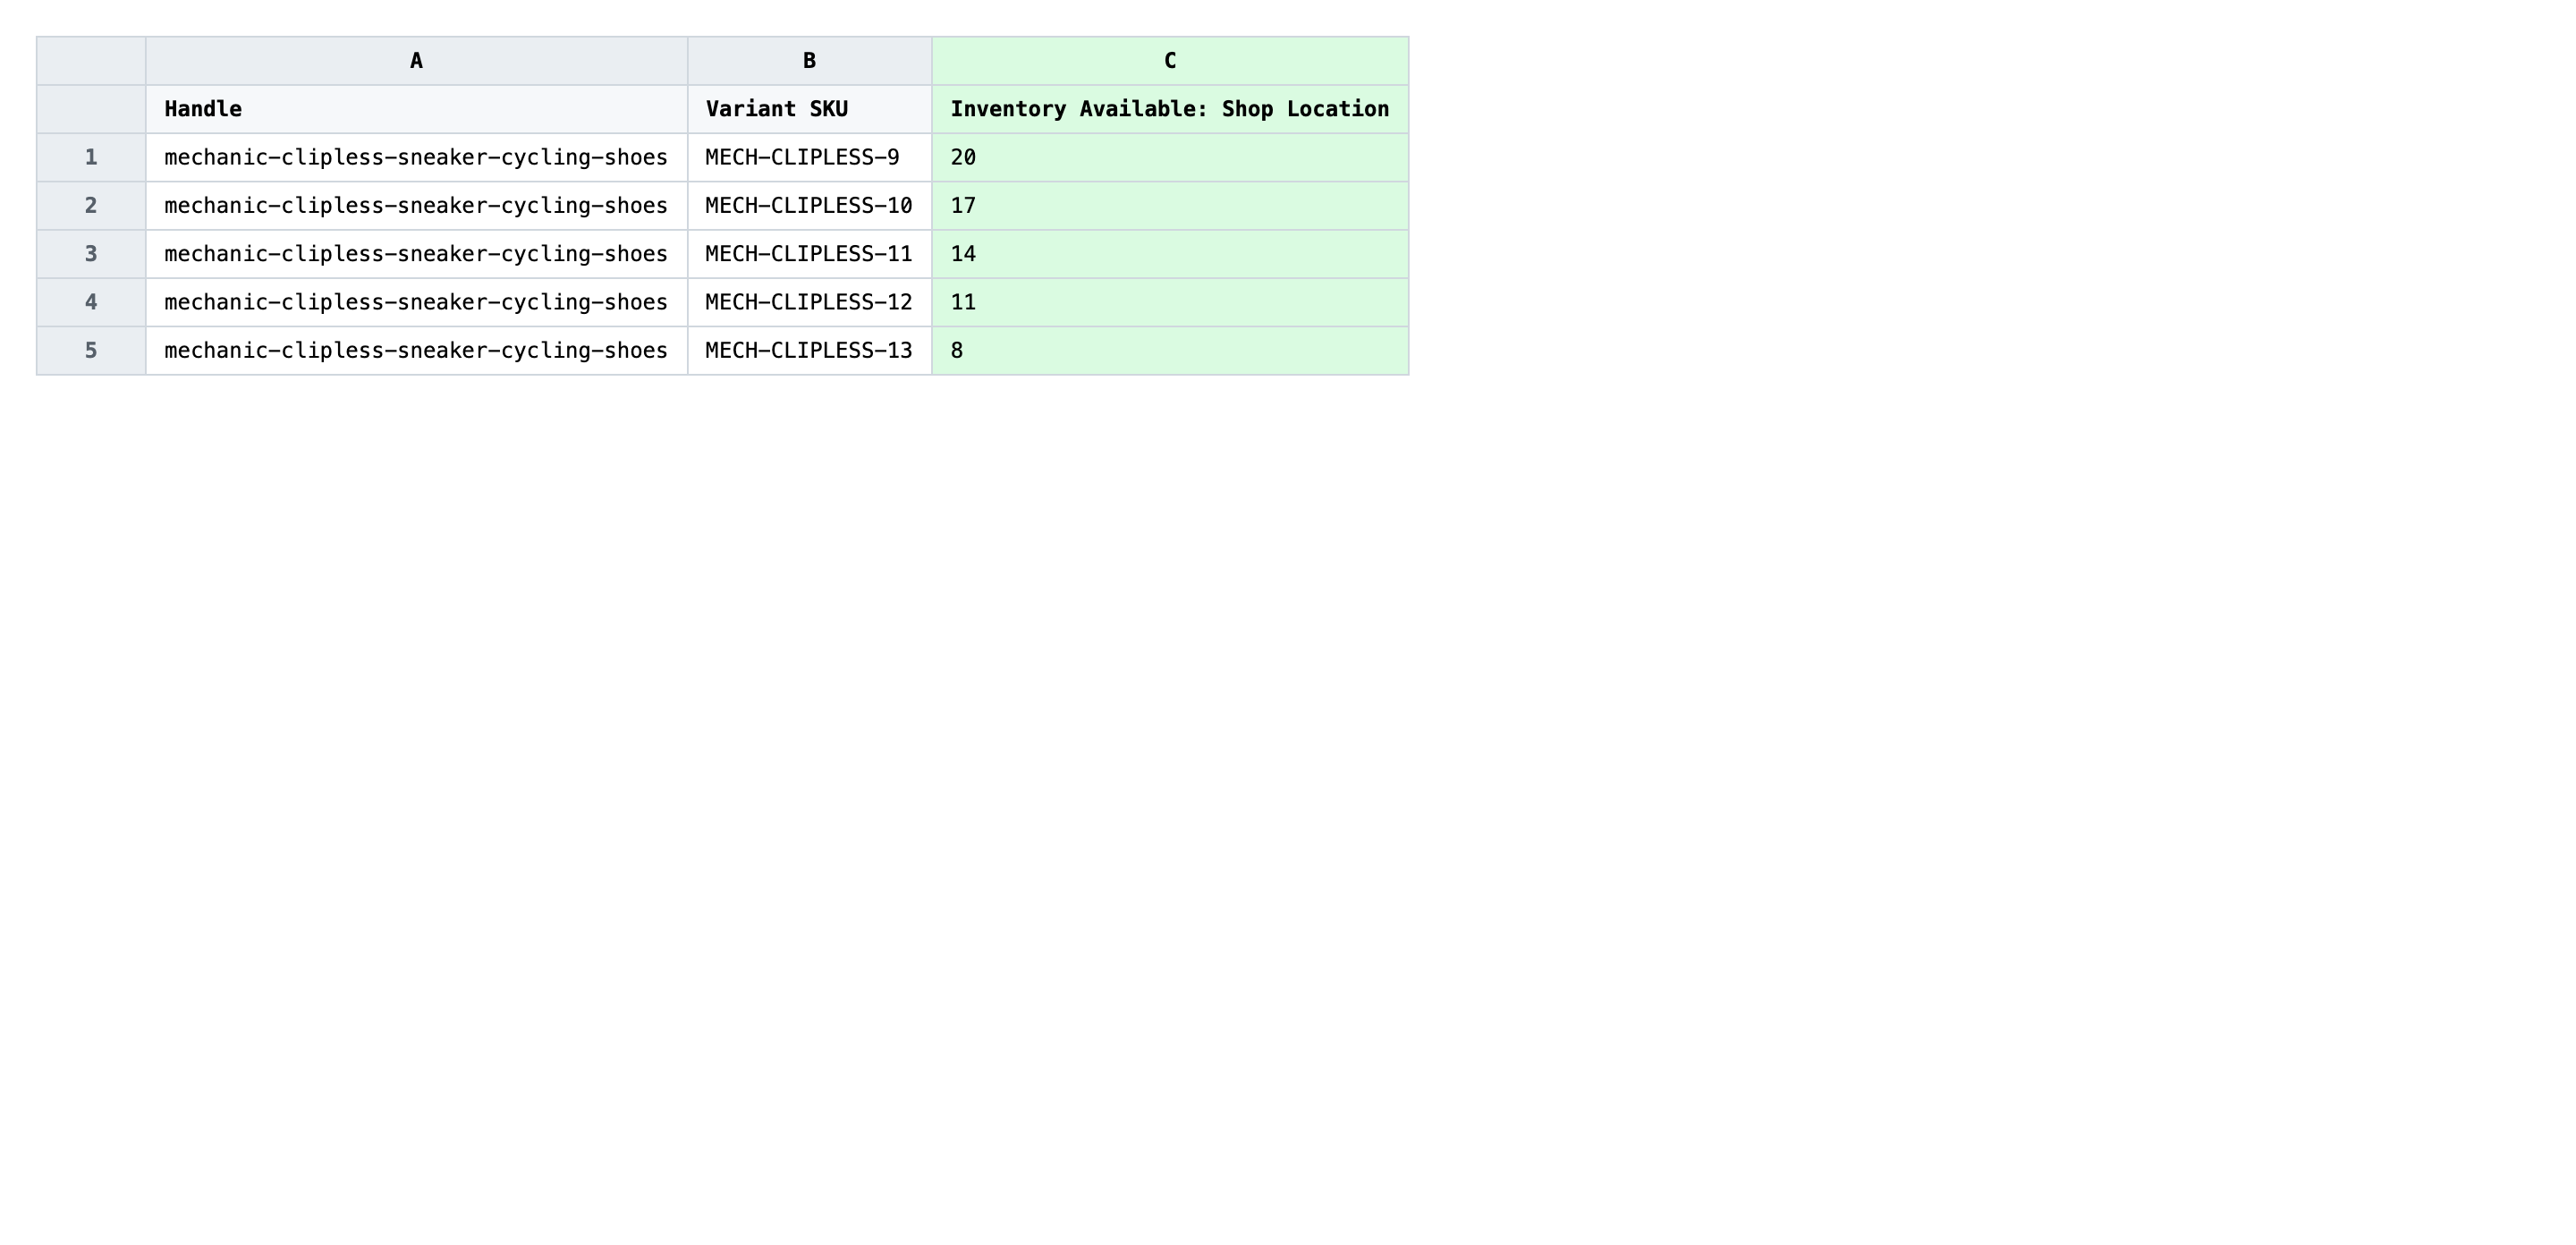
In each location column, type a signed delta for every variant you want to move — +5 adds five units, -3 subtracts three, 0 (or a blank cell) leaves that variant-location pair untouched. Always include the + or - sign so the importer reads the cell as a delta and not as a new absolute count. Leave columns blank for locations you don't want to touch.
- ✅
+5 - ❌
25 (an unsigned number reads as a target total, not a delta)
Leave Handle and Variant SKU exactly as exported — those are the matching keys and a stray edit will either send the delta to the wrong variant or skip the row entirely. Don't rename the location columns either: the text after the colon has to match the location name in your Shopify admin character-for-character, including spaces and capitalization. Rows for variants you don't want to move can stay in the file with all delta cells blank; the importer skips them.
Save the file as CSV when you're done, and keep the original export handy in case you want to revert.
Tip: A delta and an absolute count look almost identical in a cell — the only difference is the leading sign. Sort the file by Variant SKU once before saving and scan the delta columns; any cell without a
+or-is a row that will rewrite the total instead of adjusting it.
Step 3 — Import the edited file back to Shopify
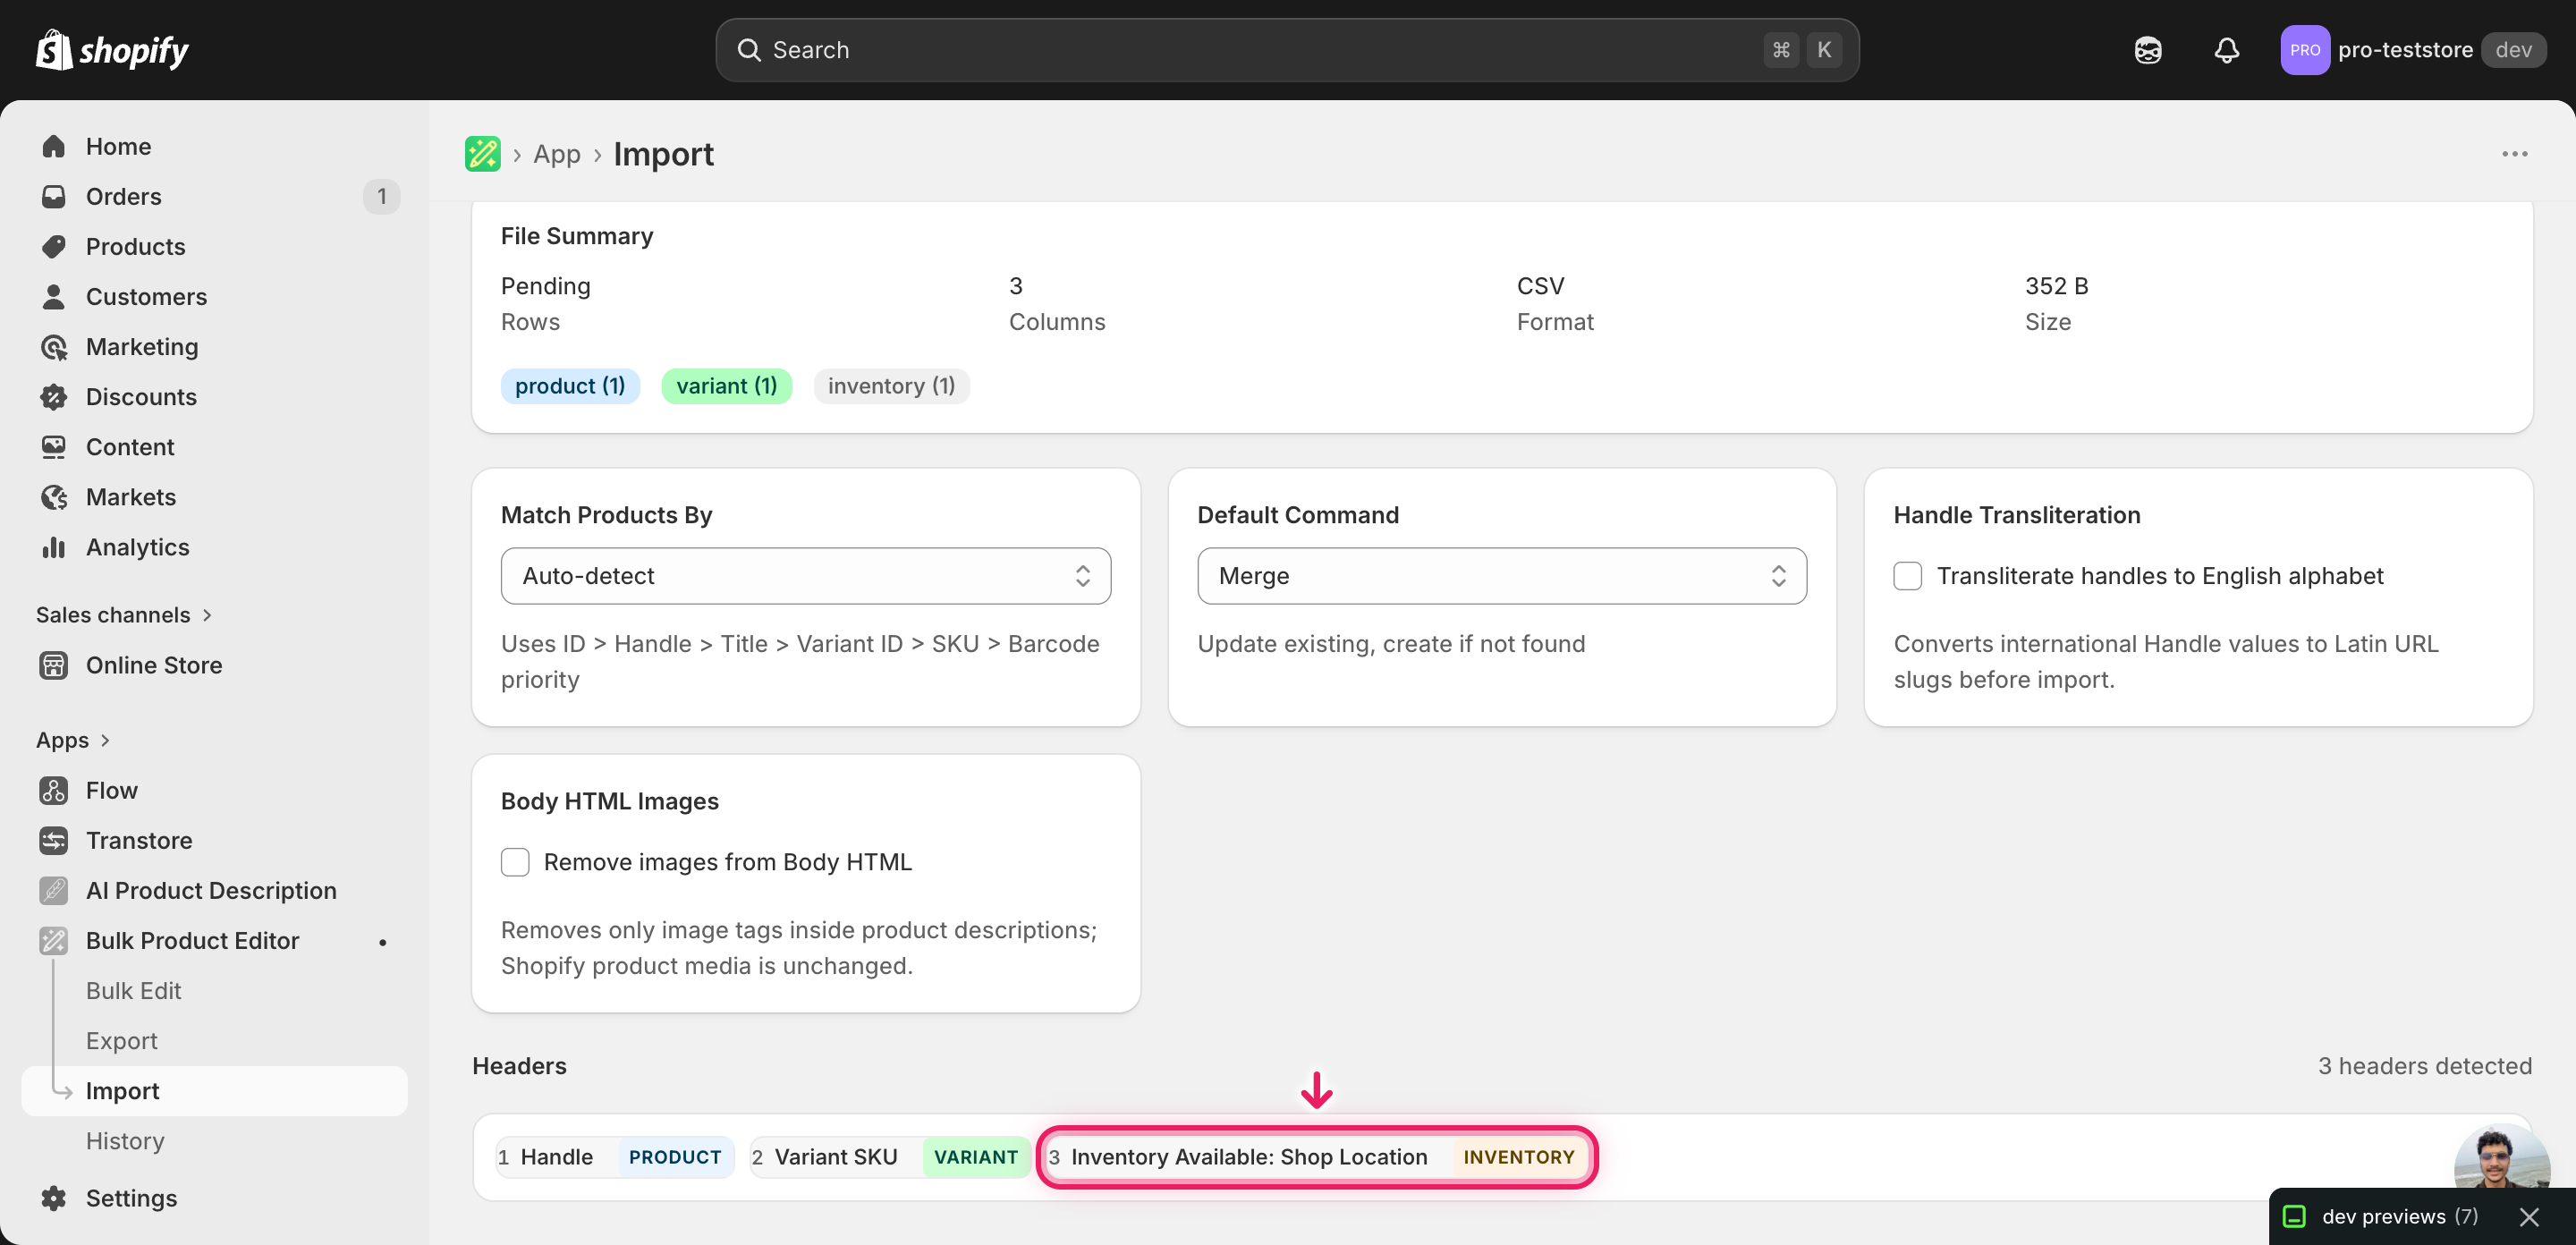
Open EditEngine → Import and select Advanced import. Then upload the file you just edited.
EditEngine reads the file and shows a summary. Check the Headers panel: every Inventory Available: <Location> column should carry the INVENTORY badge and the location name should resolve to a real Shopify location (not a yellow "unknown location" warning). Leave Match Products By on Auto-detect and Default Command on Merge so the deltas apply on top of current stock.
Note: Inventory deltas write directly to live stock, so test on a tiny batch before you commit. Trim the file to two or three variants at one location, import that, then open the Shopify admin and confirm the available count moved by exactly the delta you typed. Only once those numbers line up should you import the full catalog — a flipped sign or a renamed location column on a thousand-row file is painful to walk back.
Click Start Import and wait for the job to finish — a small file takes seconds, larger catalogs a couple of minutes. When it completes, EditEngine shows a per-row summary.
Download the results CSV. It lists every row with a pass/fail status — that file is your proof the change went through, and the new values are now live in your Shopify admin.
Tips and troubleshooting
Always sign your deltas. An unsigned 25 in an Inventory Available column is ambiguous — some import flows read it as a new total, others as a +25 delta. EditEngine's advanced import treats a leading + or - as the unambiguous signal that the cell is a delta. Make signed values the rule across the whole file and you remove a class of off-by-N bugs that only show up after the import has already touched live stock.
Match location names character-for-character. The text after the colon in Inventory Available: <Location> has to match the location name in Settings → Locations exactly, including capitalization and punctuation. A header that reads Inventory Available: Main Warehouse won't bind to a Shopify location called Main warehouse, and the importer will silently drop those deltas. Re-export rather than retype the headers when you're unsure.
Test on a slice before the full catalog. Inventory writes are immediate and there's no dry-run for advanced inventory imports. Cut the file to two or three variants, run them, then verify in the Shopify admin that the available count moved by exactly the delta you wrote. If the math checks out on the slice, the same headers and signs will hold for the full file — if it doesn't, you've caught the bug while it's still small.
Keep the original export to build a reversal. Because deltas are signed, the undo for a bad import is just the same file with every sign flipped. Save the exported CSV before you edit and the edited CSV after — between those two you can rebuild a -5 for every +5 in a spreadsheet formula in under a minute. That's the closest thing to a real undo button for multi-location inventory work.
Frequently asked questions
How do I bulk adjust inventory deltas in Shopify?
Export your variants from EditEngine with one Inventory Available column per location, type the signed delta (for example +5 or -3) per row, and import the file back through the advanced import flow. That's how you bulk adjust Shopify inventory deltas across locations in one round-trip instead of clicking through each location screen.
Can I edit Shopify inventory deltas in a spreadsheet?
Yes. EditEngine exports one row per variant with a separate column for each location, so editing Shopify inventory deltas in a spreadsheet is just typing the +/- number into the right cell. The Shopify admin only lets you adjust one variant-location pair at a time, which is why the CSV round-trip wins for anything beyond a handful of SKUs.
How long does a bulk inventory deltas import take in Shopify?
A few dozen rows finish in seconds and a few thousand in a couple of minutes. Multi-location adjustments are slower than single-location ones because each row writes once per location, so a catalog with five locations does roughly five times the work — the results CSV reports the exact duration.
What format does Shopify accept for inventory deltas imports?
A CSV or XLSX with a Handle column, a Variant SKU column, and one Inventory Available: <Location> column per location holding the signed delta. EditEngine's advanced import reads the column headers verbatim, so the location name in the header has to match the location name in your Shopify admin character-for-character.
Can I undo a bulk Shopify inventory deltas update?
There's no one-click undo, but a delta is its own undo: re-import the same file with the signs flipped (a +5 becomes -5) and the change reverses. Keep the original export alongside the edited file so you can rebuild the reversal sheet in a minute.
Related tutorials
- How to Bulk Update Shopify Inventory Quantities Across Multiple Locations
- How to Bulk Update Shopify On Hand Stock Per Location
About EditEngine: EditEngine Bulk Product Editor helps Shopify merchants bulk edit, bulk import, and bulk export their product catalog in minutes instead of days. Install on Shopify →