Products
How to Bulk Reassign Shopify Standard Categories
Last updated
Need to bulk reassign Shopify standard categories across a catalog that was built before the new taxonomy existed, or after a recent re-organization? With EditEngine Bulk Product Editor, you export every product with its current category, paste the right taxonomy node ID into the spreadsheet, and import the file back. One CSV, one import, and your entire catalog lines up with Shopify's standard product taxonomy — which means cleaner channel mapping, sharper tax rules, and consistent storefront filters.
What you'll learn
- Export every product with its current Shopify standard categories
- Edit Shopify standard categories per row in a spreadsheet
- Import the updated file back to Shopify
What you'll need
- The EditEngine Bulk Product Editor app installed in your Shopify store
- At least a handful of products in your Shopify store, each with a Handle
- A target Shopify Standard Category in mind — find the taxonomy ID at https://shopify.github.io/product-taxonomy
- The Advanced import flow in EditEngine Bulk Product Editor
- A spreadsheet editor (Excel, Google Sheets, Numbers — anything that opens CSV)
The Shopify Standard Product Taxonomy is the global category tree every store can reference — Apparel & Accessories > Shoes > Athletic Shoes and so on. Each node has a stable ID (like gid://shopify/TaxonomyCategory/aa-2-1-6). Shopify uses that ID to decide tax treatment in some regions, eligibility for sales channels like Google and Meta, and storefront filtering. Getting it right across the catalog is tedious in the admin because you reassign one product at a time — which is what the spreadsheet workflow below fixes.
Step 1 — Export your Shopify standard categories
Open EditEngine and go to the Export page. This is where you pick which fields land in your spreadsheet.
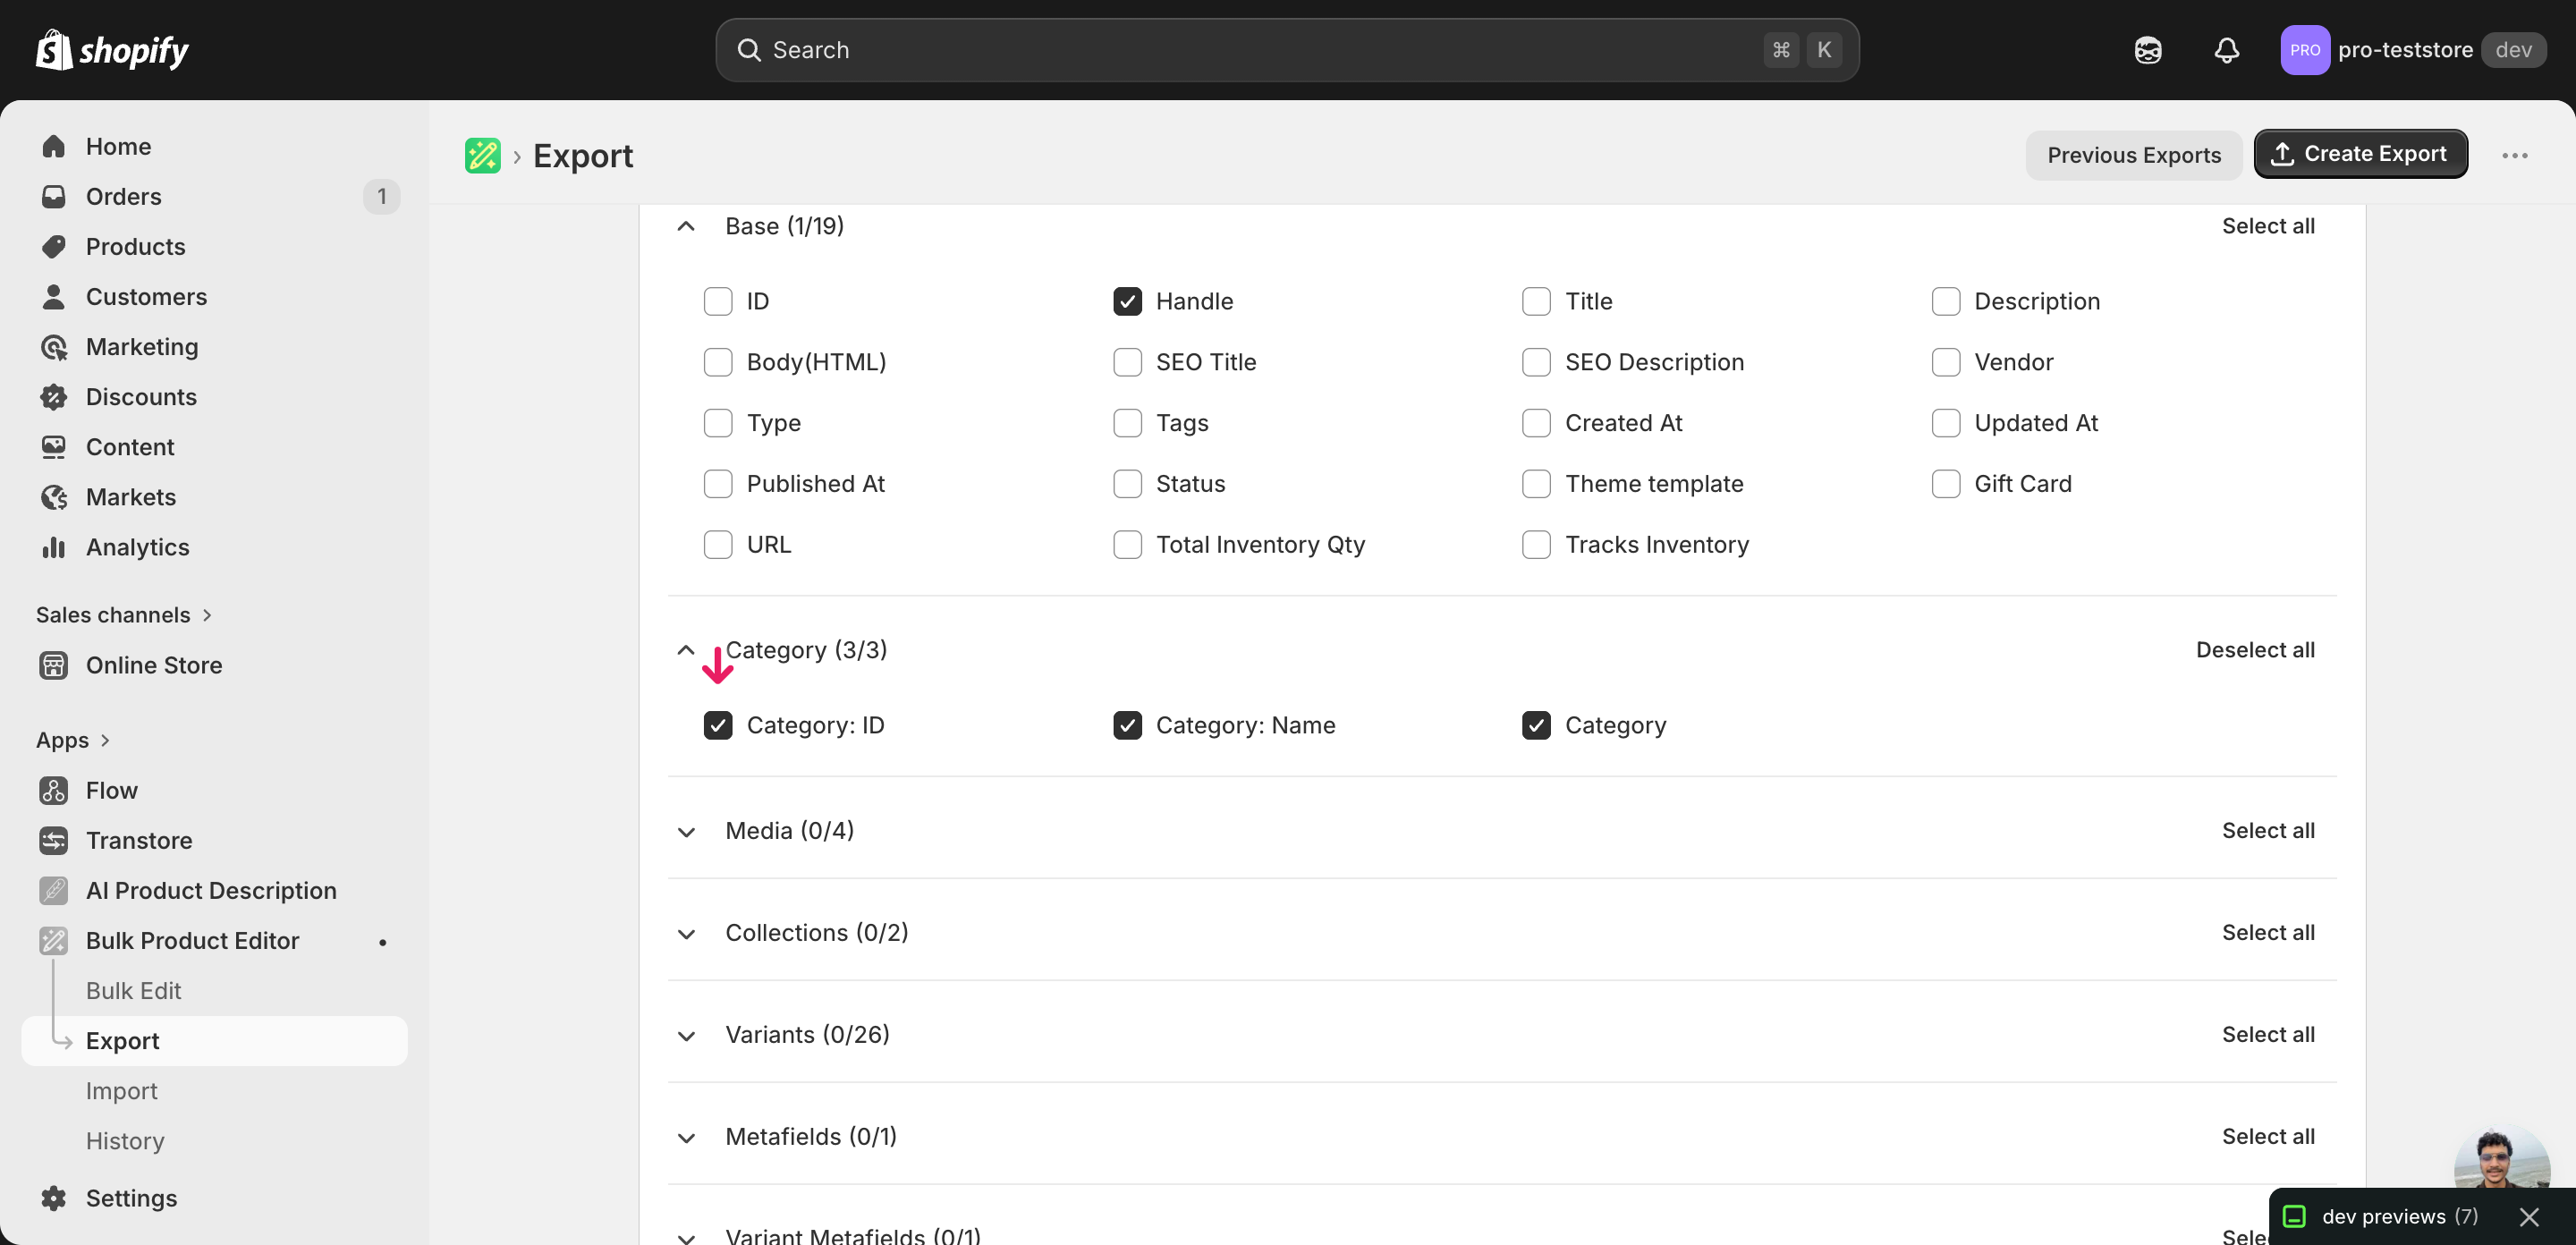
Pick the right columns
- Handle — the unique product identifier the importer uses to match each row back to the right product on import.
- Category — the human-readable full category path (for example,
Apparel & Accessories > Shoes > Athletic Shoes). Read-only context so you can see what each product is set to today. - Category: ID — the taxonomy node ID (for example,
gid://shopify/TaxonomyCategory/aa-2-1-6). This is the column the importer actually writes — change this value to reassign the product. - Category: Name — the leaf name only (for example,
Athletic Shoes). Useful while editing as a sanity check that the ID and the name line up. - Category: Handle — the slug form of the leaf (for example,
athletic-shoes). Reference only — it follows whatever Category: ID resolves to.
When the export completes, click Download. You'll get one row per product with all four Category columns populated for anything already assigned — products that have no category yet show those columns as blank, which is exactly where this workflow earns its keep.
New to exporting? This guide assumes you know how to run an export and focuses only on the columns and edit unique to this workflow.
Step 2 — Bulk reassign Shopify standard categories in your spreadsheet
Open the downloaded CSV in Excel or Google Sheets. The Category: ID column is the one that matters — everything else is reference.
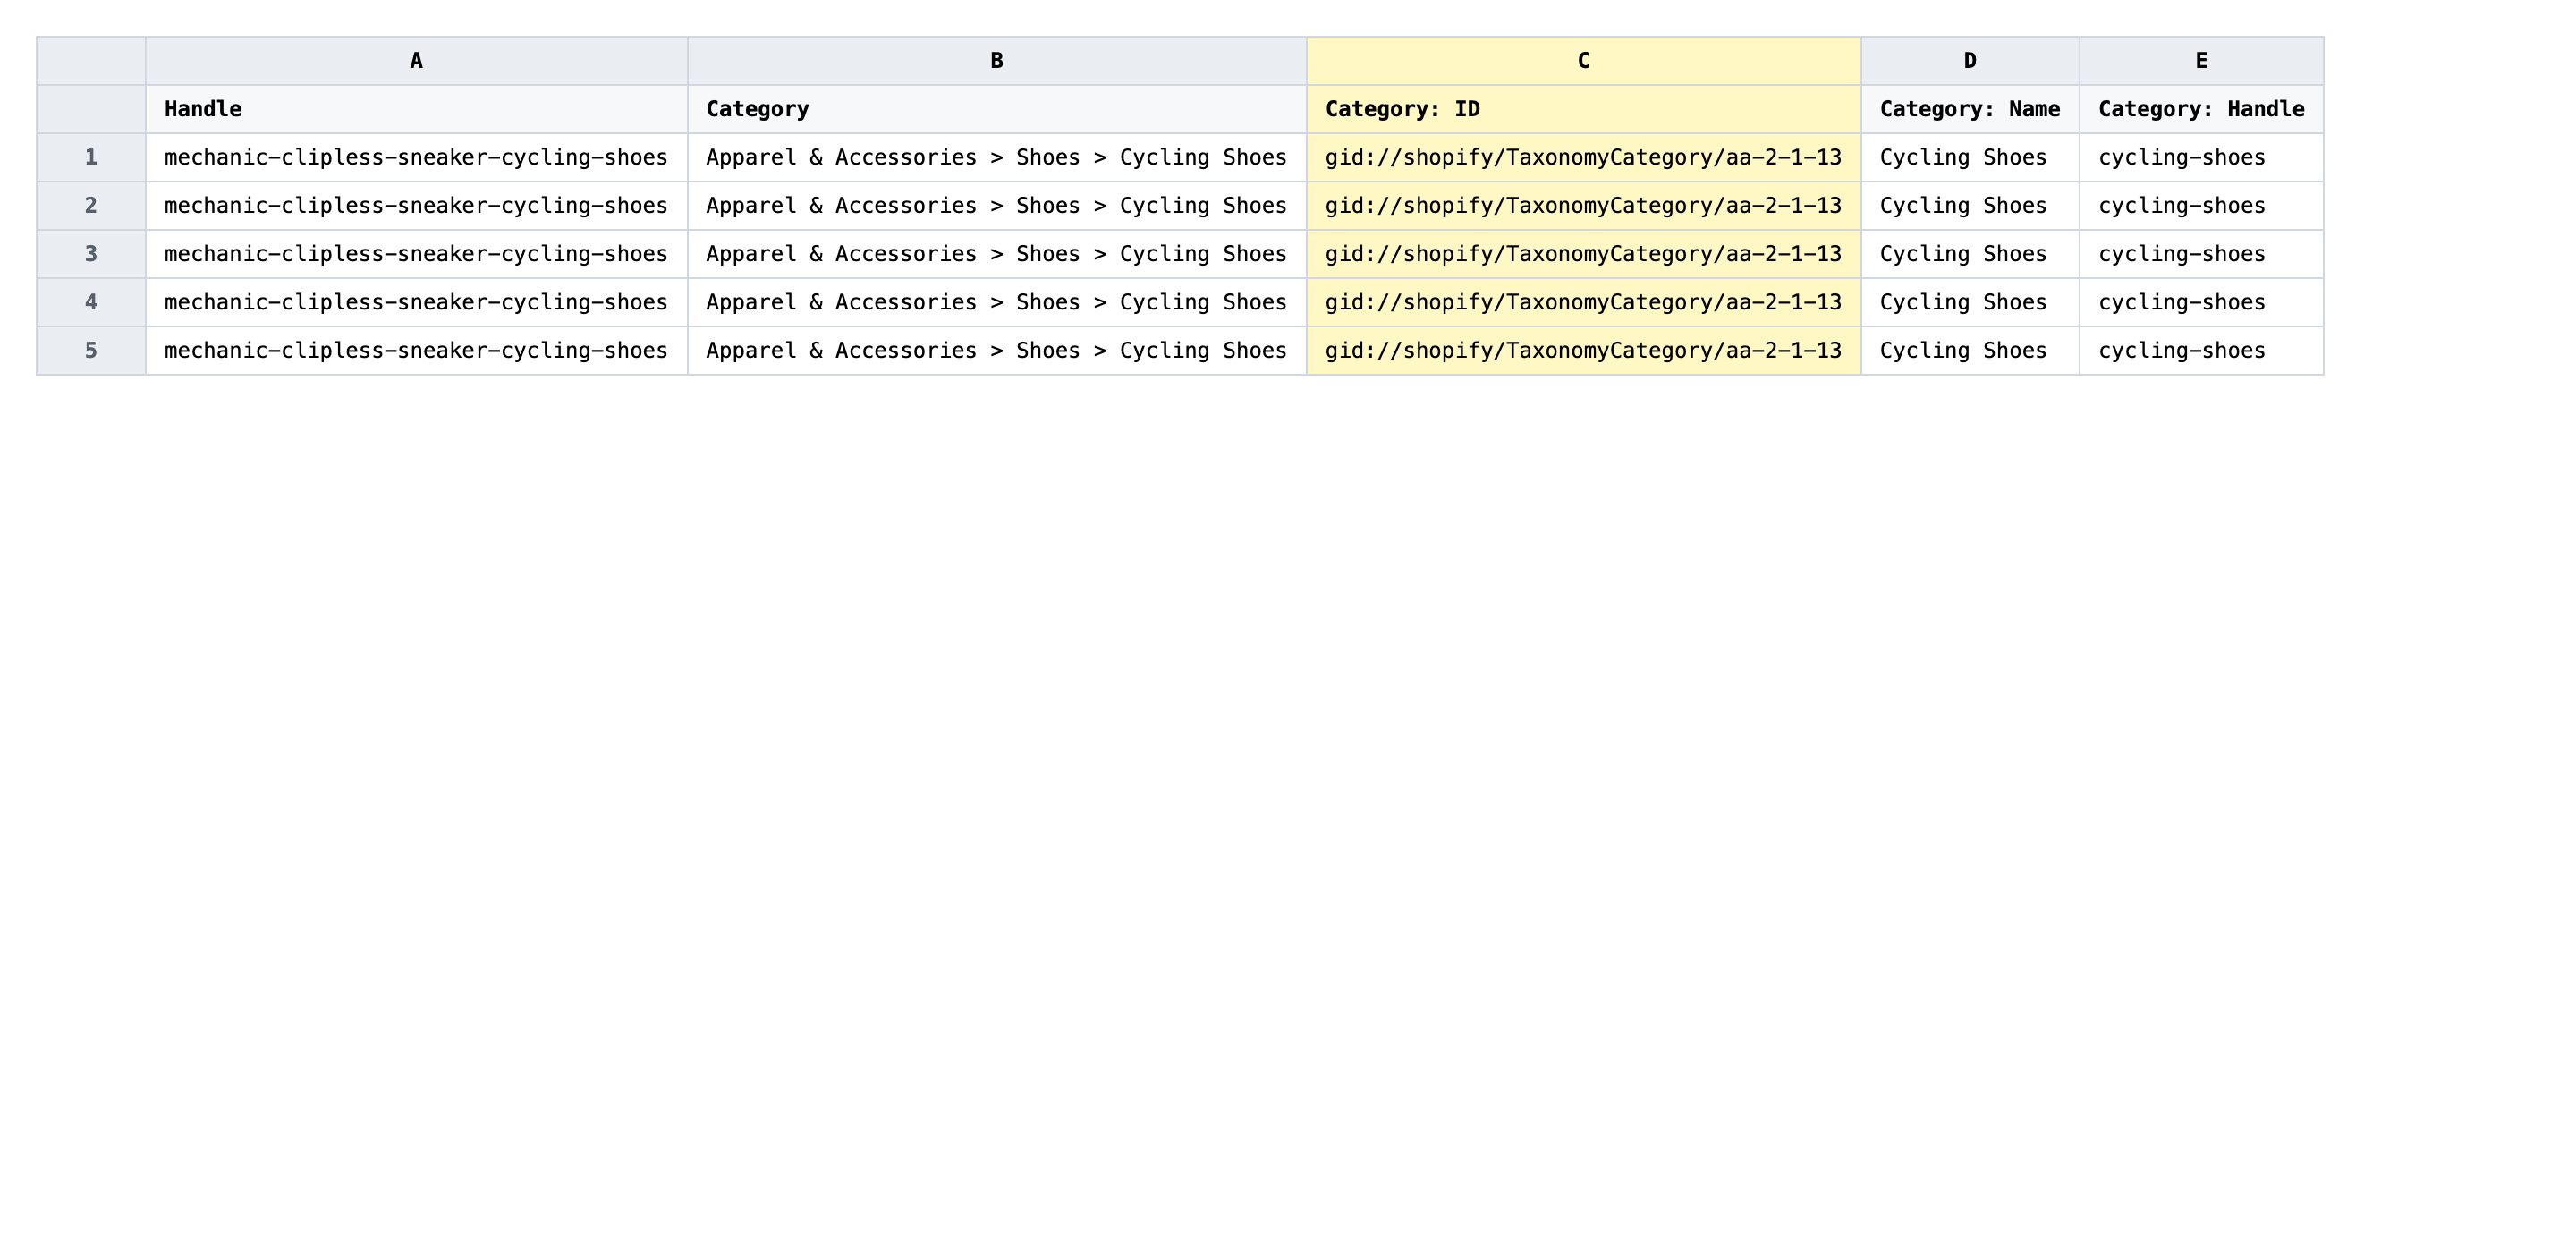
For each product you want to recategorize, paste the new taxonomy node ID into Category: ID. The IDs look like gid://shopify/TaxonomyCategory/aa-2-1-6 — grab them from the Shopify Standard Product Taxonomy browser at https://shopify.github.io/product-taxonomy. If you have a column of products that all belong in the same category, copy the ID once and paste it down the column.
- ✅
gid://shopify/TaxonomyCategory/aa-2-1-6 - ❌
Athletic Shoes
Leave the Handle column exactly as exported — it's the matching key, and editing it will either point your update at the wrong product or fail to match anything. You can ignore Category, Category: Name, and Category: Handle while editing; the importer derives the readable name and handle from whatever Category: ID resolves to, so trying to set the path string directly won't override the ID. Rows where you don't want to change the category can be left untouched or deleted from the file — both options are fine.
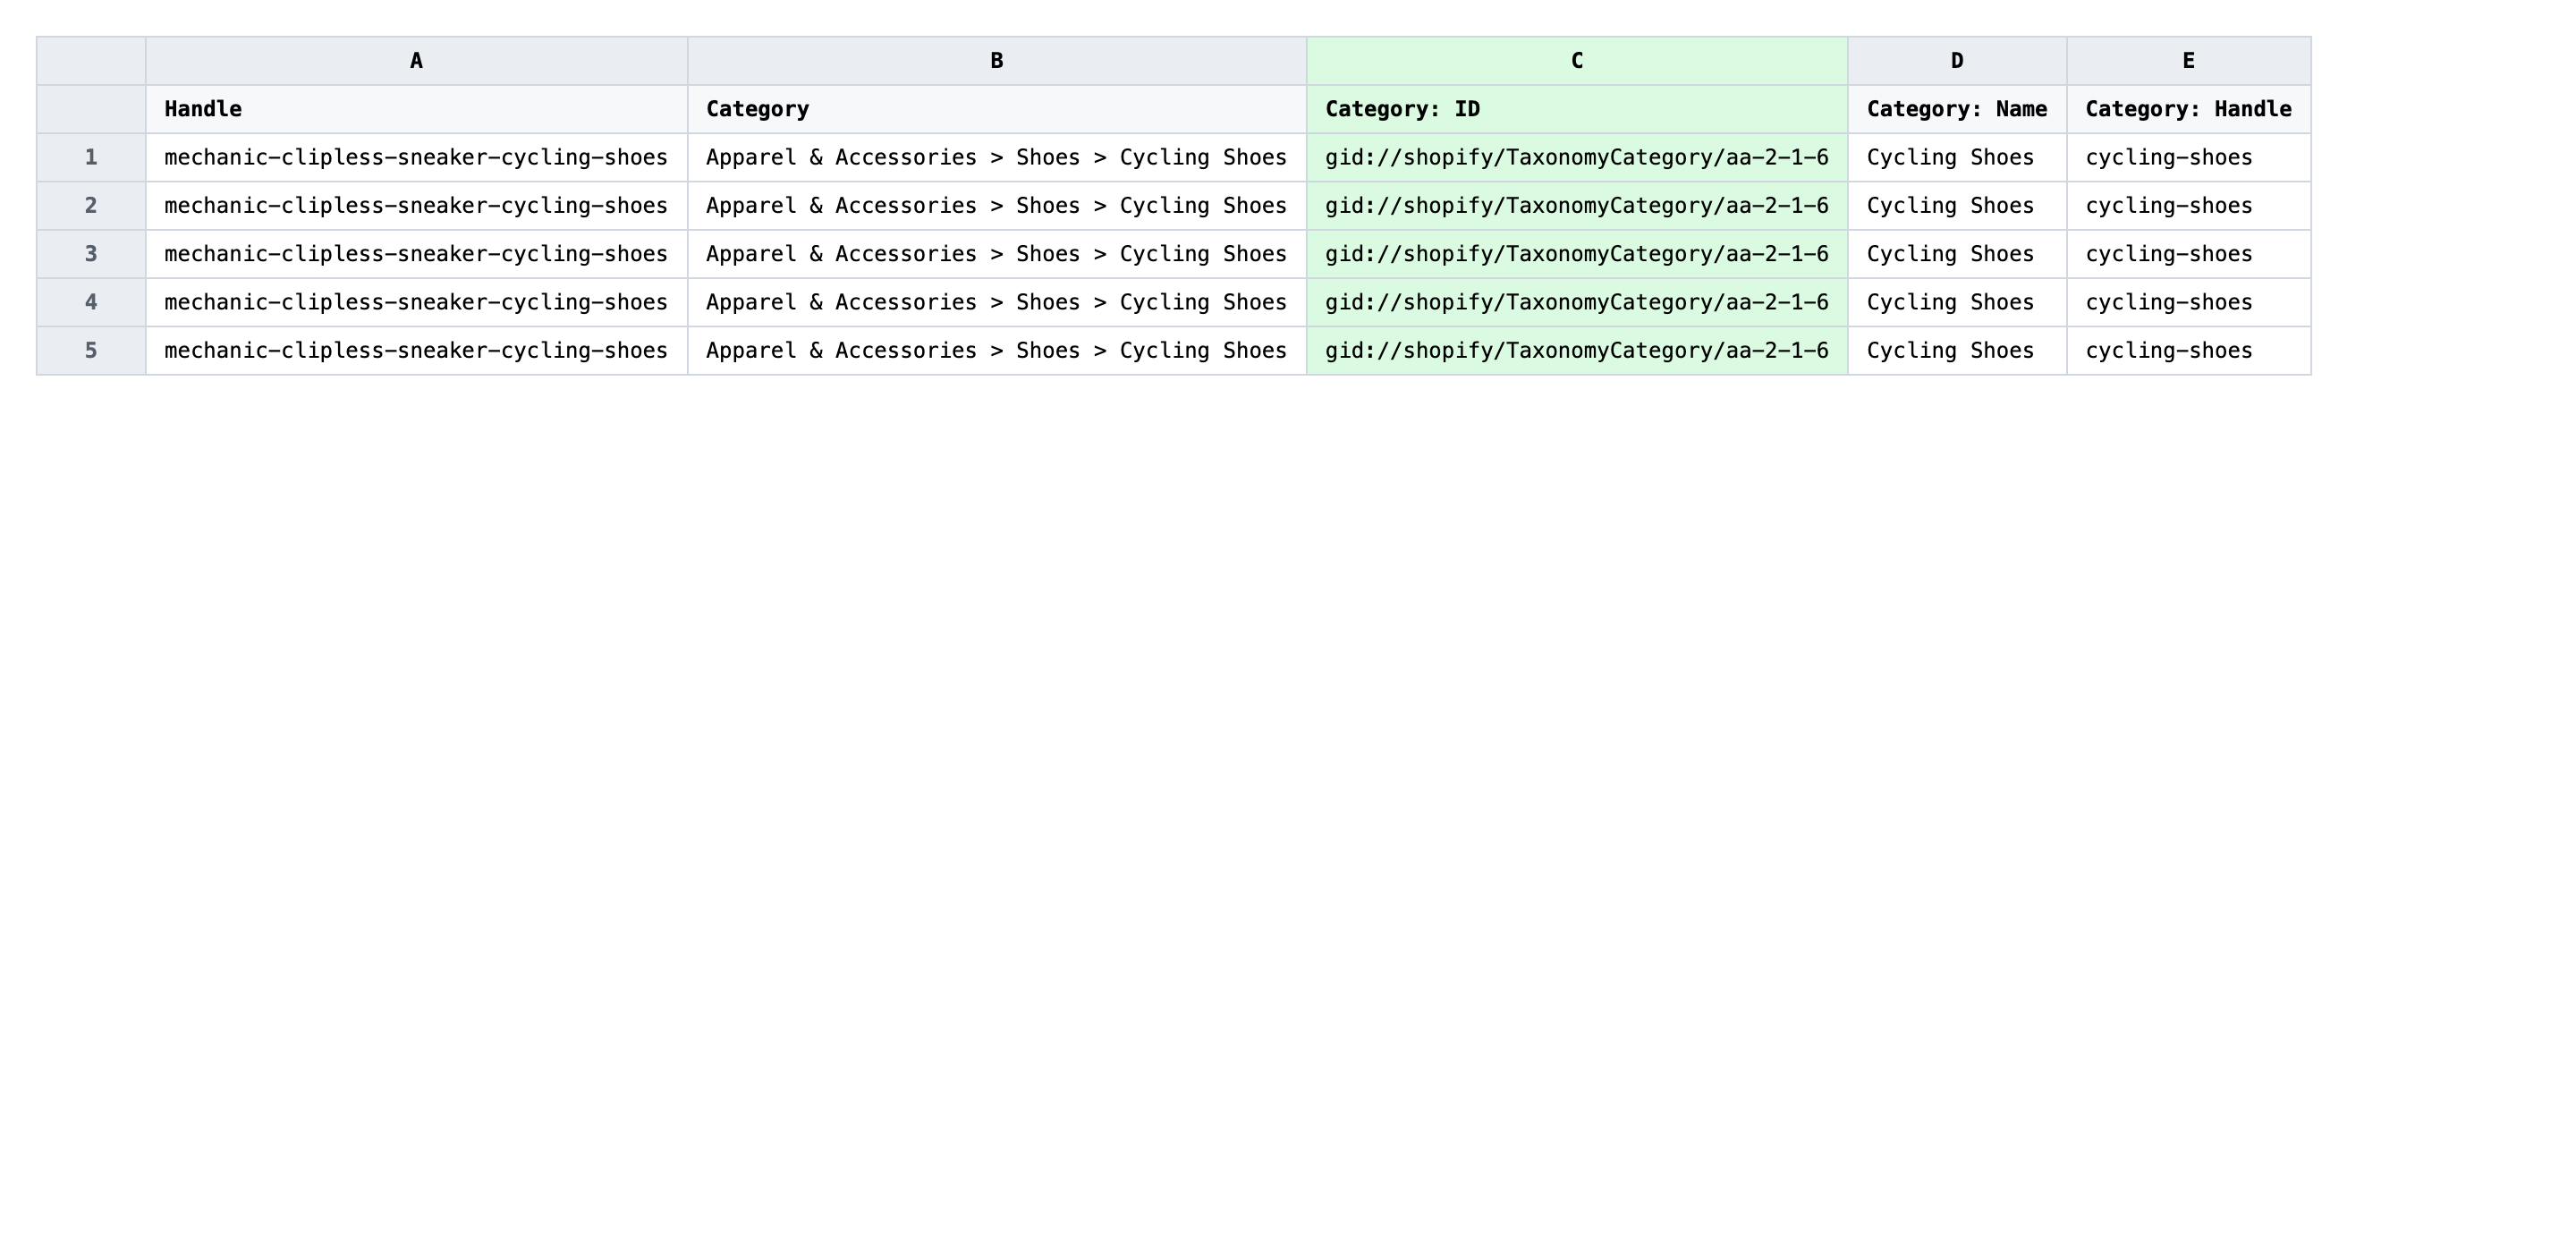
Save the file as CSV when you're done, and keep the original export handy in case you want to revert.
Tip: Open the Shopify taxonomy browser in a second tab while you edit — copying the full
gid://shopify/TaxonomyCategory/...string from there is faster and safer than typing IDs by hand.
Step 3 — Import the edited file back to Shopify
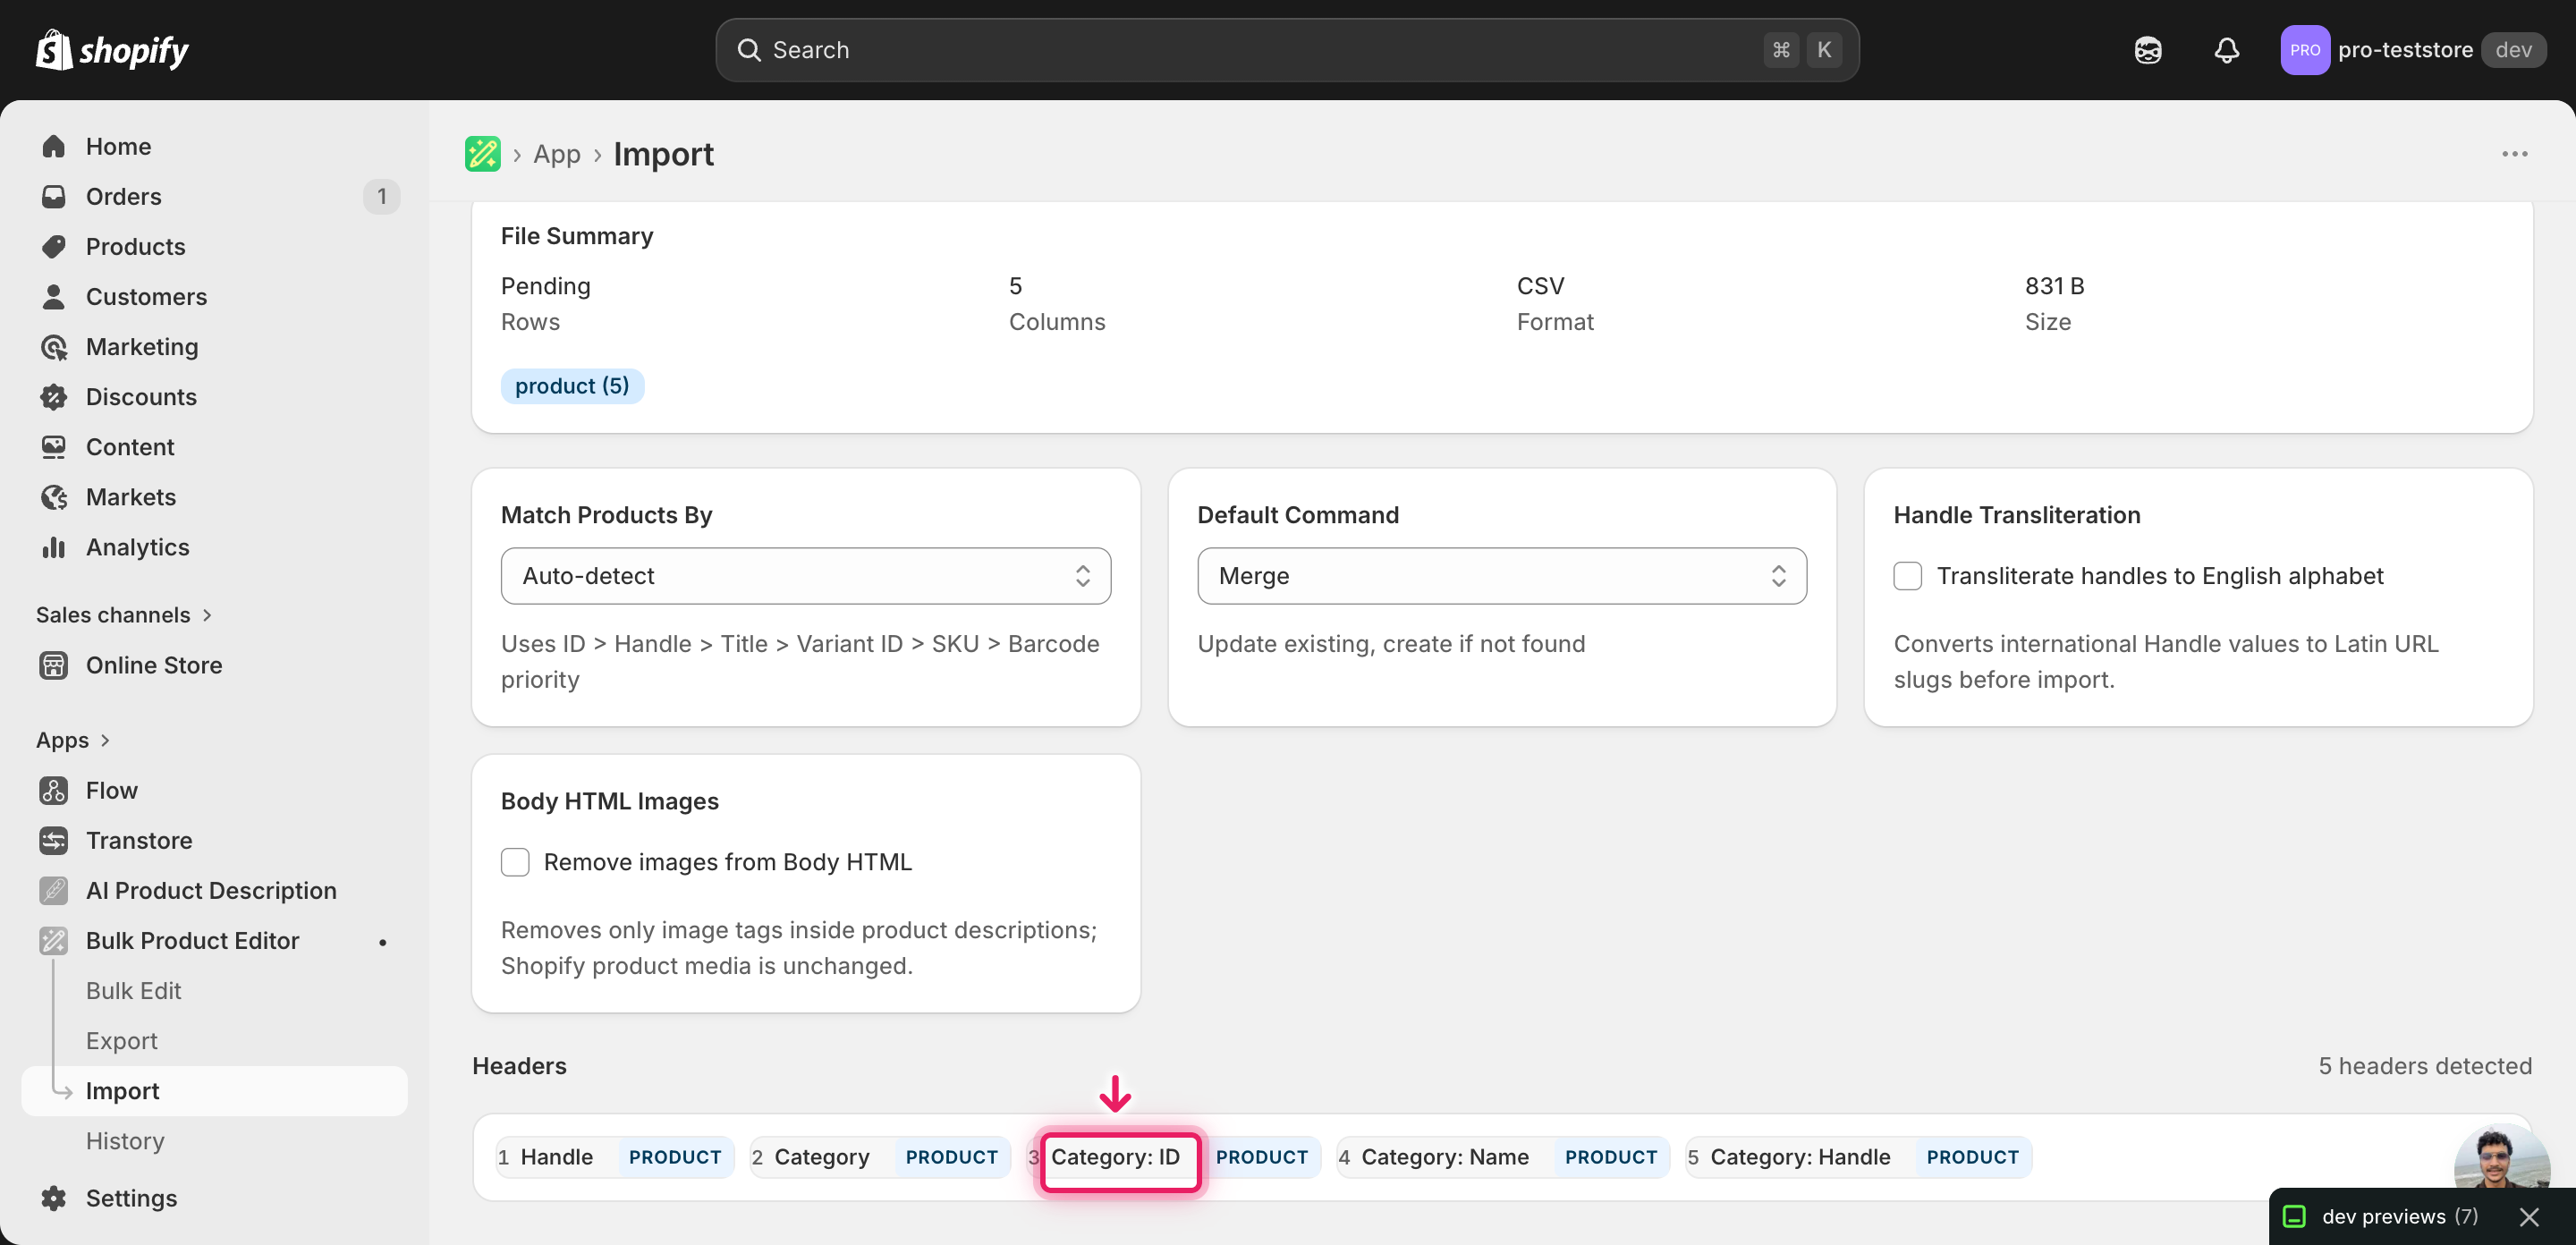
Open EditEngine → Import and select Advanced import. Then upload the file you just edited.
EditEngine reads the file and shows a summary. Check the Headers panel: Category: ID should be mapped to the category field, with Handle as the product matching key. Leave Match Products By on Auto-detect and Default Command on Merge so existing fields like Title, Tags, and Vendor are left alone.
Note: Reassigning categories changes tax behavior in some regions and sales-channel eligibility on Google and Meta, so test on a tiny batch before doing the whole catalog. Import a file with two or three rows first, open those products in the Shopify admin, confirm the new category resolves correctly, then run the full file. The Advanced import flow has no dry-run toggle — the small-batch test is the substitute.
Click Start Import and wait for the job to finish — a small file takes seconds, larger catalogs a couple of minutes. When it completes, EditEngine shows a per-row summary.
Download the results CSV. It lists every row with a pass/fail status — that file is your proof the change went through, and the new values are now live in your Shopify admin.
Tips and troubleshooting
Category: ID is the only column that drives the change. Editing Category, Category: Name, or Category: Handle does nothing — those are derived from whatever Category: ID resolves to on import. If you paste Athletic Shoes into Category: Name and leave Category: ID alone, the product keeps its old assignment. Always edit the ID column.
Copy IDs from the taxonomy browser, don't retype them. The IDs are long strings like gid://shopify/TaxonomyCategory/aa-2-1-6 and a one-character typo silently fails — the row imports, but the category doesn't change. Keep https://shopify.github.io/product-taxonomy open in another tab and copy-paste each ID to avoid drift.
Run two or three rows before the full catalog. Category reassignment ripples into tax classification and channel eligibility, so a wrong ID applied to thousands of products is expensive to clean up. Import a three-row test file, open those products in the admin, confirm the path looks right, then come back and import the rest. Five extra minutes of test now saves an hour of rollback later.
Keep the original export as your rollback file. There's no native undo for a bulk reassign Shopify standard categories job. The cleanest revert is to re-import the file you exported before editing — the old Category: ID values overwrite the new ones row by row, putting the catalog back exactly where it started.
Frequently asked questions
How do I bulk reassign Shopify standard categories in Shopify?
Export your products from EditEngine with the Category columns, paste the new taxonomy ID into the Category: ID column for each row, and import the file back through Advanced import. That's how you bulk reassign Shopify standard categories without opening each product card.
Can I edit Shopify standard categories in a spreadsheet?
Yes. EditEngine exports the Category, Category: ID, Category: Name, and Category: Handle columns so you can bulk edit Shopify standard categories in Excel or Google Sheets. Shopify itself has no built-in spreadsheet view for taxonomy assignments.
How long does a bulk Shopify standard categories import take in Shopify?
A few dozen products finish in seconds. A catalog of a few thousand typically completes in a couple of minutes, and the results CSV reports the exact runtime. Category reassignment is a single field write per product, so it's one of the faster bulk reassign Shopify standard categories jobs you can run.
What format does Shopify accept for Shopify standard categories imports?
A CSV or XLSX with a Handle column to match each product plus a Category: ID column containing the taxonomy node ID (for example, gid://shopify/TaxonomyCategory/aa-2-1-6). EditEngine's Advanced import reads that format for Shopify standard categories CSV uploads directly.
Can I undo a bulk Shopify standard categories update?
There's no one-click undo, but the round-trip is its own backup. Keep the original export, and to revert a bulk Shopify standard categories change just re-import that unedited file — the previous Category: ID values overwrite the new ones.
Related tutorials
About EditEngine: EditEngine Bulk Product Editor helps Shopify merchants bulk edit, bulk import, and bulk export their product catalog in minutes instead of days. Install on Shopify →