
Products
How to Bulk Add or Replace Shopify Tags Using the Tags Command Column
Last updated
Want to bulk add or replace Shopify tags using the Tags Command column so you can add a seasonal tag to one set of products and trim an old promo tag from another in the same file? With EditEngine Bulk Product Editor, you export your products to a spreadsheet, set MERGE or REPLACE on each row, and import the file back. The Tags Command column is what makes per-row add-versus-overwrite behavior possible.
What you'll learn
- Export every product with its current tags
- Set MERGE or REPLACE per row in a spreadsheet
- Import the updated file back to Shopify
What you'll need
- The EditEngine Bulk Product Editor app installed in your Shopify store
- Products in your Shopify store that already carry tags you want to add to or trim
- The Advanced import flow enabled in EditEngine — the
Tags Commandcolumn is only honored by advanced import - A spreadsheet editor (Excel, Google Sheets, Numbers — anything that opens CSV)
Tags drive collections, search filters, theme logic, and reporting. The Tags column alone is overwrite-only — uploading it replaces the whole list — so a typo or a forgotten tag wipes work. The Tags Command column tells EditEngine how to apply that row's Tags: MERGE adds the listed tags on top of what's already there, and REPLACE swaps the full list. That's the difference between adding summer-sale to 500 products and accidentally erasing every other tag on them.
Step 1 — Export your Shopify tags and command column
Open EditEngine and go to the Export page. This is where you choose which product fields land in your spreadsheet.
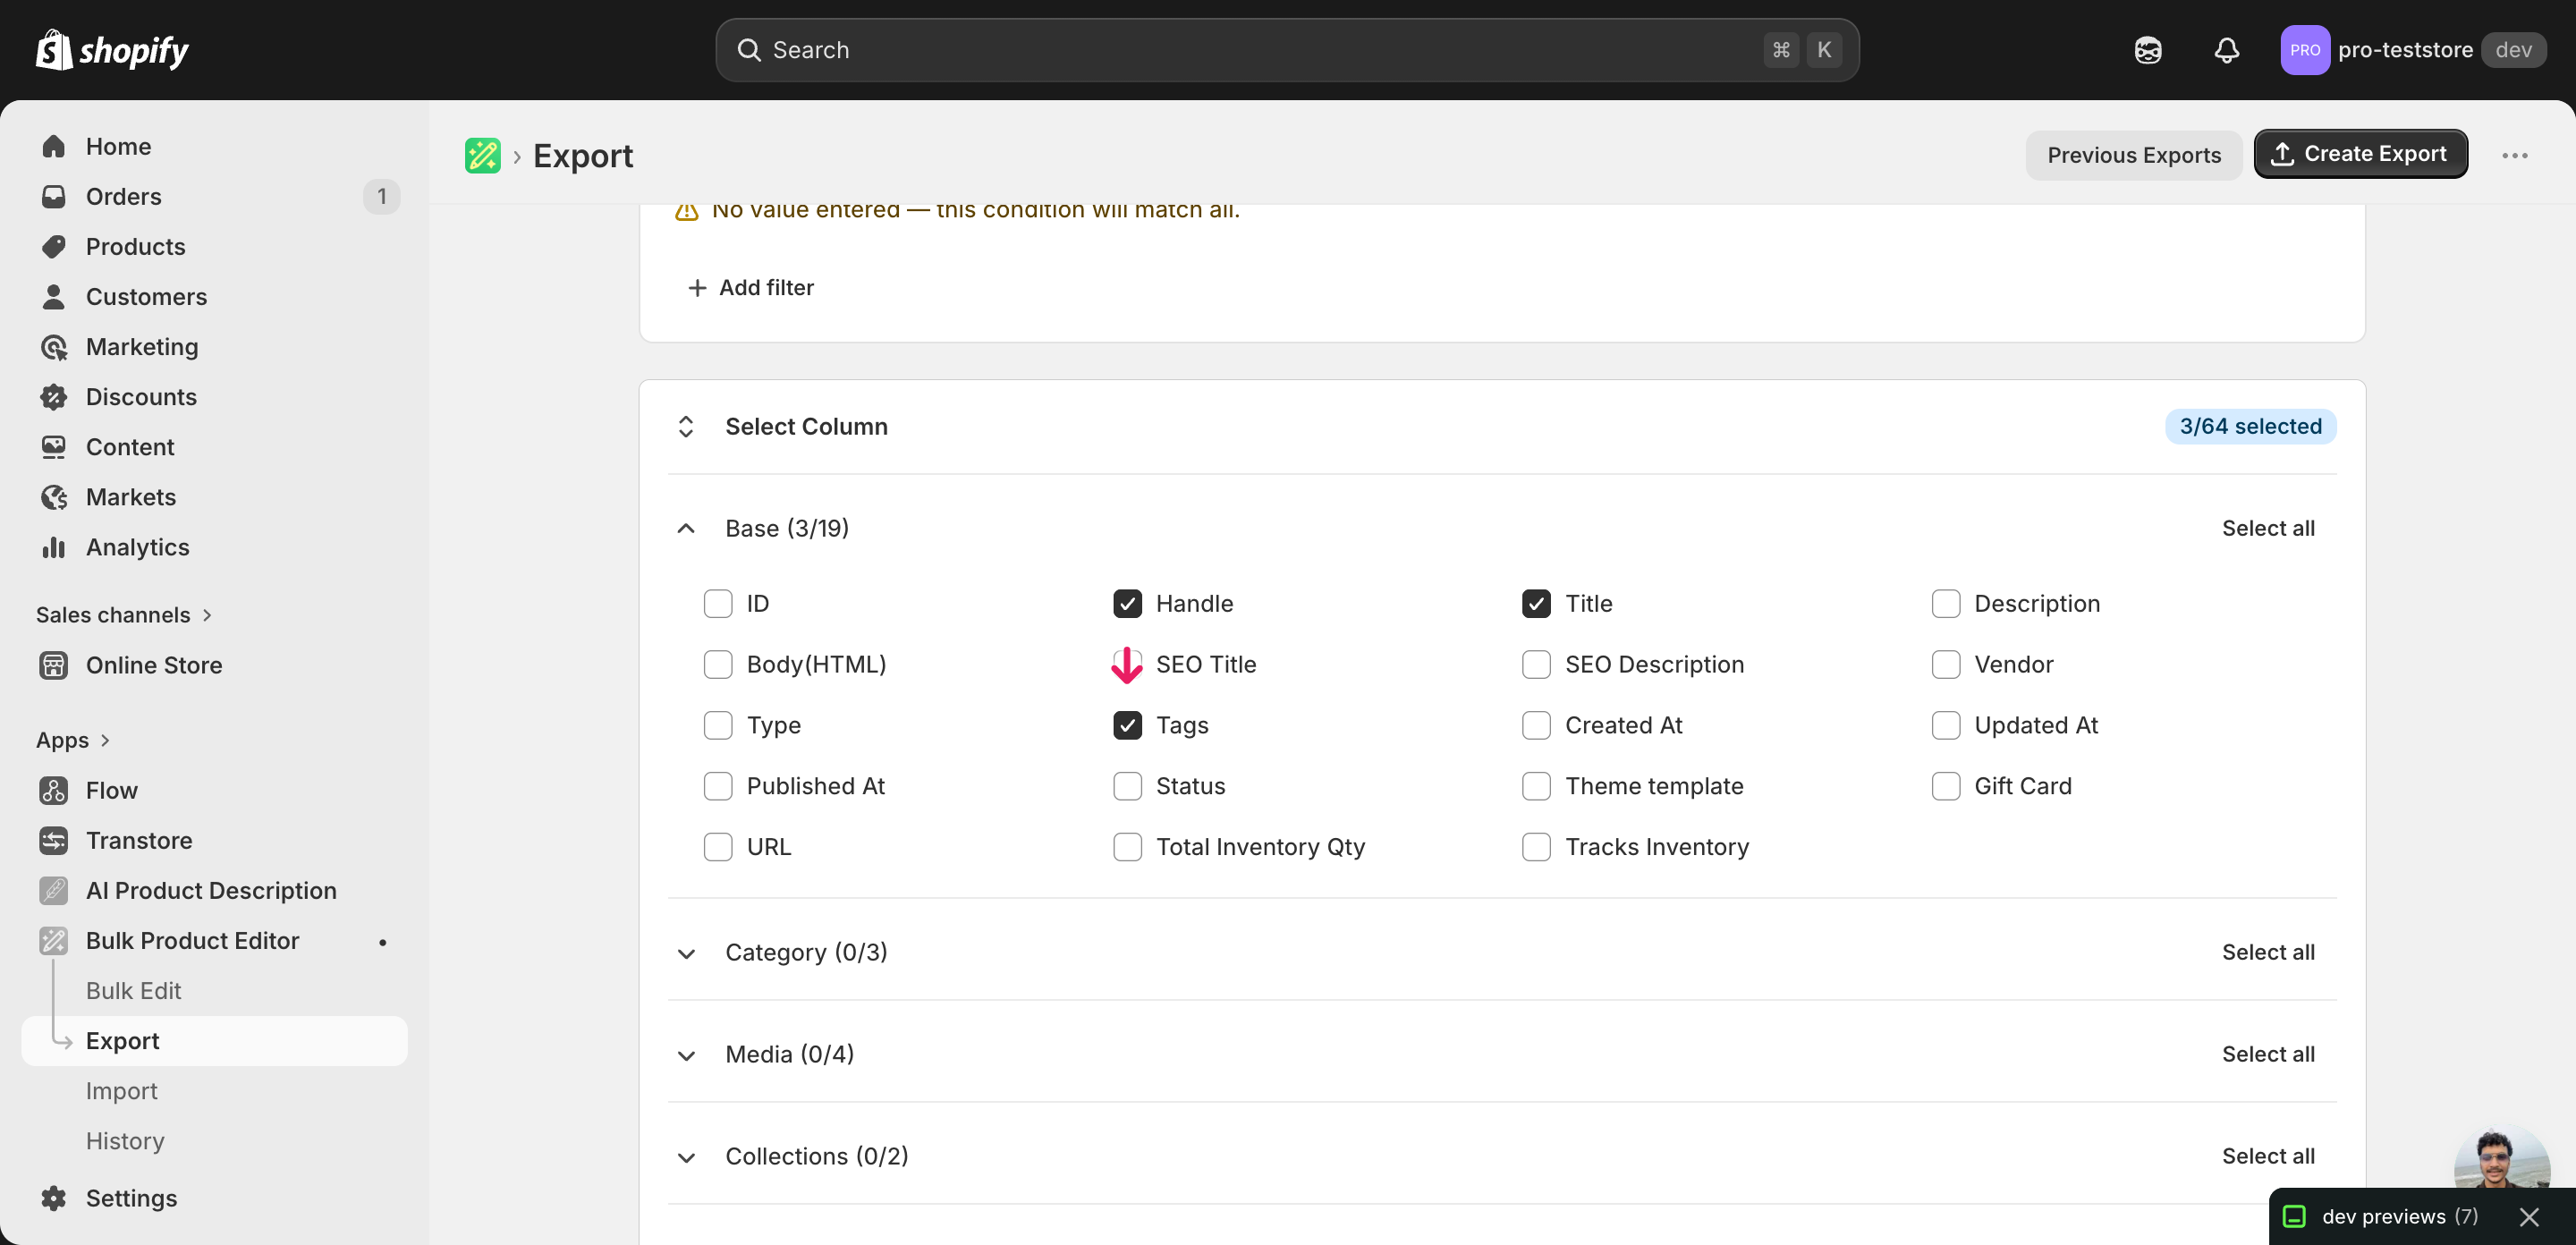
Pick the right columns
- Handle — the unique product identifier the importer uses to match each row back to the right product.
- Title — context only, so you can see which product a row belongs to while you decide what to tag.
- Tags — the current comma-separated tag list. You'll either add to it (with MERGE) or replace it (with REPLACE) depending on the Tags Command on the same row.
- Tags Command — the per-row directive. Exports blank — you fill it in with MERGE, REPLACE, or leave it empty to skip that row.
When the export completes, click Download. You'll get one row per product with the current Tags filled in and the Tags Command column empty — that empty column is where the work happens in Step 2.
New to exporting? This guide assumes you know how to run an export and focuses only on the columns and edit unique to this workflow.
Step 2 — Bulk add or replace Shopify tags using the Tags Command column in your spreadsheet
Open the downloaded CSV in Excel or Google Sheets. The Tags Command column is blank by default; the Tags column holds the current comma-separated list for each product.
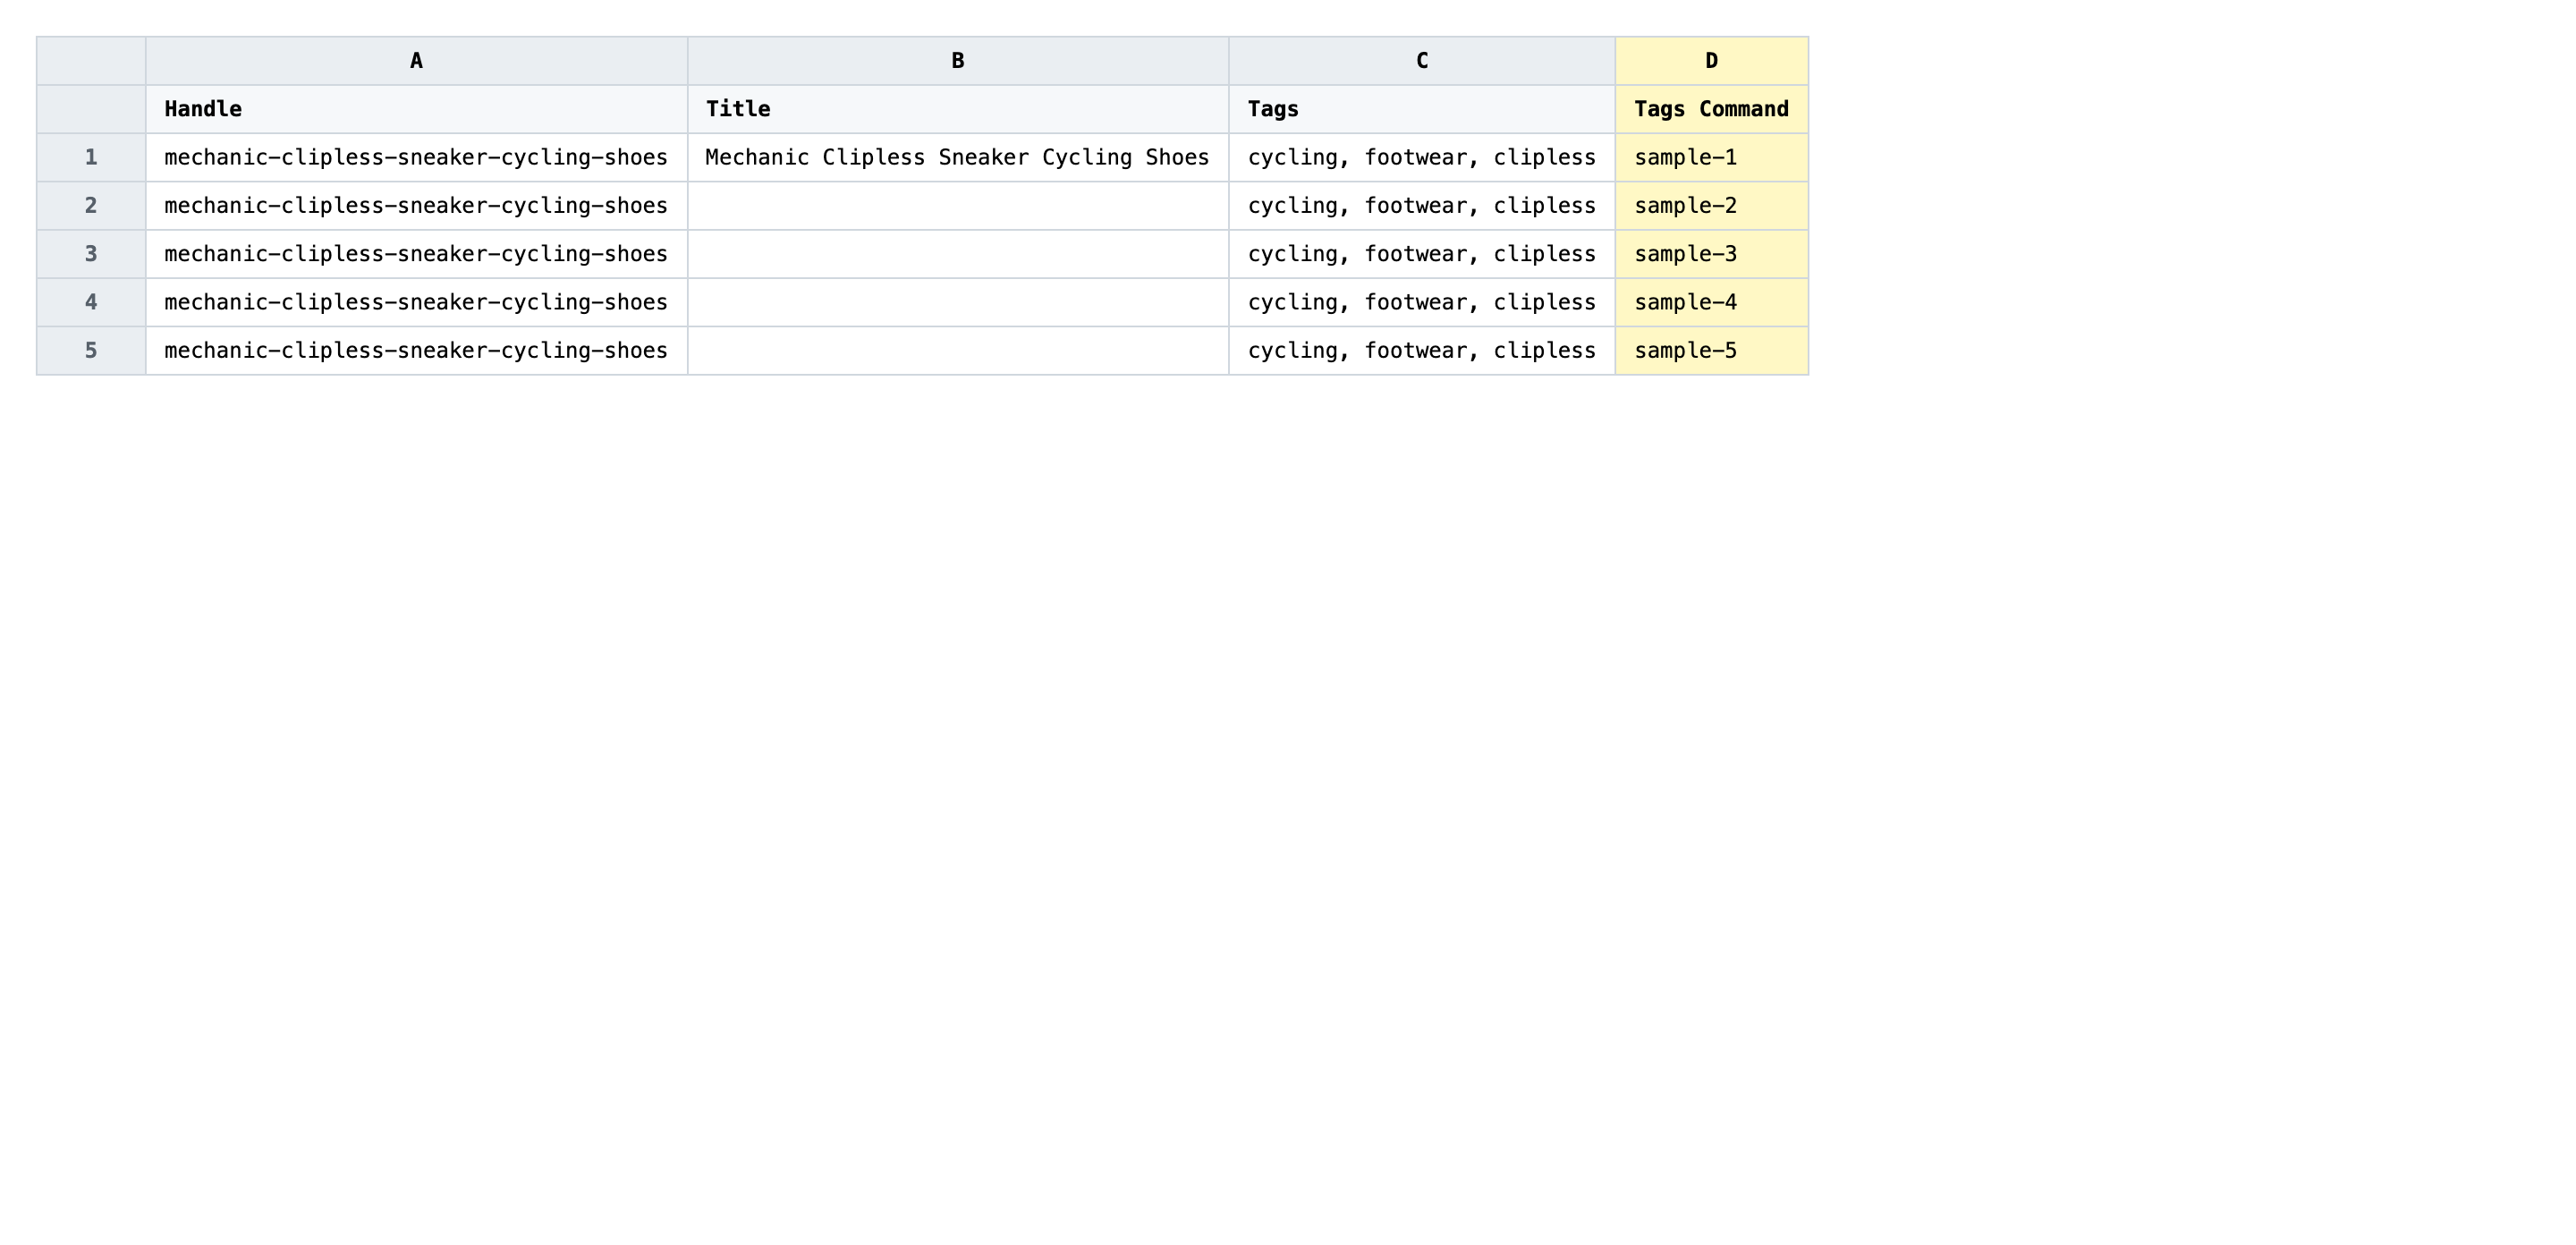
For every product you want to change, set Tags Command to one of two values. Use MERGE to add new tags on top of the existing list — type the new tags into the Tags column (just the additions, comma-separated). Use REPLACE to overwrite the existing list entirely — type the complete new tag list into Tags. Leave Tags Command blank on any row you don't want touched. Tag names are case-sensitive and can include spaces; separate multiple tags with a comma and a space.
- Good: Tags Command
MERGE, Tagssummer-sale, clearance— adds those two tags and keeps the rest. - Bad: Tags Command
REPLACE, Tags empty — wipes every tag the product had.
Leave Handle exactly as exported — that's the matching key, and editing it points the row at a different product (or none at all). Don't try to use Tags Command to remove a single tag while keeping the rest; the command is set-level, not tag-level. To trim one tag, switch the row to REPLACE and type the full list minus the tag you want gone. Rows with an empty Tags Command are skipped by the importer, which is exactly the behavior you want for products you're not retagging.
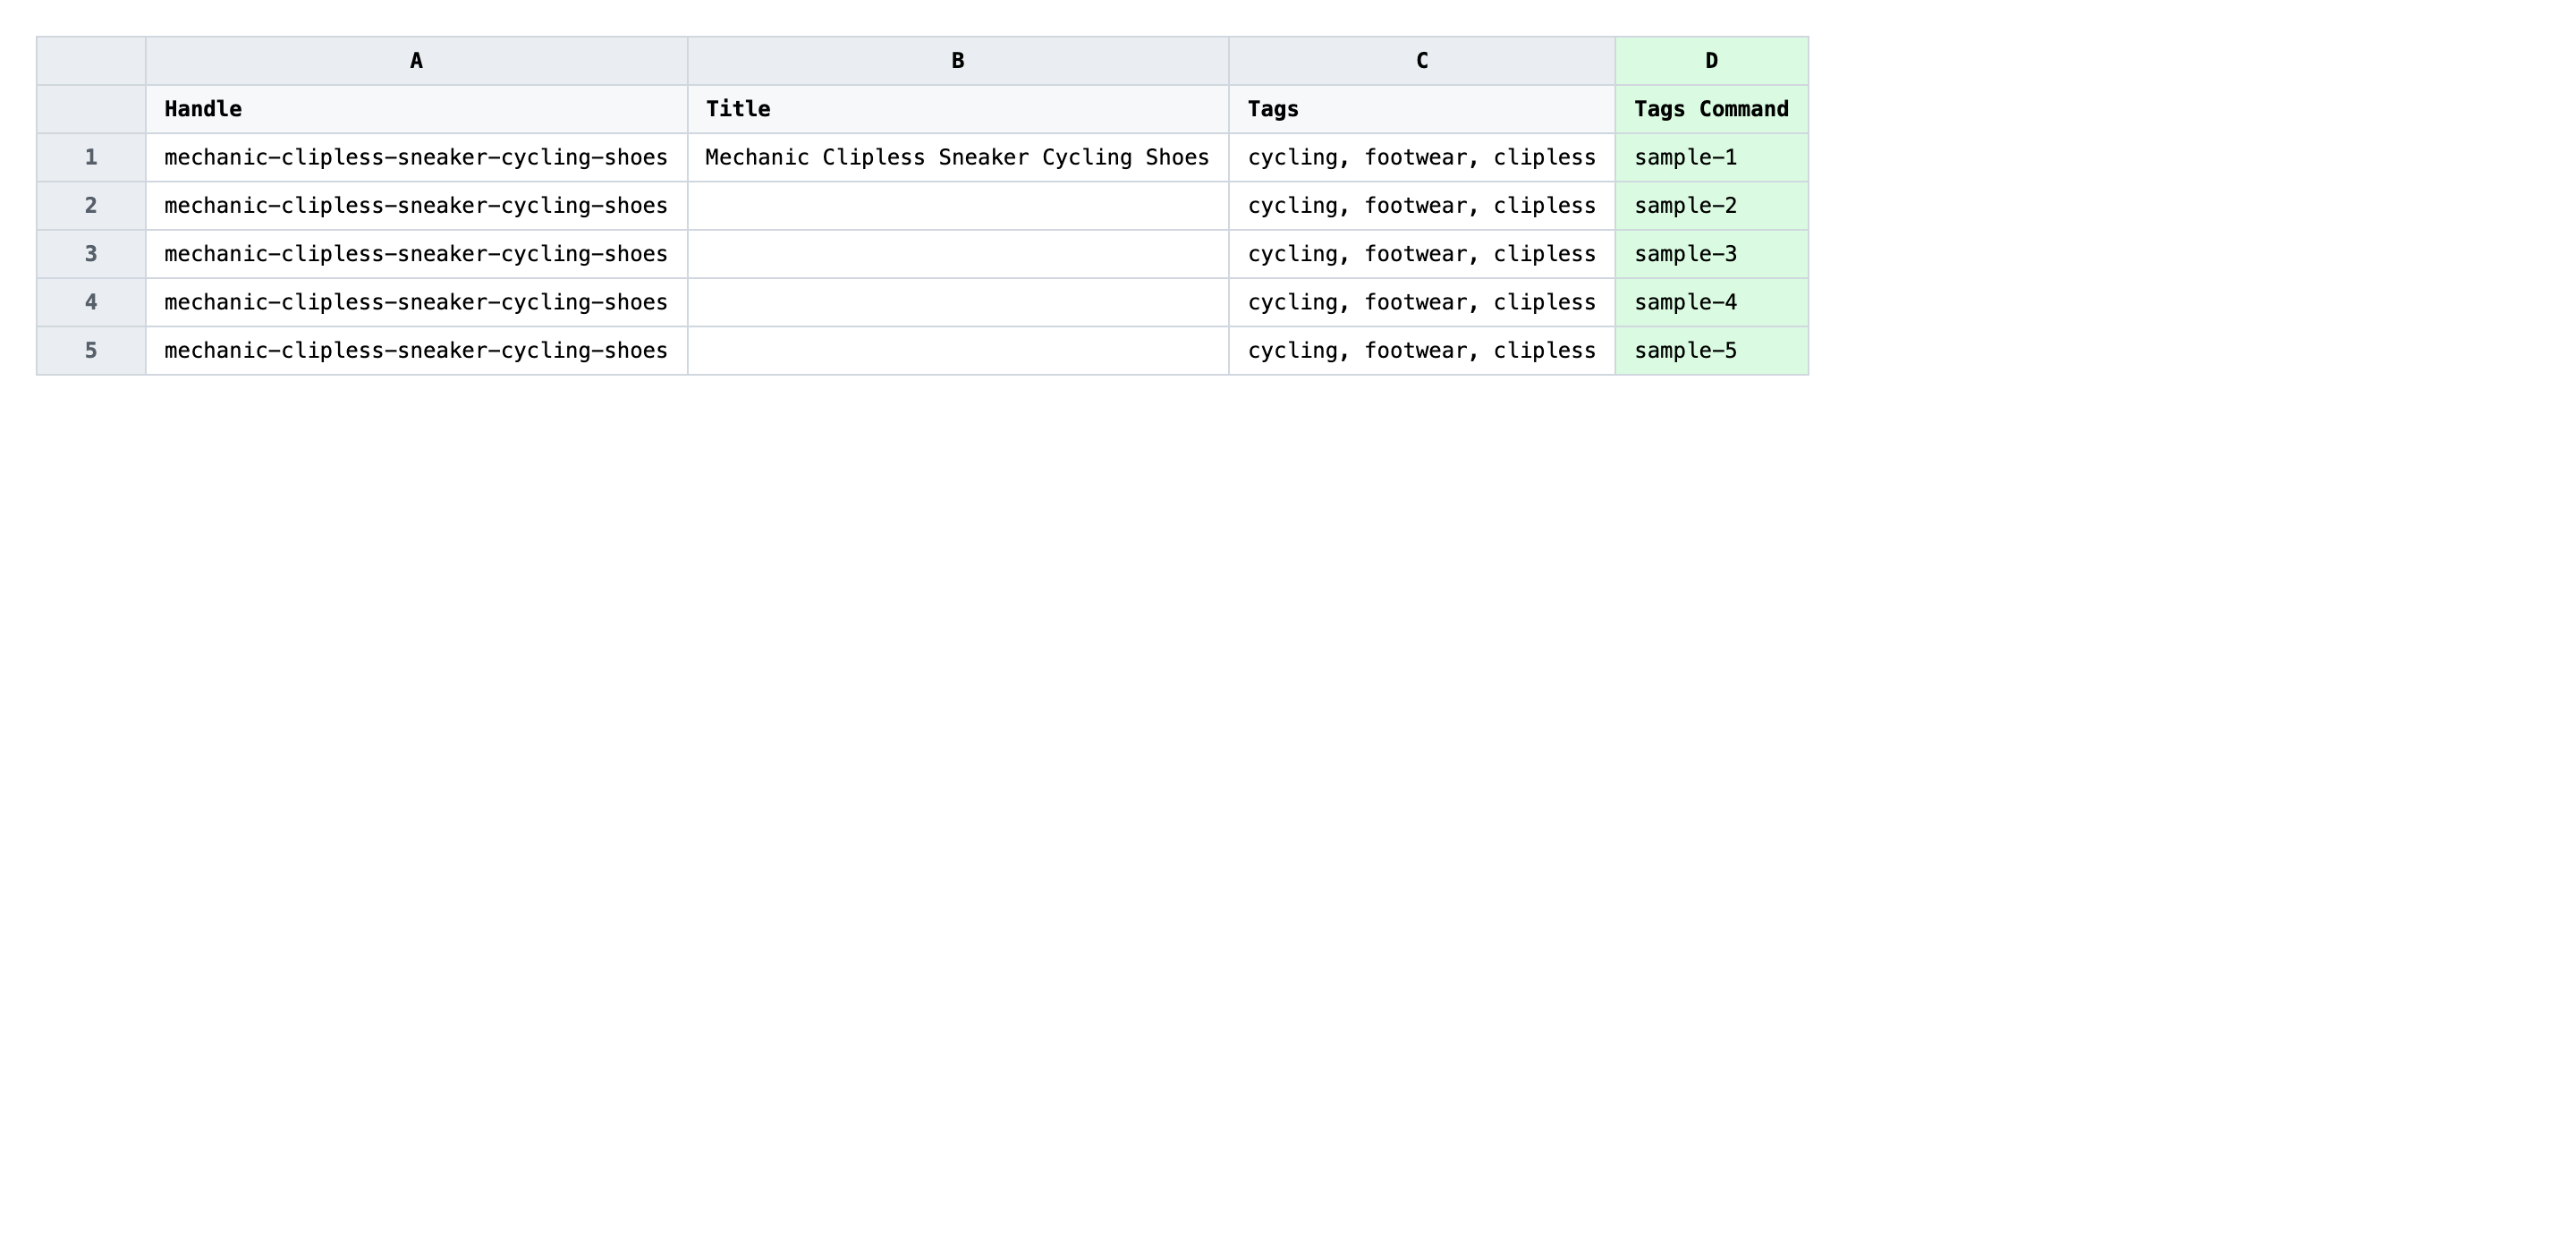
Save the file as CSV when you're done, and keep the original export handy in case you want to revert.
Tip: Sort or filter the spreadsheet by an existing tag before you start — it's far faster to apply the same MERGE value to a contiguous block of rows than to scan a 10,000-row file looking for the ones that need it.
Step 3 — Import the edited file back to Shopify
Open EditEngine → Import and select Advanced import. Then upload the file you just edited.
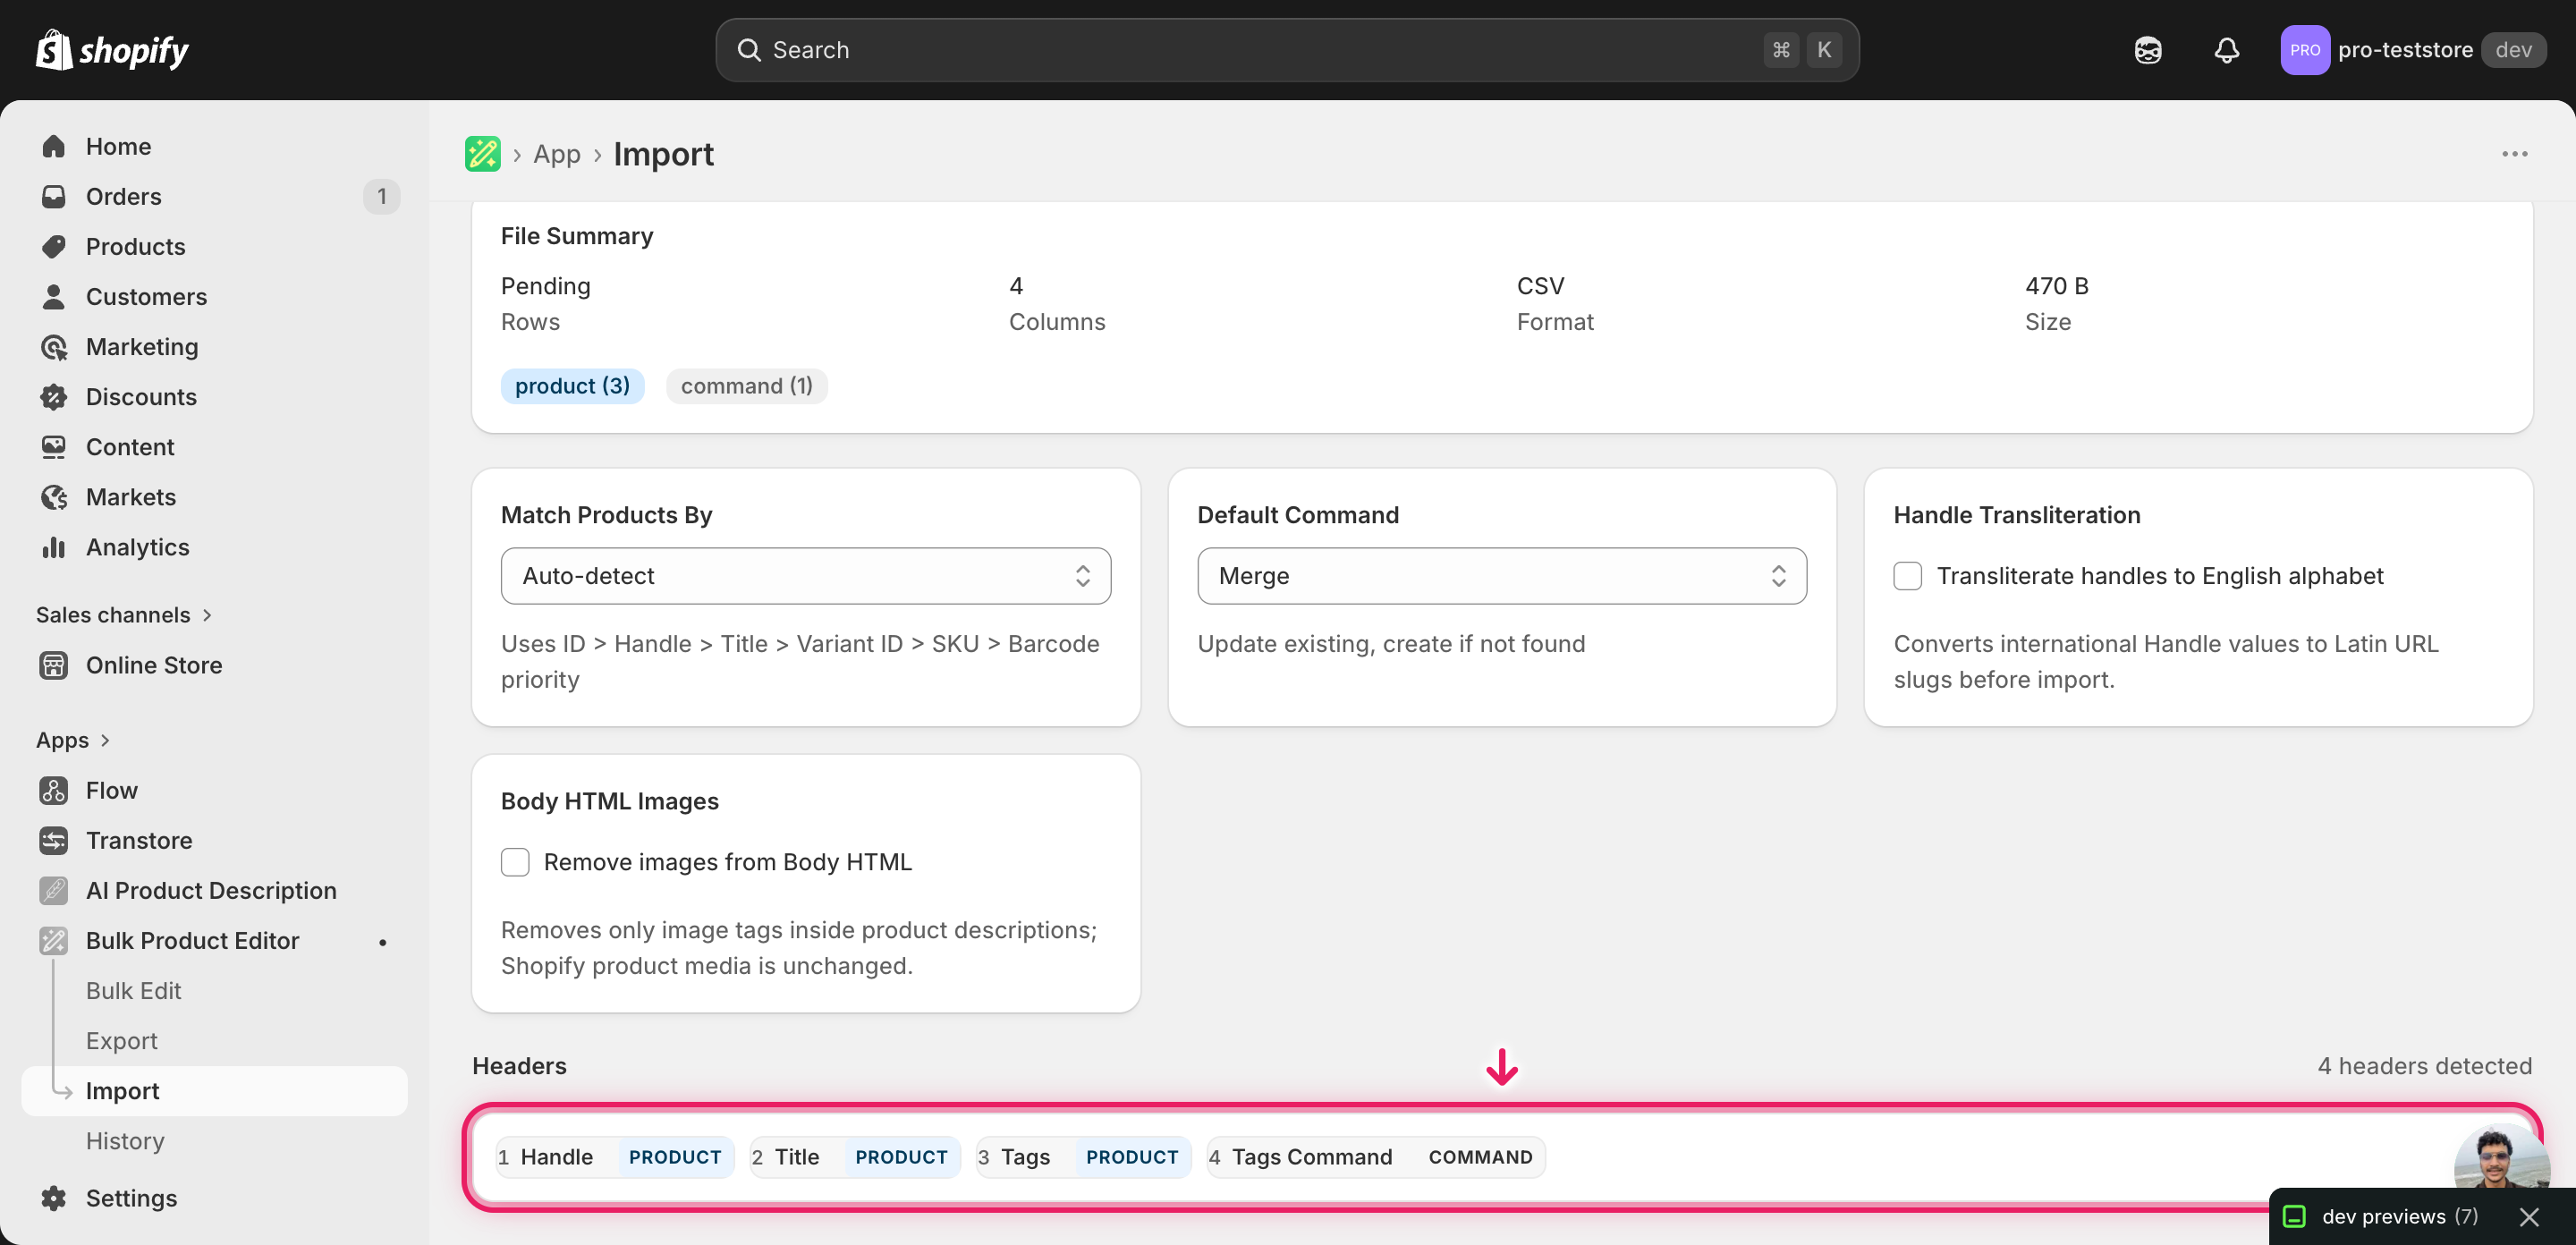
EditEngine reads the file and shows a summary. Check the Headers panel: Tags Command should be recognized as a command column (not a plain text field), and Tags should map as the tag list. Leave Match Products By on Auto-detect so it keys off Handle, and confirm the row count matches what you exported.
Note: REPLACE is destructive — a wrong value in the Tags column on a REPLACE row wipes that product's existing tags. Before you import the full file, copy two or three rows into a fresh CSV, import that subset first, and check those products in the Shopify admin. Only push the complete file once the small batch comes back clean. For pure MERGE files, the risk is lower but the same small-batch habit catches a misnamed header or a stray REPLACE value.
Click Start Import and wait for the job to finish — a small file takes seconds, larger catalogs a couple of minutes. When it completes, EditEngine shows a per-row summary.
Download the results CSV. It lists every row with a pass/fail status — that file is your proof the change went through, and the new values are now live in your Shopify admin.
Tips and troubleshooting
MERGE adds, REPLACE overwrites — pick on purpose. MERGE keeps every existing tag and adds the ones you list. REPLACE throws away the current list and pins exactly what's in your Tags cell. Mixing them in the same file is fine and often what you want — just never use REPLACE with an empty Tags cell, because that empties the product's tags. Read every REPLACE row before you import.
The Tags column and the Tags Command column do different jobs. Tags is the data — the actual list of tag strings. Tags Command is the verb — how to apply that data to the product. Native Shopify CSV imports only have the Tags column, which is why they always overwrite. EditEngine's Tags Command column is what lets you bulk add or replace Shopify tags using the Tags Command column without rewriting the whole list on every product.
To remove one tag, REPLACE with the rest. There is no REMOVE value on this column — the directive is set-level, not tag-level. If a product carries summer, sale, clearance, mens and you want to drop clearance, set Tags Command to REPLACE and put summer, sale, mens in the Tags column. A spreadsheet formula that strips one tag from a comma-separated list does this across thousands of rows in one pass.
Dry-run with a 2-3 row subset before the full import. EditEngine's advanced import doesn't have a one-click dry-run for tags. The practical substitute is to save a copy of your CSV with only two or three rows, import that, check the products in the Shopify admin, then import the full file. That catches a wrong command value, a renamed header, or a Handle typo before it touches your whole catalog.
Frequently asked questions
How do I bulk add or replace tags using the Tags Command column in Shopify?
Export your products from EditEngine with the Handle, Tags, and Tags Command columns, then set each row's Tags Command to MERGE (to add) or REPLACE (to overwrite) and import the file back. That round-trip is how you bulk add or replace Shopify tags using the Tags Command column without touching products one by one in the admin.
Can I edit Shopify tags with a command column in a spreadsheet?
Yes. EditEngine exports one row per product with the current Tags and an empty Tags Command, and you fill in the command per row in Excel or Google Sheets. Shopify's native importer has no equivalent directive, which is what makes the Tags Command workflow worth the round-trip.
How long does a bulk tag command import take in Shopify?
A few dozen products finish in seconds and a few thousand take a minute or two. EditEngine streams the file so even ten-thousand-row catalogs complete without timing out when you bulk add or replace Shopify tags using the Tags Command column. The results CSV shows the exact duration for your job.
What format does Shopify accept for tag command imports?
A CSV or XLSX with a Handle column to match each product, a Tags column carrying the comma-separated list, and a Tags Command column set to MERGE or REPLACE per row. EditEngine's advanced import reads this format directly and applies the command logic per row.
Can I undo a bulk Shopify tag update?
There is no one-click undo, but the original export is your backup: keep it, and to revert just re-import that file with every Tags Command set to REPLACE. That re-pins each product to its pre-edit tag list when you bulk add or replace Shopify tags using the Tags Command column.
Related tutorials
About EditEngine: EditEngine Bulk Product Editor helps Shopify merchants bulk edit, bulk import, and bulk export their product catalog in minutes instead of days. Install on Shopify →