
Products
How to Bulk Replace Shopify Entire Product Records
Last updated
Need to bulk replace Shopify entire product records — title, description, price, tags, SEO — without touching each product by hand? The EditEngine Bulk Product Editor turns the round-trip into one spreadsheet pass: export every field you care about, rewrite the rows, and re-import with the Command column set to REPLACE. EditEngine wipes each matched product back to a clean slate and rewrites it from your file, so the catalog ends up exactly as the spreadsheet describes.
What you'll learn
- Export every product with its current entire product records
- Edit entire product records per row in a spreadsheet
- Import the updated file back to Shopify
What you'll need
- The EditEngine Bulk Product Editor app installed in your Shopify store
- At least one product in the store you're willing to overwrite end-to-end
- A recent, untouched export saved as your rollback file before you change anything
- The Advanced import flow — the REPLACE command is advanced-import only
- A spreadsheet editor (Excel, Google Sheets, Numbers — anything that opens CSV)
REPLACE is the most destructive of Shopify's import commands. Where MERGE only overwrites the columns present in your file, REPLACE first clears every field on the matched product — including columns you didn't export — and then writes back whatever the row contains. That's the right tool when you're re-platforming a catalog or scrubbing legacy data, and the wrong tool when you only want to change a handful of fields. If in doubt, use MERGE instead and read the Shopify product CSV reference before committing.
Step 1 — Export your Shopify entire product records
Open EditEngine and go to the Export page. Tick every column you want the new file to control after the replace.
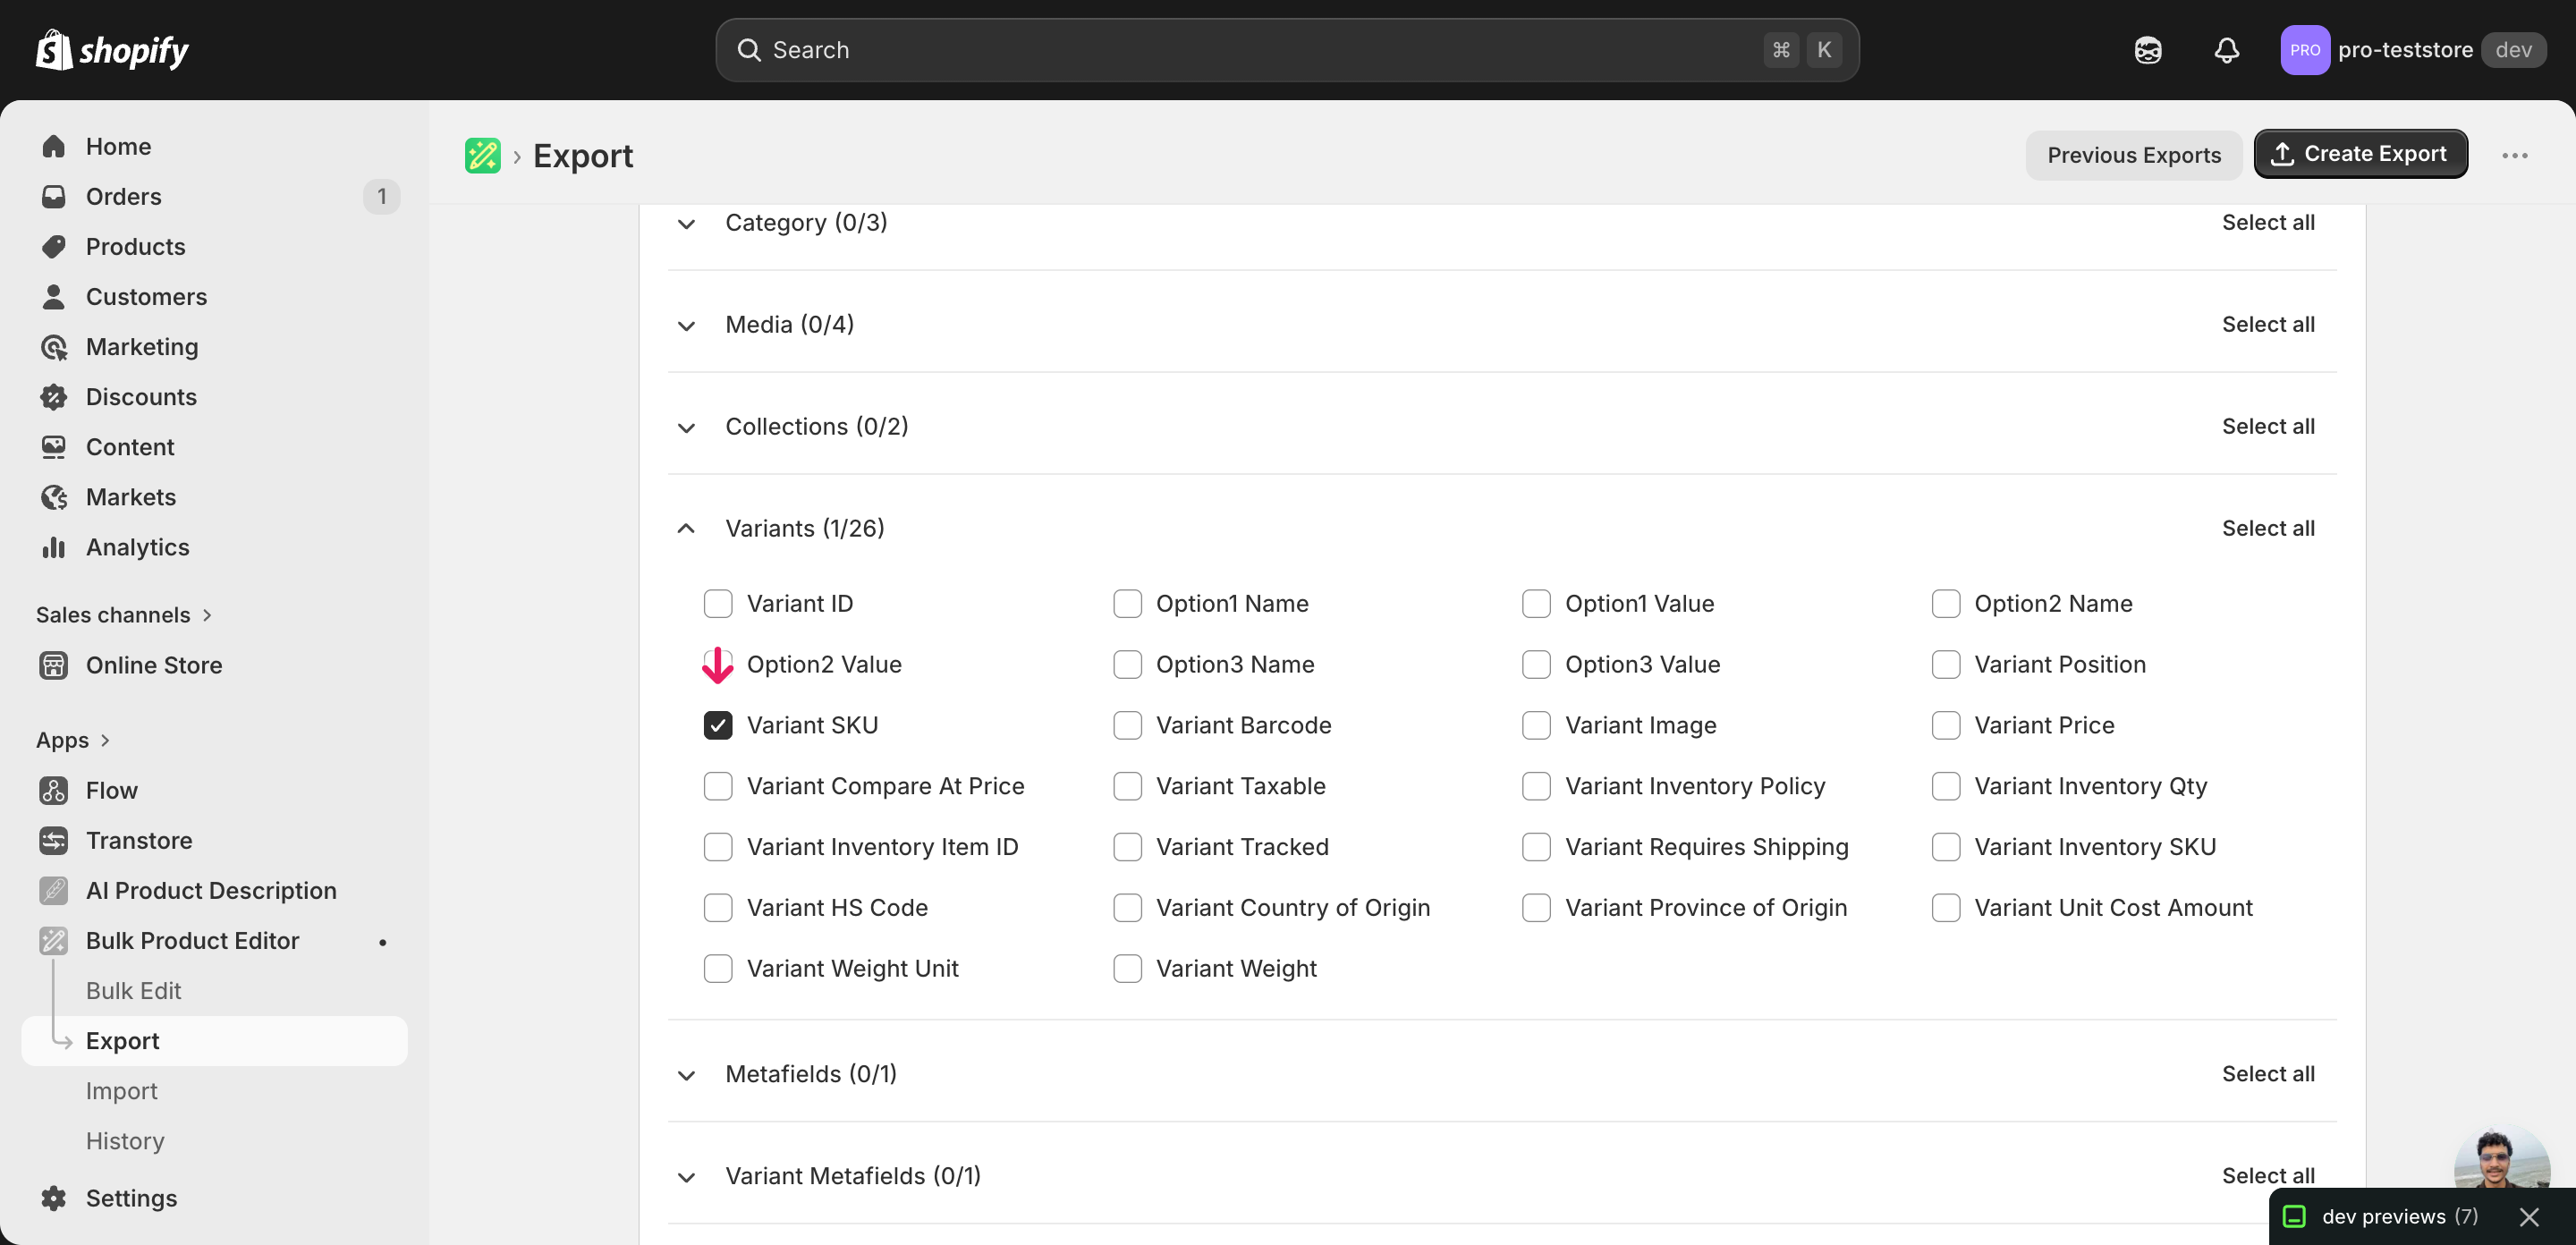
Pick the right columns
- Handle — the unique product identifier the importer uses to match each row back to the right product. Never edit this column.
- Variant SKU — the secondary match key for variant rows so REPLACE rewrites the correct variant when a product has more than one.
- Command — the column that tells the importer what to do. You'll set this to REPLACE in Step 2 for every row you want overwritten.
- Title, Body (HTML), Vendor, Type, Tags, Status — the core product fields. Anything you leave out of the export — and therefore out of the import file — gets cleared on the live product when REPLACE runs.
- Variant Price, Variant Compare At Price, Variant SKU, Variant Barcode, Variant Inventory Qty — the variant-level fields. Export every variant column you want preserved or rewritten, because REPLACE blanks the rest.
- SEO Title, SEO Description, Image Src, Image Alt Text — the storefront-facing fields. Include these so SEO and media survive the replace instead of being wiped along with everything else.
When the export completes, click Download and immediately save a second copy named something like rollback-YYYY-MM-DD.csv. That untouched file is your only way back if a REPLACE goes wrong — keep it somewhere you won't accidentally edit it.
New to exporting? This guide assumes you know how to run an export and focuses only on the columns and edit unique to this workflow.
Step 2 — Bulk replace Shopify entire product records in your spreadsheet
Open the downloaded CSV in Excel or Google Sheets. Every product is one row (with extra rows for additional variants and images), and the Command column is the switch that turns this from a read-only export into a destructive rewrite.
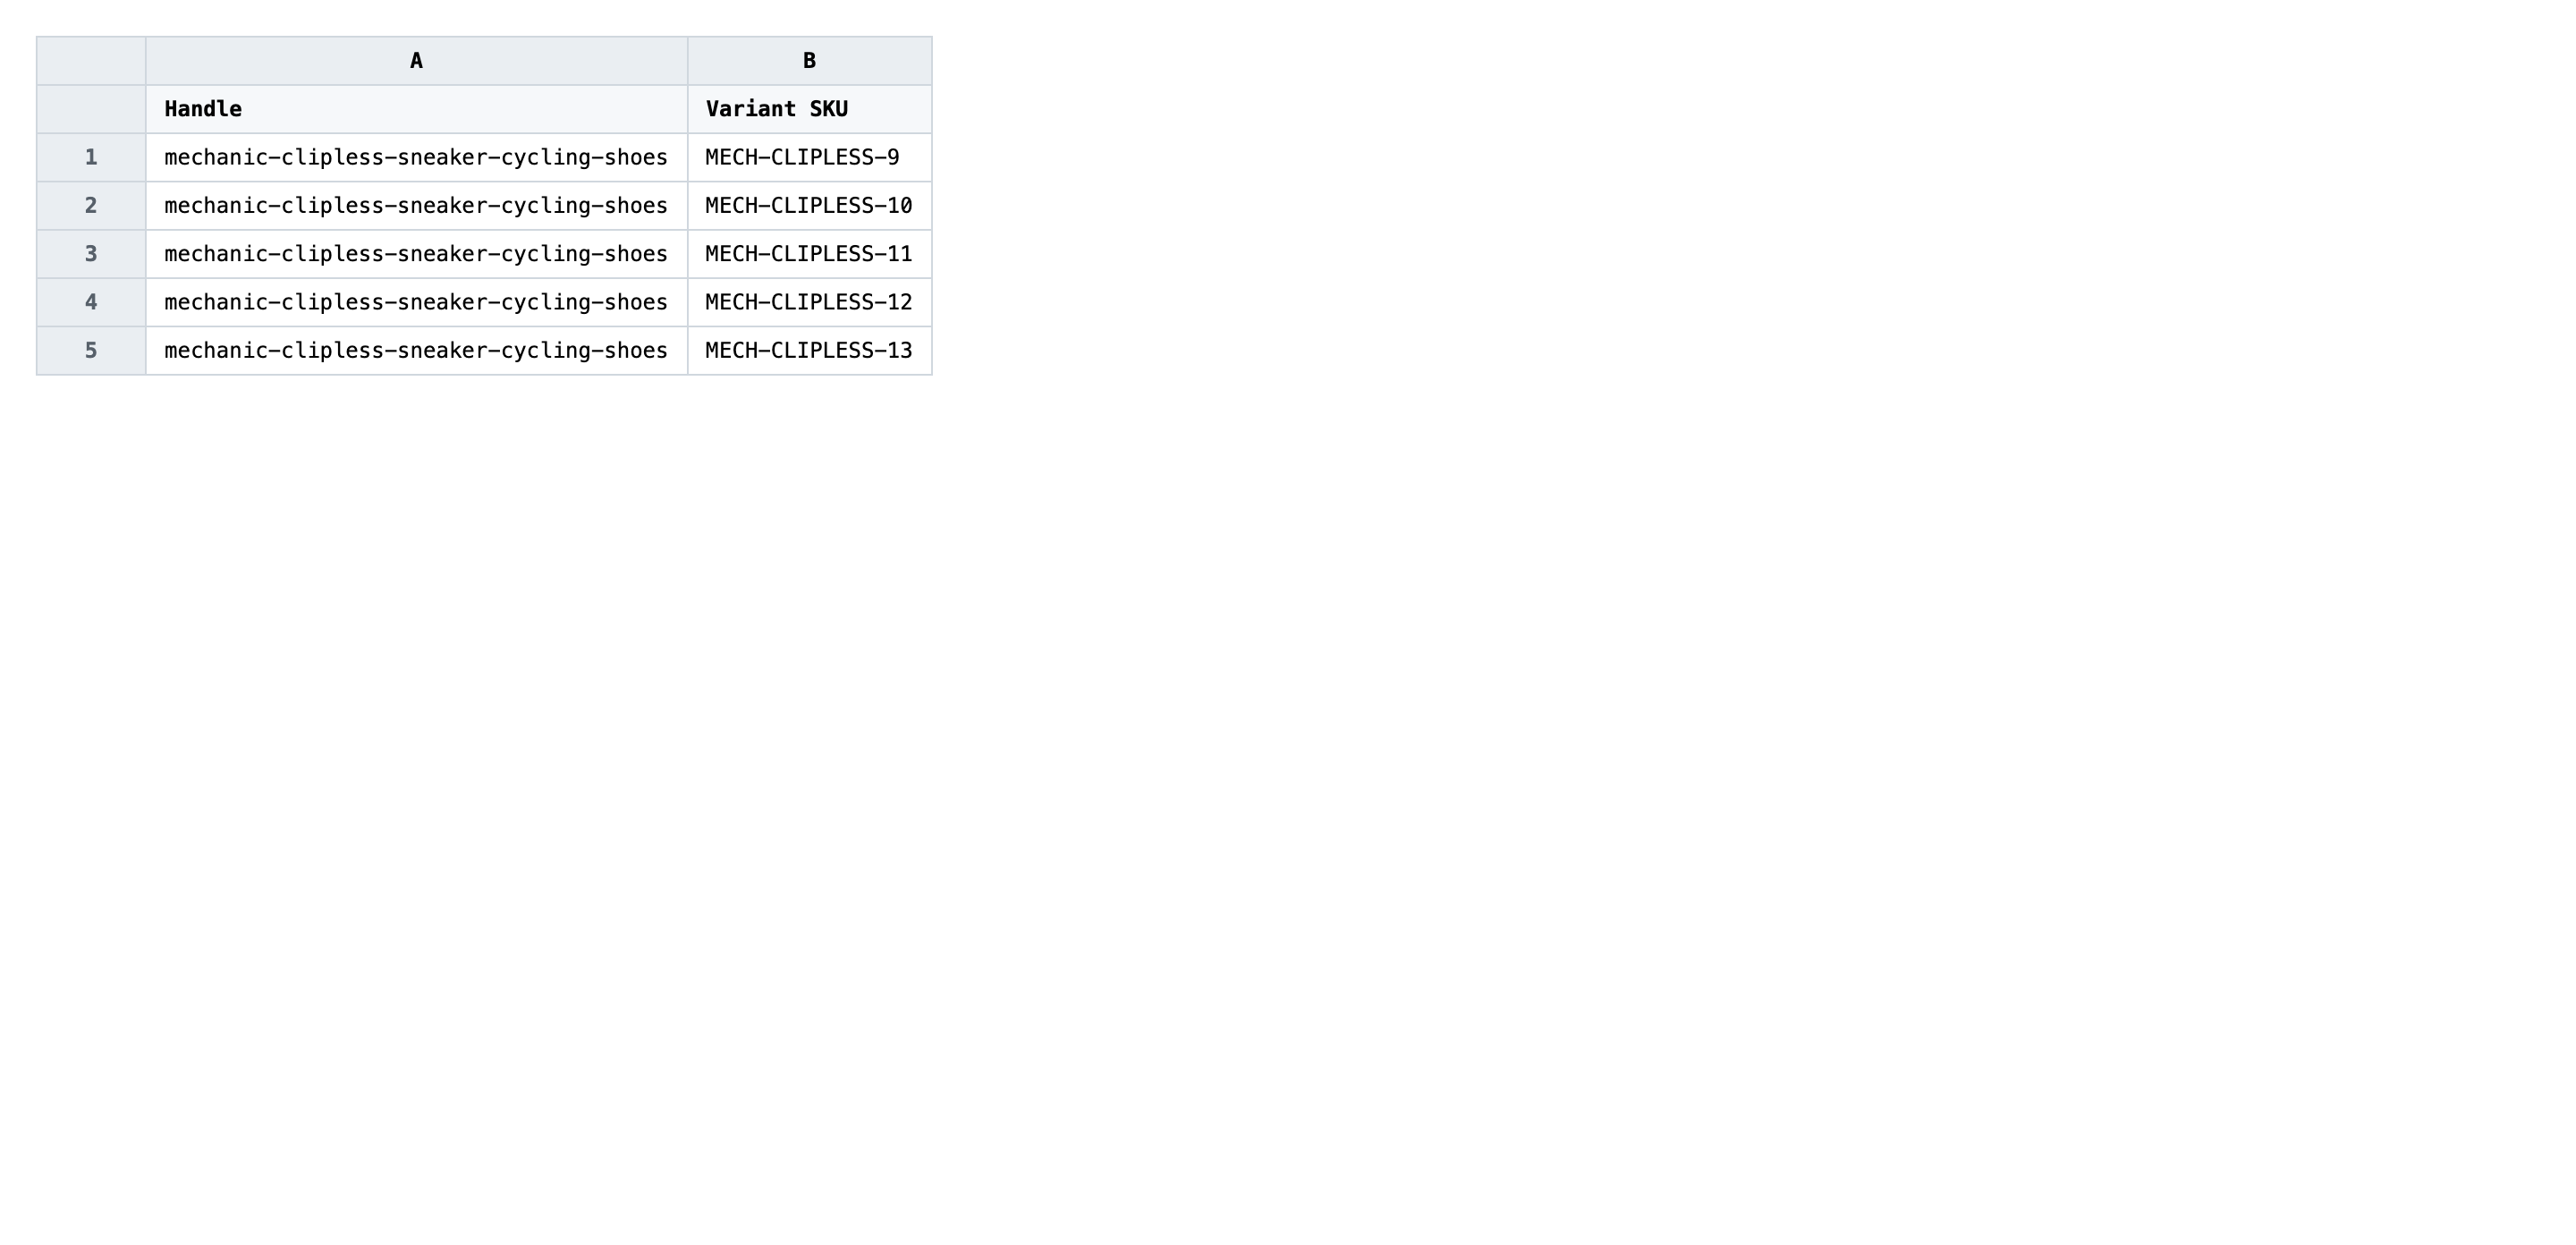
Set the Command column to REPLACE on every row you want overwritten, then rewrite the other columns with the values you want live — new titles, descriptions, prices, tags, SEO, whatever the project calls for. Every column you leave blank will be cleared on the live product when the import runs, so fill in anything you want to keep. For variant rows, repeat the Handle and set Command to REPLACE on each variant line.
- ✅
REPLACE - ❌
Replace product / replace / REPLACE ALL
Never edit the Handle or Variant SKU columns — those are the match keys that tie each row to a real product in Shopify. Change them and REPLACE either misses the product (no-op) or hits the wrong one (data loss). If a row has a Handle but blank variant fields, leave it alone unless you genuinely want that variant cleared. Treat empty cells as deletions, not as "no change".
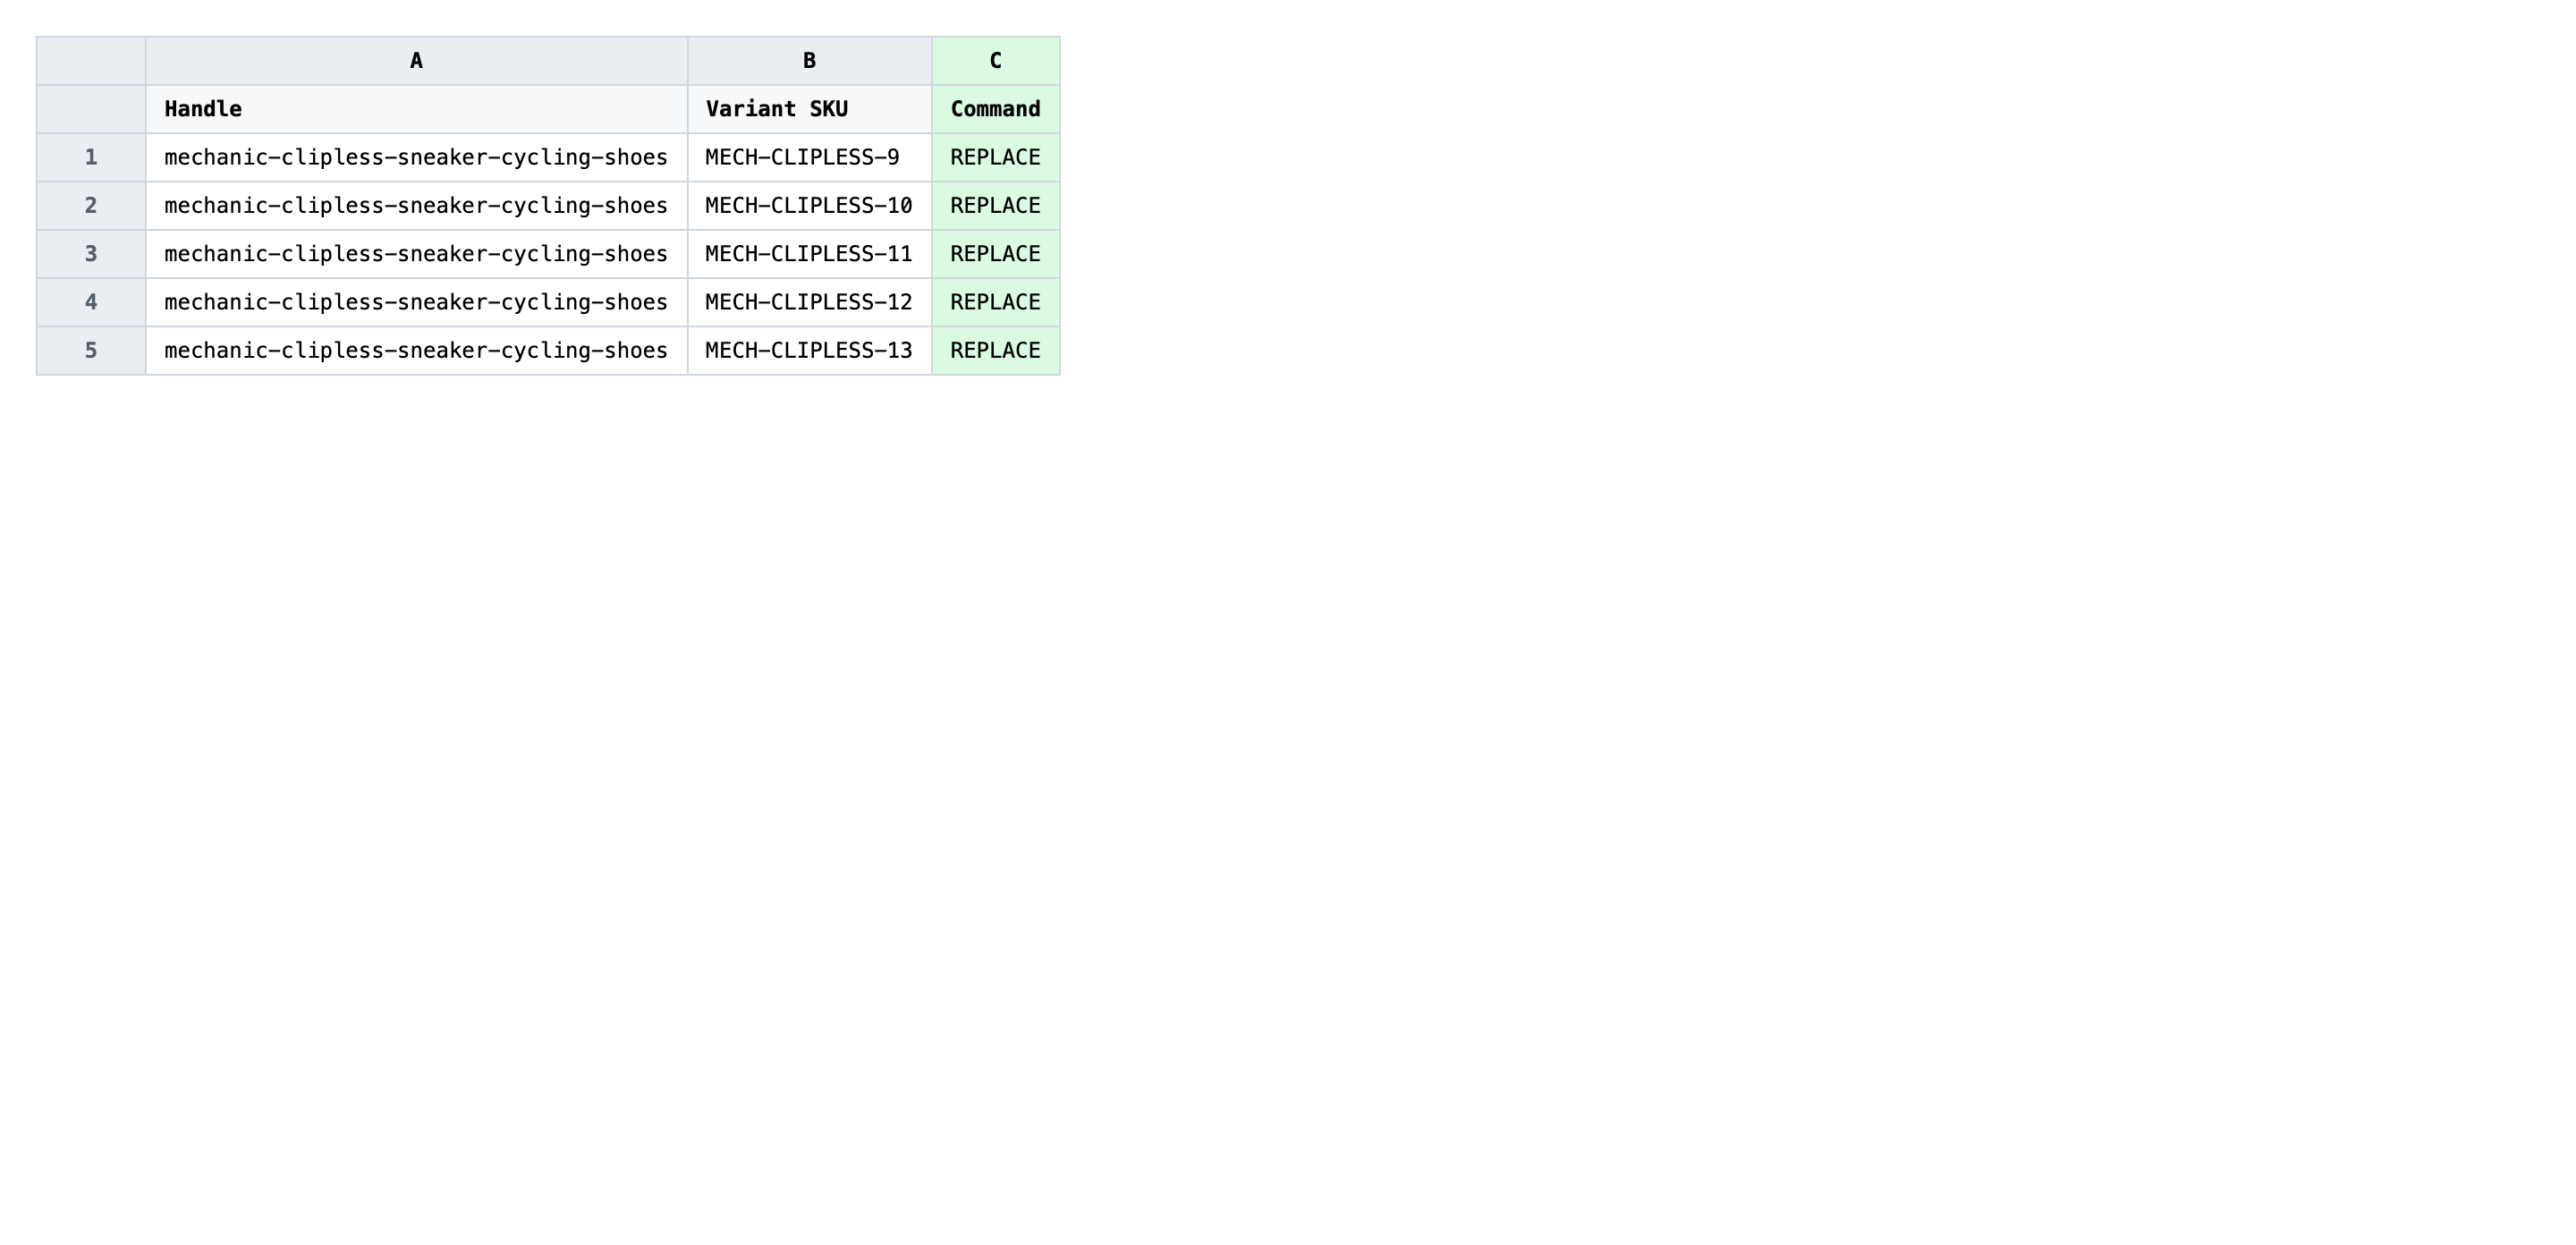
Save the file as CSV when you're done, and keep the original export handy in case you want to revert.
Tip: Blank cells under REPLACE mean "clear this field", not "leave it alone" — if you only exported half the columns, the unexported half gets wiped on import.
Step 3 — Import the edited file back to Shopify
Open EditEngine → Import and select Advanced import. Then upload the file you just edited.
EditEngine reads the file and shows a header summary. Confirm the Command column is detected and that Match Products By is set to Handle (or Auto-detect). Scan the headers panel for any column flagged as unrecognized — a typo there means that field won't be written, and under REPLACE that translates to a cleared value on the live product.
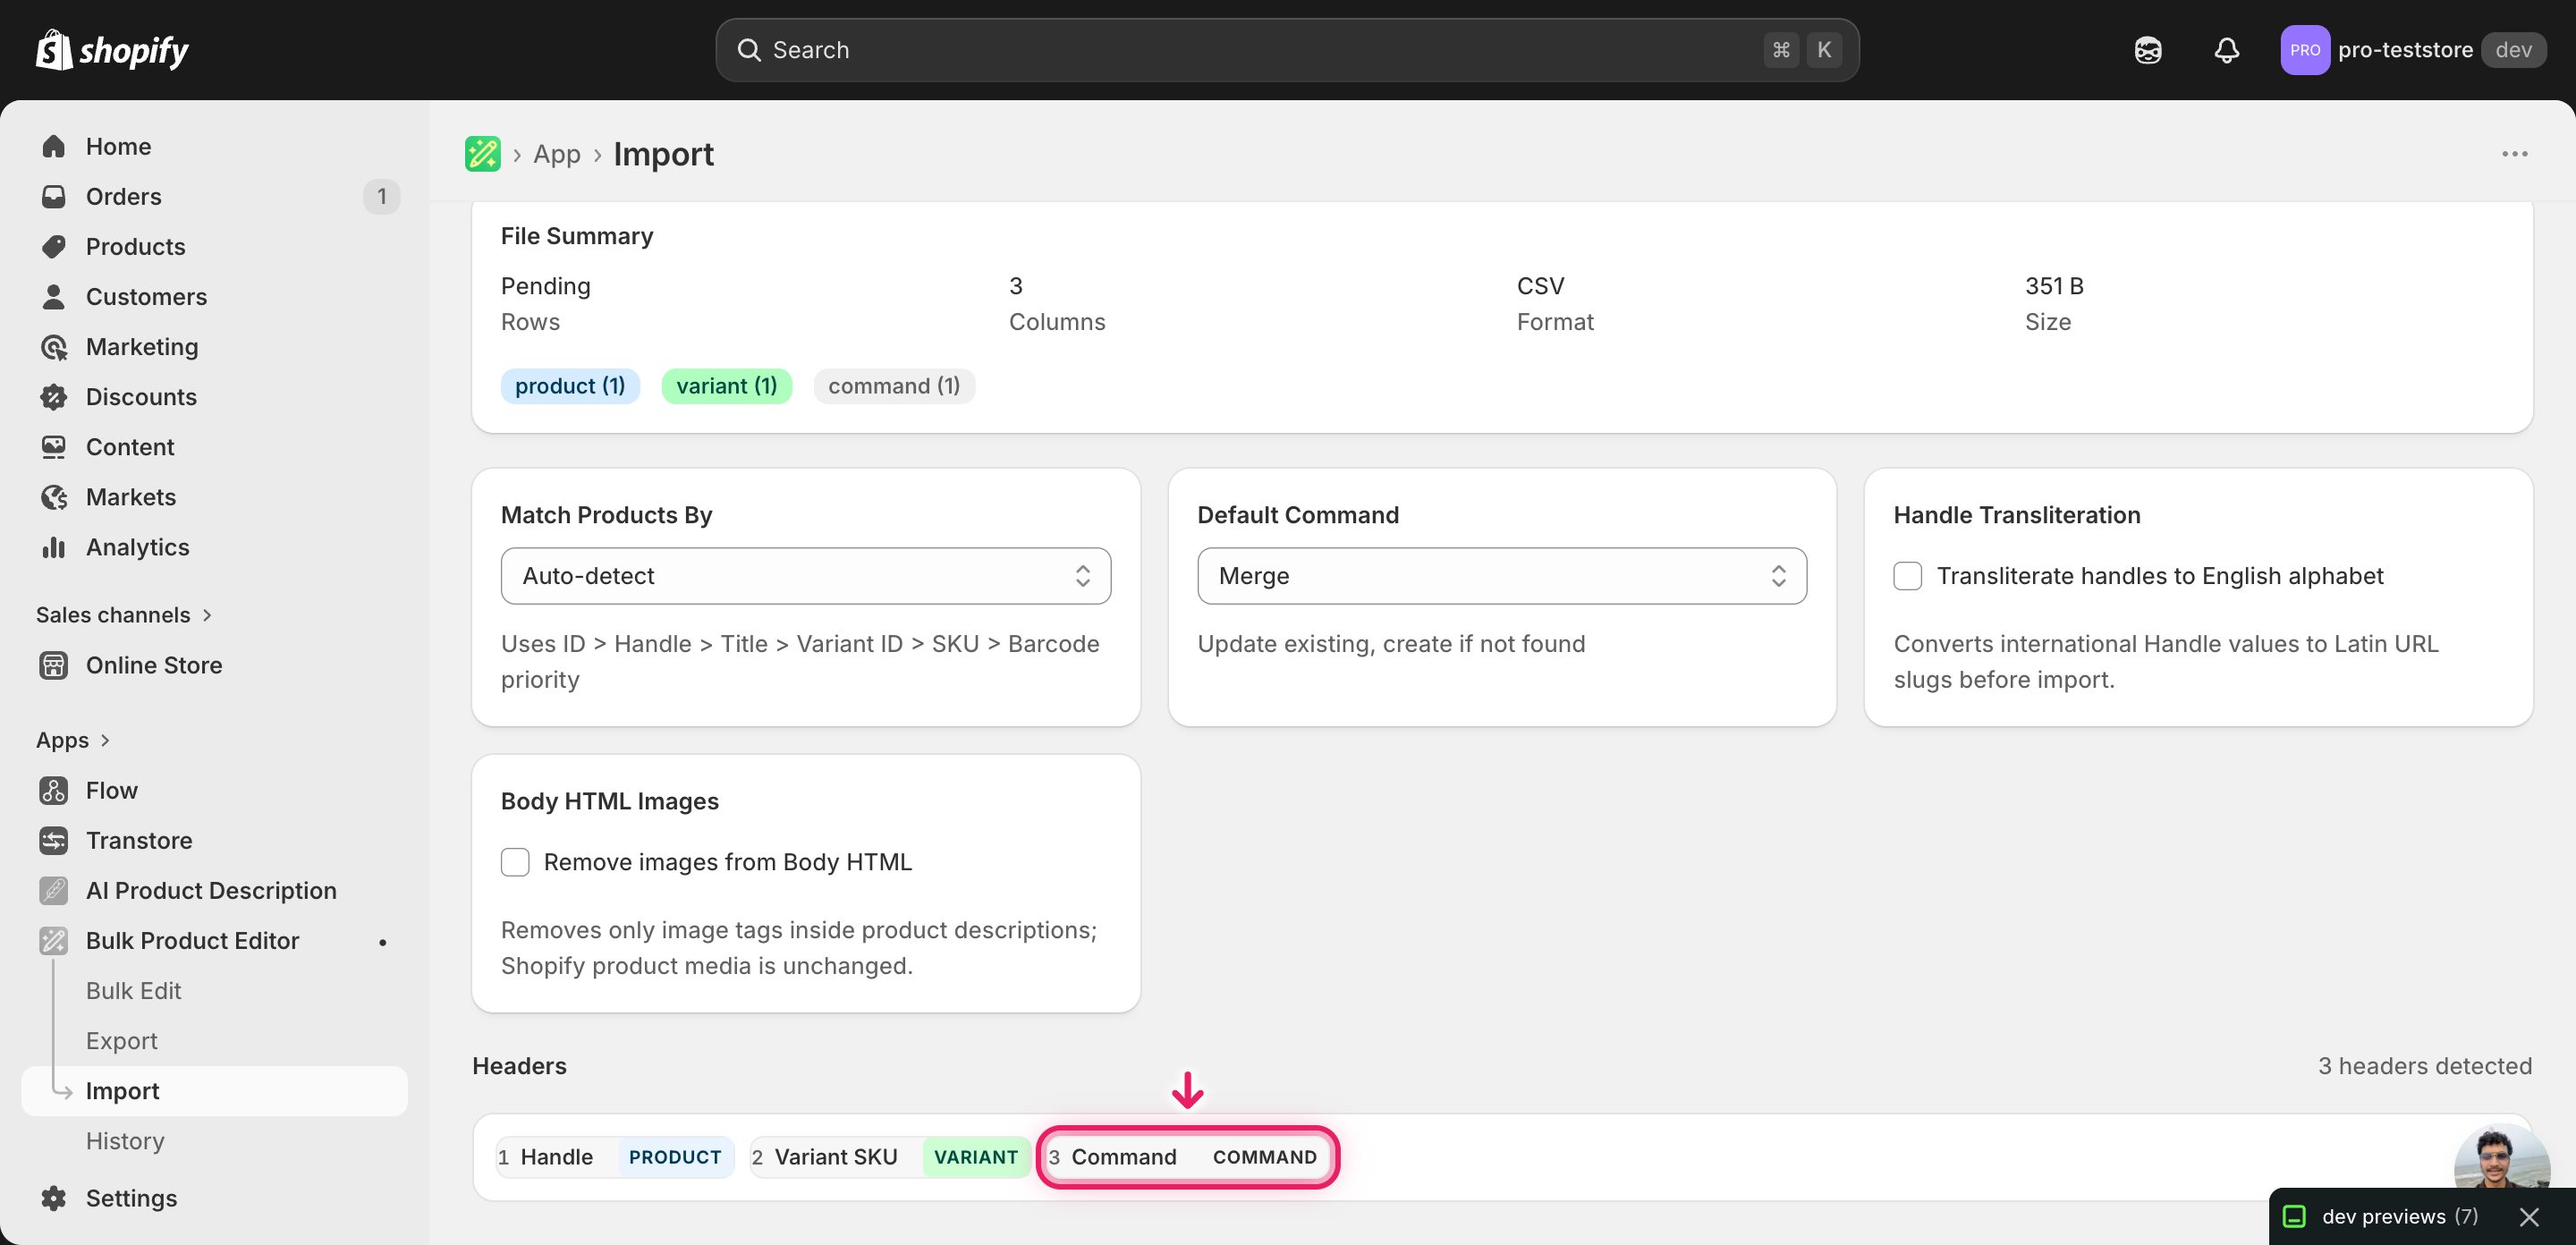
Note: REPLACE is destructive — it wipes each matched product before rewriting it, and there is no built-in undo. Always test on a tiny batch first: duplicate your file, keep only two or three rows, and run that import end-to-end. Open the affected products in the Shopify admin, confirm every field looks right, then come back and import the full file. Skipping this step on a real catalog is how merchants lose descriptions, SEO, and tags in one click.
Click Start Import and wait for the job to finish — a small file takes seconds, larger catalogs a couple of minutes. When it completes, EditEngine shows a per-row summary.
Download the results CSV. It lists every row with a pass/fail status — that file is your proof the change went through, and the new values are now live in your Shopify admin.
Tips and troubleshooting
REPLACE clears anything you didn't export. This is the single biggest footgun in the bulk replace Shopify entire product records workflow. The importer treats your file as the new truth: any column missing from the file is treated as "clear this field". If you exported only Handle, Title, and Price and then ran REPLACE, every product would lose its body HTML, tags, SEO, vendor, and type. Export every column you want to keep, even if you aren't changing it.
Keep two copies of the export — one to edit, one to roll back to. There is no undo button on a REPLACE. The only way back to the prior state is re-importing the original, unedited export with Command set to REPLACE. Save that file with a clear name (rollback-2025-06-05.csv) and leave it untouched. If a teammate opens the wrong copy and starts editing, you've lost your safety net before you even ran the import.
Test REPLACE on two or three products before the full catalog. Duplicate your edited file, delete every row except two or three test products, and run that mini-import first. Open the test products in the Shopify admin and walk through every tab — General, Pricing, Inventory, SEO, Media. If anything looks blanked-out or wrong, you've caught it before it touches the rest of the catalog. Only then re-run the full file.
Match keys are not editable. Handle and Variant SKU are how the importer finds the existing product to replace. Edit those columns and you either create a brand-new product (Handle didn't exist) or no-op (Handle didn't match anything). Rename a product slug in the Shopify admin? Re-export before you import, because your old Handle is stale.
Frequently asked questions
How do I bulk replace entire product records in Shopify?
Export every column you care about from EditEngine, edit the rows in a spreadsheet, set the Command column to REPLACE, and import the file through the advanced import flow. That is how you bulk replace Shopify entire product records in one pass instead of editing fields one at a time in the admin.
Can I edit Shopify entire product records in a spreadsheet?
Yes. EditEngine exports one row per variant with every field you select, and you can rewrite titles, descriptions, prices, SEO, tags, and media in Excel or Google Sheets. Save the file as CSV and re-import it with the REPLACE command to bulk edit Shopify entire product records in place.
How long does a bulk entire product records import take in Shopify?
A handful of products replaces in well under a minute. Several hundred typically lands in a few minutes, and EditEngine streams larger files so a full-catalog bulk replace of Shopify entire product records finishes without timing out. The results CSV reports the exact duration.
What format does Shopify accept for entire product records imports?
A CSV or XLSX file with a Handle column for matching, a Command column set to REPLACE, and every other field column you want rewritten. EditEngine's advanced import reads the same Shopify entire product records CSV shape you exported, so a round-tripped file works without remapping.
Can I undo a bulk Shopify entire product records update?
There is no one-click undo for a REPLACE, which is why the unedited export is your safety net — re-import that original file with Command set to REPLACE and the products revert. Treat every bulk replace of Shopify entire product records as destructive until you have verified the rollback file is saved.
Related tutorials
- How to Bulk Create Shopify New Products From A Spreadsheet
- How to Bulk Delete Shopify Products By SKU Handle Barcode
About EditEngine: EditEngine Bulk Product Editor helps Shopify merchants bulk edit, bulk import, and bulk export their product catalog in minutes instead of days. Install on Shopify →