Products
How to Bulk Assign Different Shopify Theme Templates to Product Subsets
Last updated
Need to bulk assign Shopify different theme templates to different product subsets so gift cards, preorders, and bundles each render with their own custom layout? With EditEngine Bulk Product Editor, you export your catalog to a spreadsheet, set a Template Suffix per row, and import the file back. EditEngine applies each suffix to the matching product, and your storefront immediately uses the right template for every subset.
What you'll learn
- Export every product with its current Template Suffix
- Assign a different theme template per subset by editing the Template Suffix column
- Import the updated file back to Shopify and confirm each subset now renders with the right template
What you'll need
- The EditEngine Bulk Product Editor app installed in your Shopify store
- Your active Shopify theme already contains the alternate templates you want to assign — for example
product.gift-card.liquid,product.preorder.liquid, orproduct.bundle.liquidin the theme'stemplates/folder - A way to identify each product subset in the spreadsheet (Product Category, Type, Vendor, Tags, or a Handle prefix you can filter on)
- The Advanced import flow in EditEngine Bulk Product Editor
- A spreadsheet editor (Excel, Google Sheets, Numbers — anything that opens CSV)
Template Suffix is the part of a product template filename that follows product.. A suffix of gift-card points the product at product.gift-card.liquid in your theme; an empty suffix uses the default product.liquid. Shopify reads this single field to decide which Liquid template renders the product page, which is why a spreadsheet edit is enough to swap templates across hundreds of products at once.
Step 1 — Export your Shopify product Template Suffix column
Open EditEngine and go to the Export page. This is where you pick the columns that land in your spreadsheet.
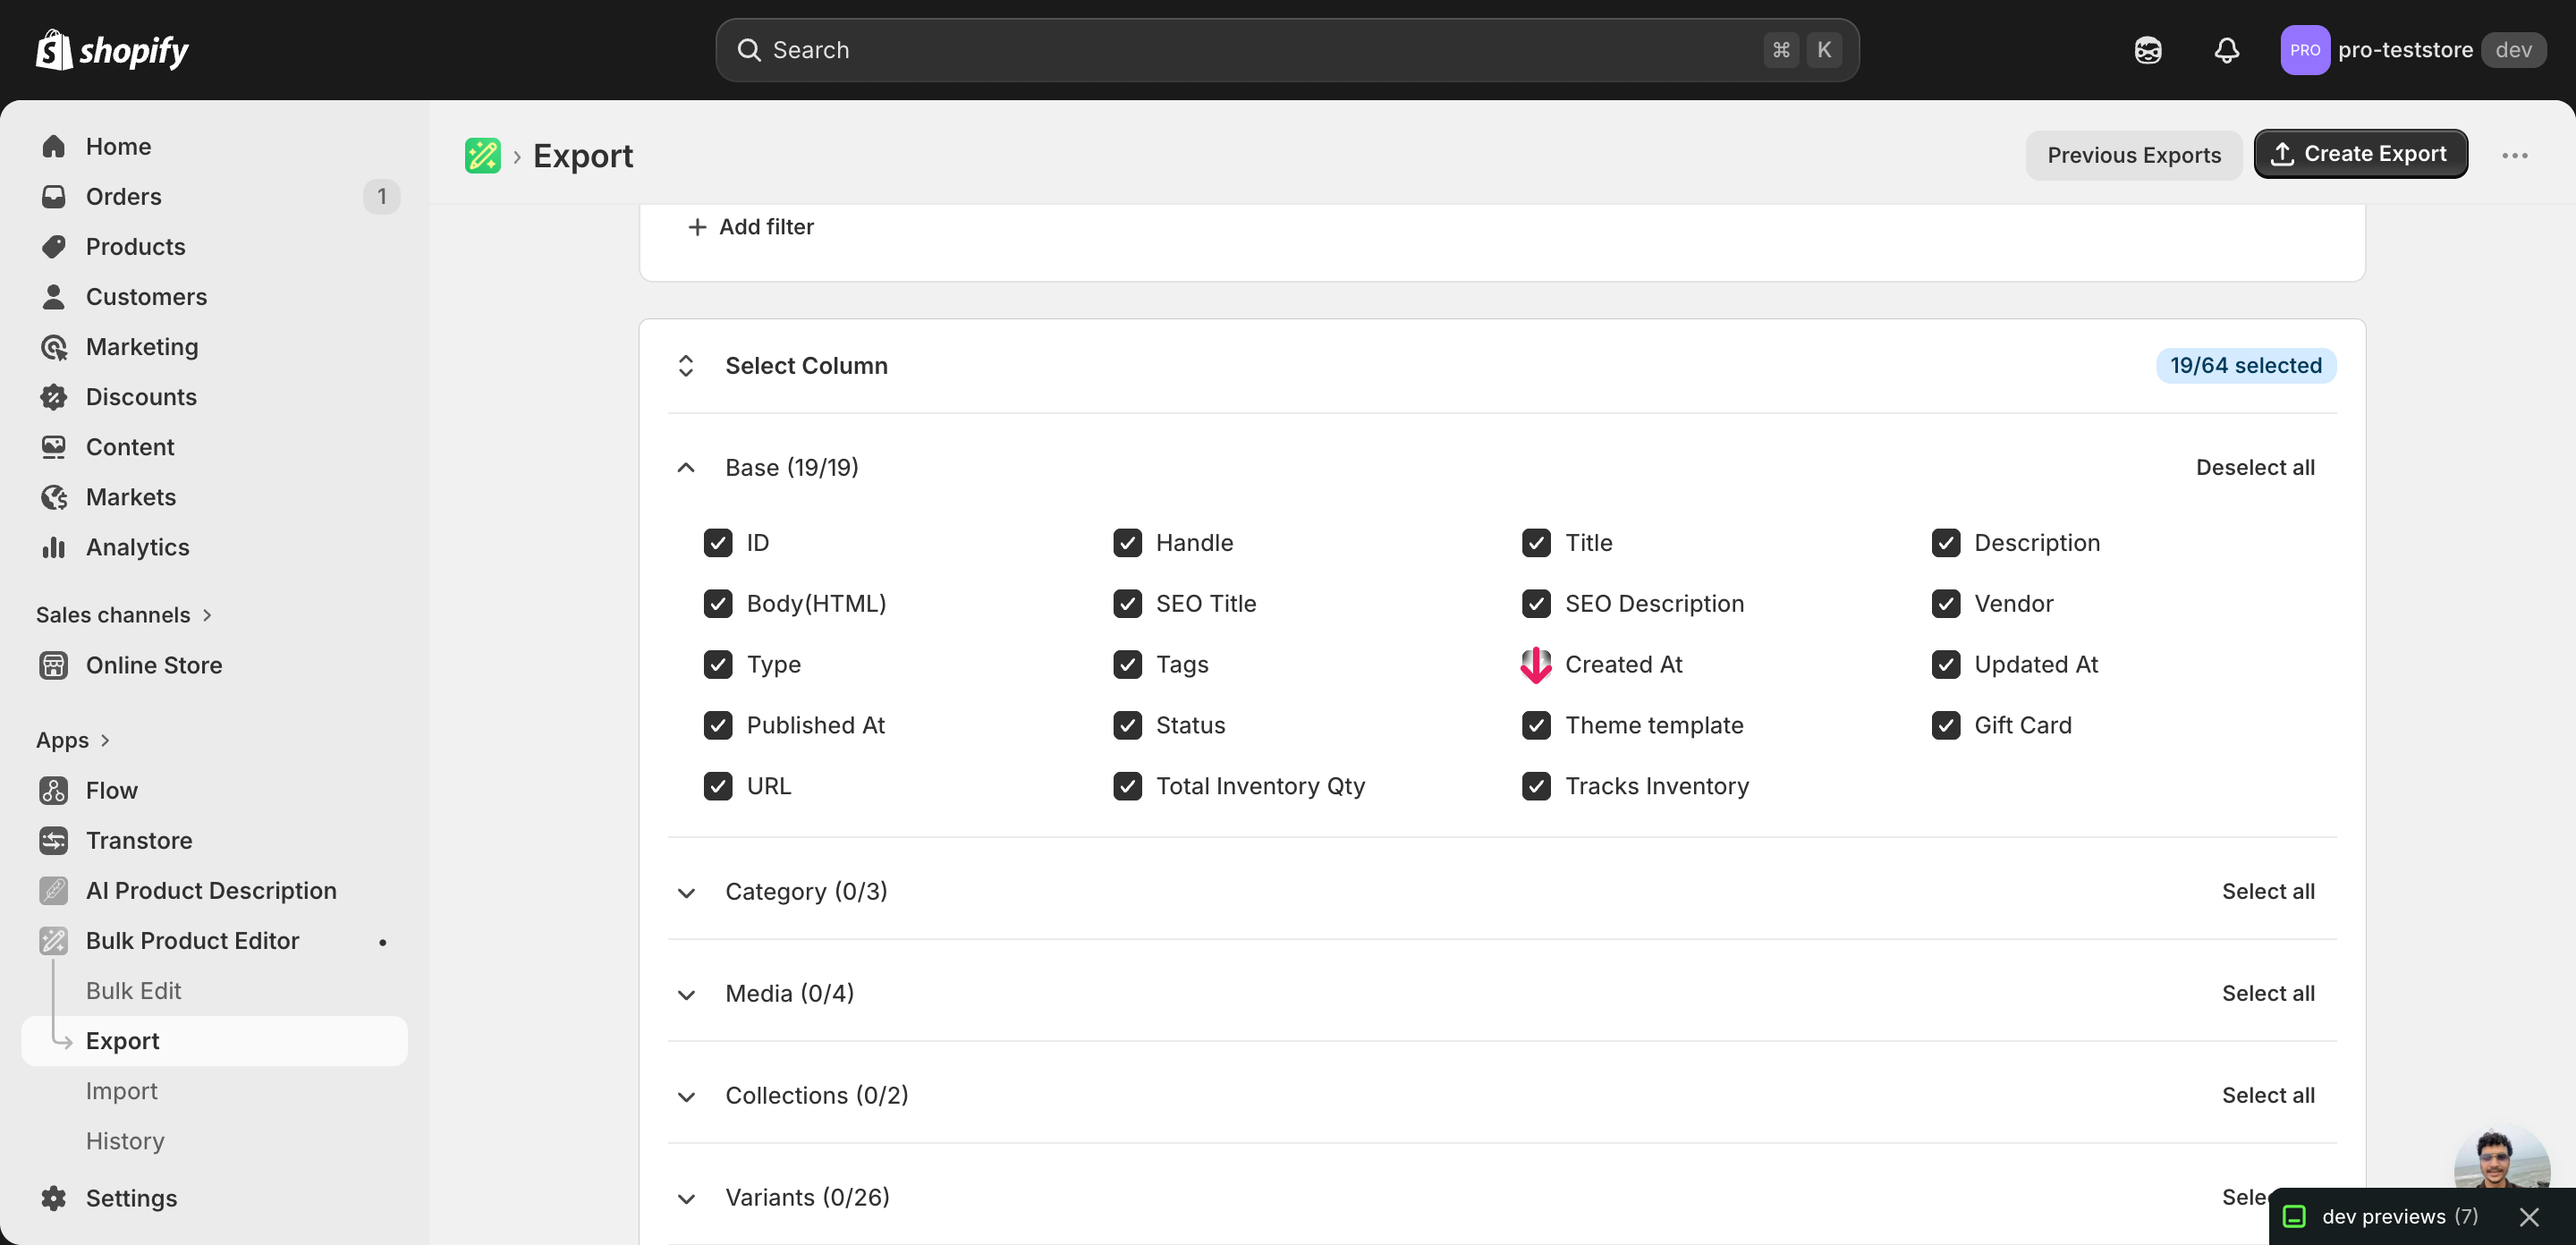
Pick the right columns
- Handle — the unique product identifier the importer uses to match each row back to the right product.
- Title — context only, so you can see which product a row belongs to while you assign suffixes.
- Product Category — the column you'll filter or sort on to identify each subset before writing its Template Suffix. Type, Vendor, or Tags work the same way.
- Template Suffix — the column you'll edit. Expand the Online Store group and tick Template Suffix — the value here becomes the product's
templateSuffixin Shopify.
When the export completes, click Download. You'll get one row per product, with the current Template Suffix in the rightmost column — blank rows are products on the default product.liquid template, and that's normal.
New to exporting? This guide assumes you know how to run an export and focuses only on the columns and edit unique to this workflow.
Step 2 — Bulk assign Shopify different theme templates to different product subsets in your spreadsheet
Open the downloaded CSV in Excel or Google Sheets. Sort or filter by Product Category (or Type, Vendor, Tags — whichever defines your subsets), then set the Template Suffix column to the right value for each group.
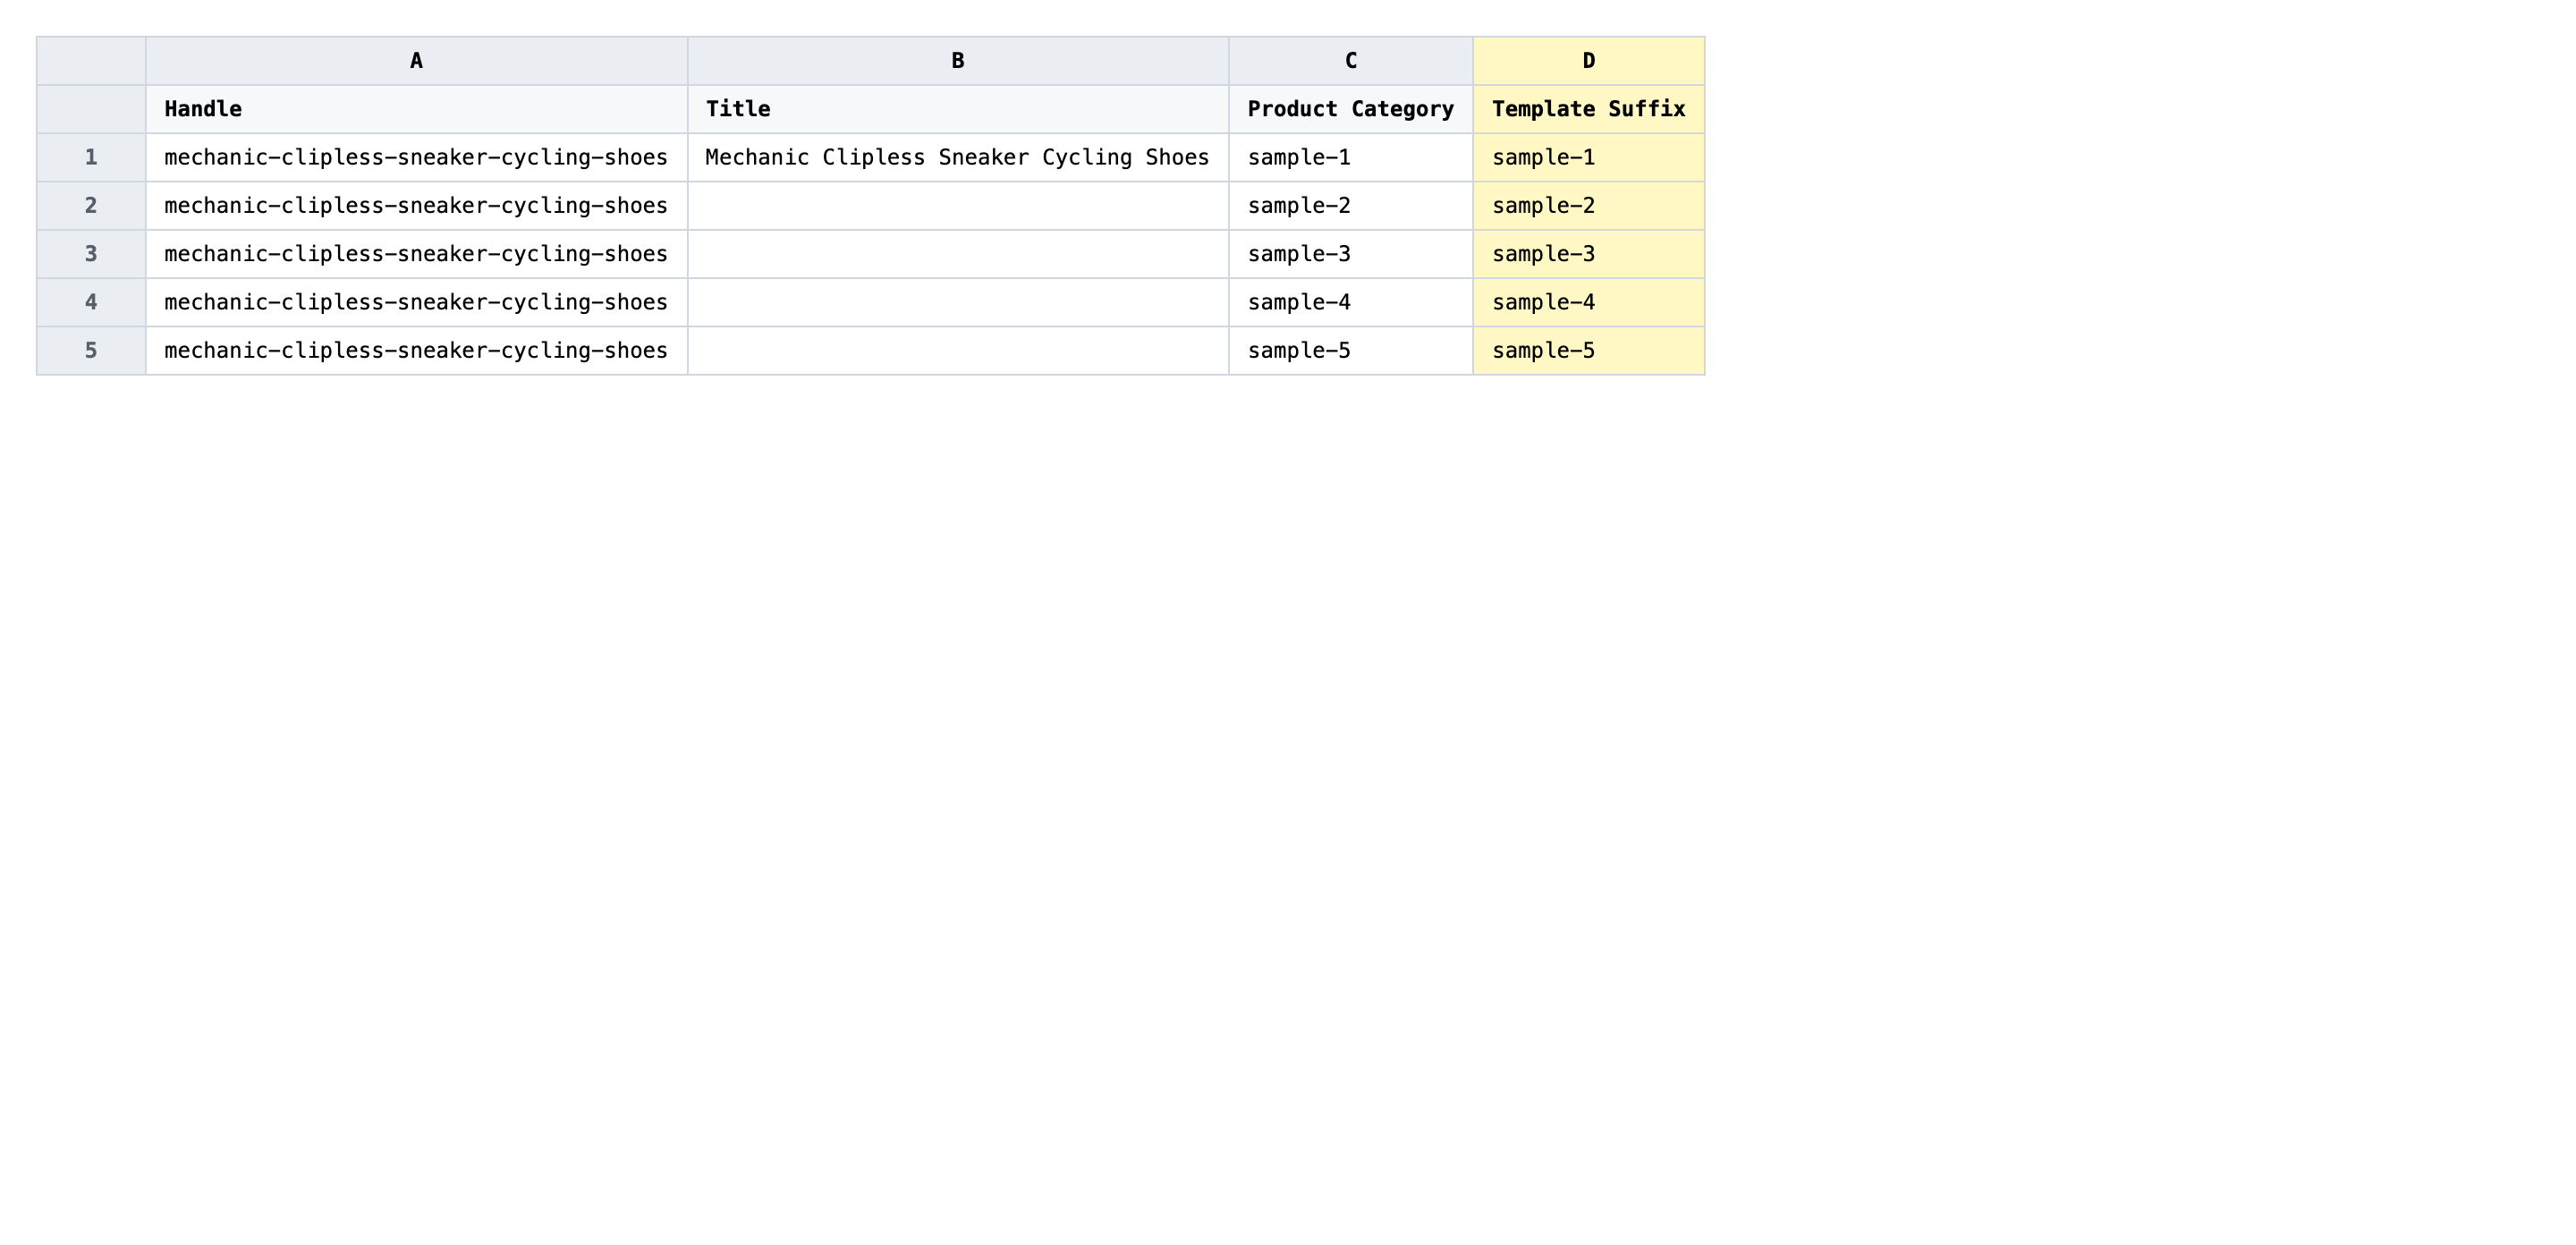
For each subset, type the suffix only — the part that comes after product. and before .liquid. If your theme has product.gift-card.liquid, the suffix is gift-card. Lowercase, hyphenated, no quotes, no file extension. Leave a row blank to put that product back on the default template.
- ✅
gift-card - ❌
product.gift-card.liquid
Leave Handle exactly as exported — that's the matching key. Don't include the product. prefix or the .liquid extension in the Template Suffix value; Shopify rejects suffixes that contain a dot or a slash. If a subset should use the default theme template, clear the cell rather than typing default or product.

Save the file as CSV when you're done, and keep the original export handy in case you want to revert.
Tip: Open your theme's
templates/folder in the code editor before you start typing suffixes — copy each filename's middle segment exactly. A typo here doesn't error on import; it silently falls back to the default template on the storefront.
Step 3 — Import the edited file back to Shopify
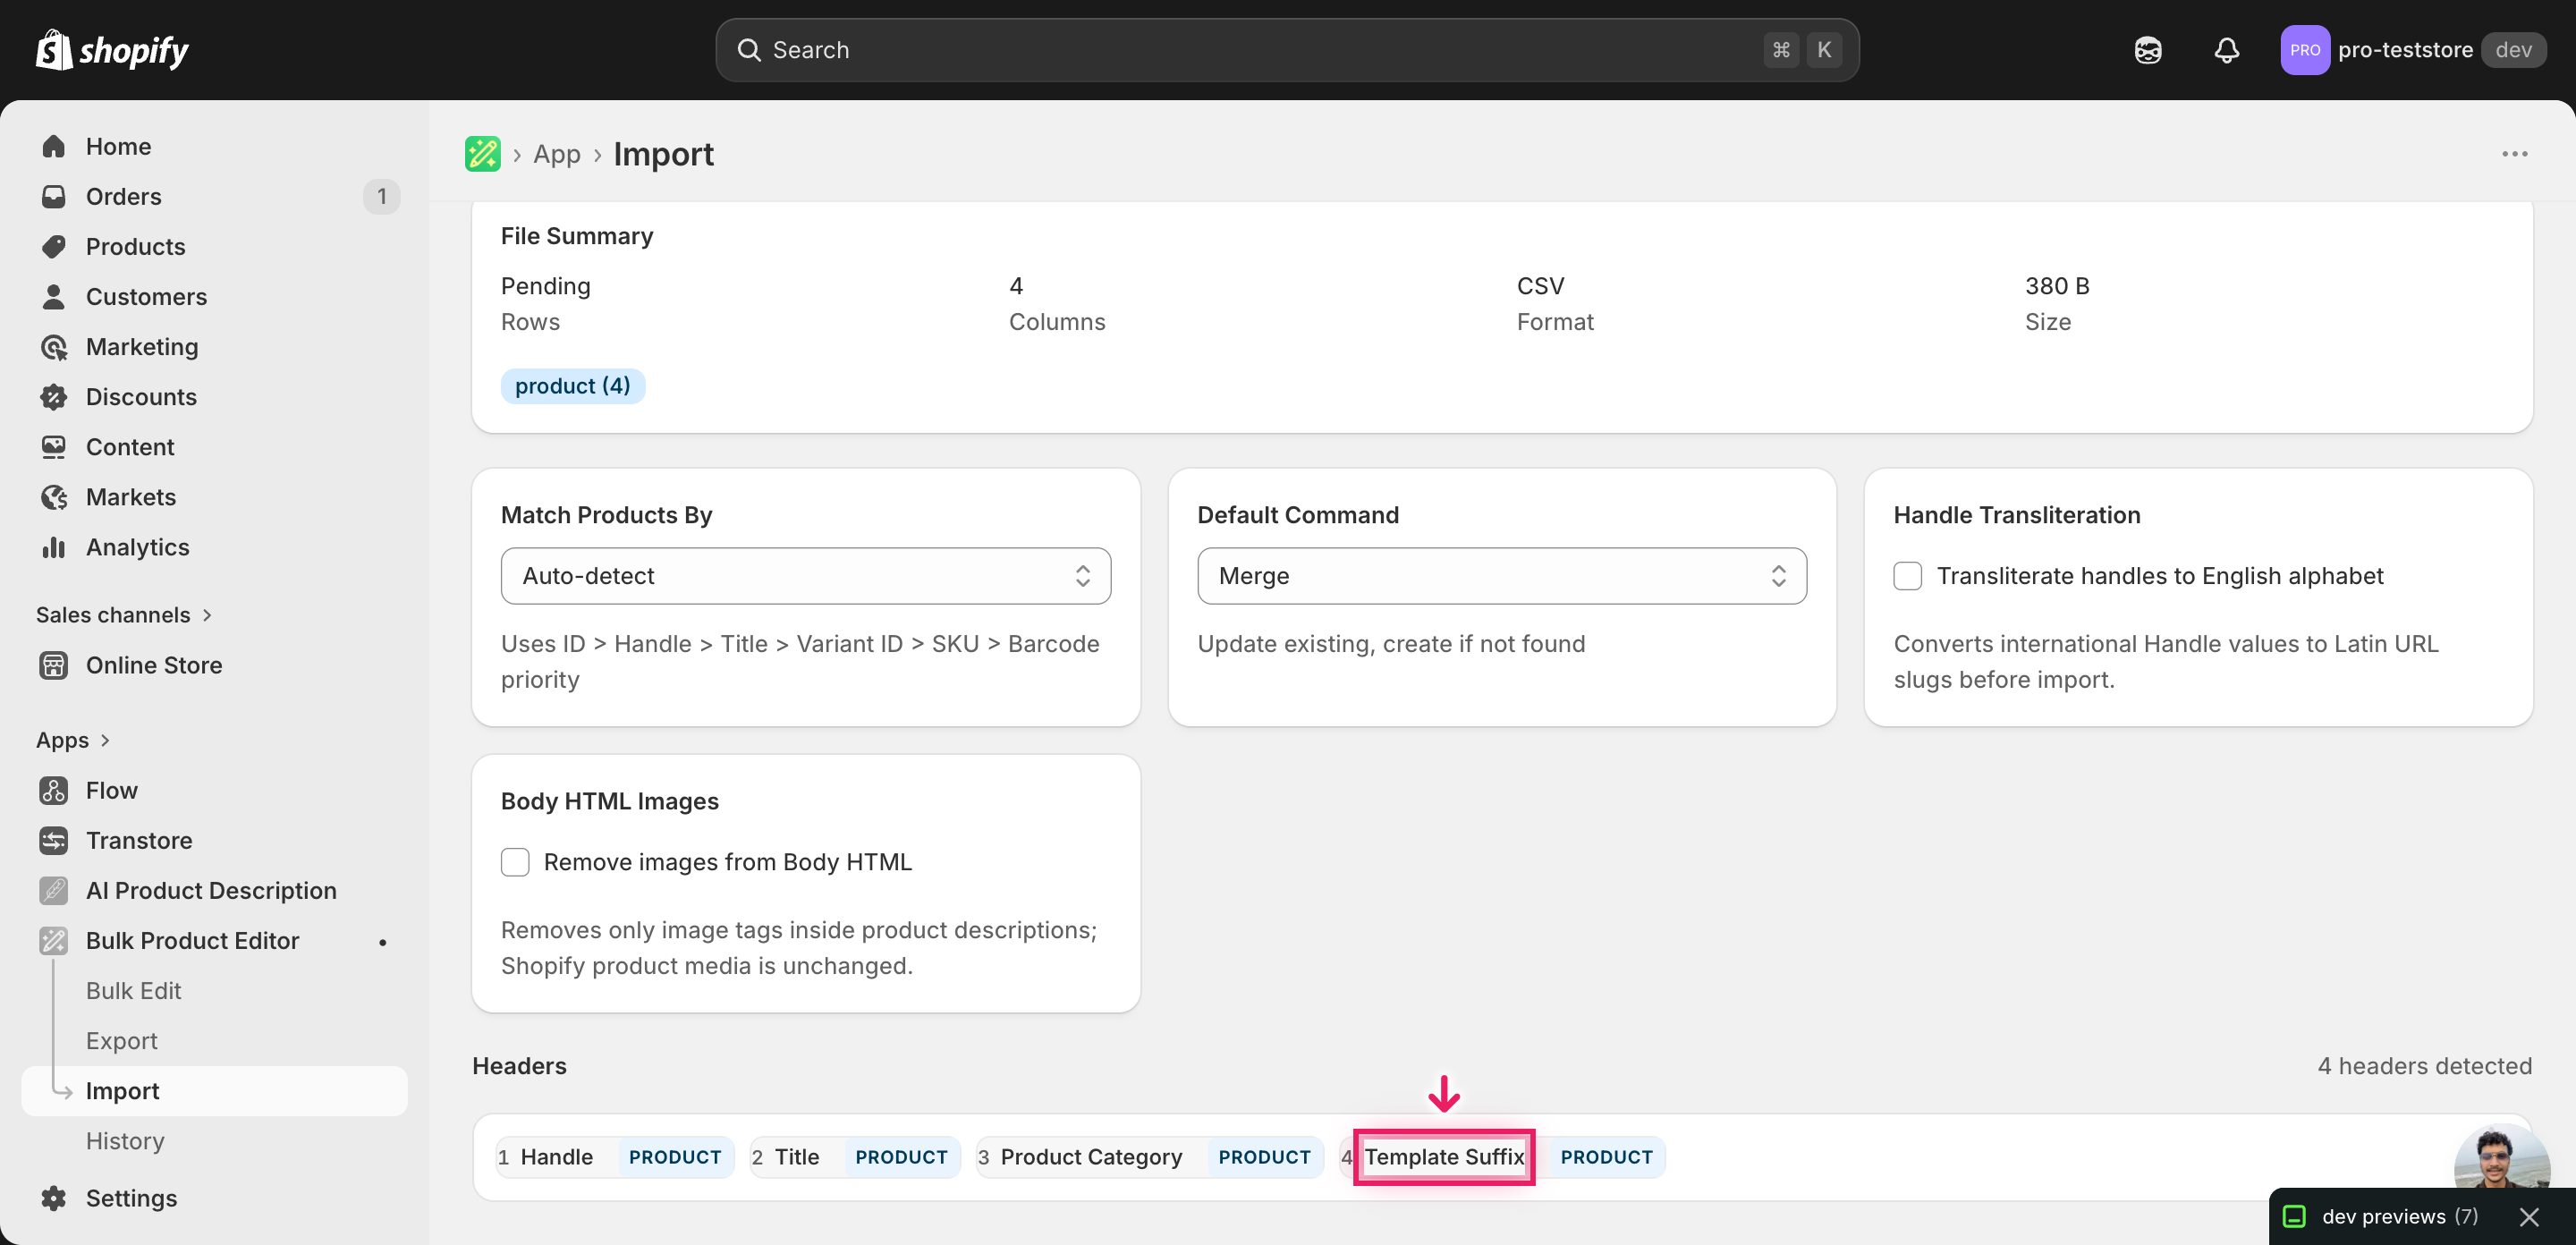
Open EditEngine → Import and select Advanced import. Then upload the file you just edited.
EditEngine reads the file and shows a summary. Check the Headers panel: Template Suffix should carry the PRODUCT badge, which confirms the importer recognized it as the templateSuffix field. Leave Match Products By on Auto-detect and Default Command on Merge so existing fields aren't overwritten.
Note: Template Suffix changes are reversible but storefront-visible — a wrong suffix renders the product with the wrong layout (or the default, if the suffix doesn't match a template). Import a tiny batch first: pick three to five products from one subset, import, then load those product pages on the storefront to confirm the right template is in use. Once that subset looks correct, run the full file.
Click Start Import and wait for the job to finish — a small file takes seconds, larger catalogs a couple of minutes. When it completes, EditEngine shows a per-row summary.
Download the results CSV. It lists every row with a pass/fail status — that file is your proof the change went through, and the new values are now live in your Shopify admin.
Tips and troubleshooting
Write the suffix, not the filename. Shopify stores only the middle segment of the template filename in templateSuffix. For product.preorder.liquid, the value is preorder — not product.preorder, not product.preorder.liquid, and not preorder.liquid. Anything with a dot or a slash gets rejected at the API layer and the row fails; anything that doesn't match an existing template imports cleanly but silently falls back to the default on the storefront.
Confirm the template exists in your live theme. EditEngine writes whatever suffix you provide — it doesn't validate against your theme. Before importing, open your active theme in the code editor and list the files in templates/ that start with product.. Every suffix in your spreadsheet must match one of those filenames exactly, otherwise affected products will render with the default template and you'll be debugging from the storefront instead of from a Shopify error.
Test one subset before reassigning the whole catalog. Bulk theme template assignments are easy to get right once, and easy to get wrong everywhere. Filter the spreadsheet to one subset — say, all gift cards — import just those rows, then visit two or three of those product pages on the live storefront. If the layout is correct, repeat for the next subset. This catches a wrong suffix or a missing template before it touches the rest of your products.
Use Product Category, Type, or Tags as your subset key. The spreadsheet is most useful when you can sort or filter the rows that should share a template into one block. Product Category is exported by default; Type, Vendor, and Tags work just as well. Apply a filter, paste the suffix down the visible Template Suffix cells, clear the filter, and you've assigned a different theme template to every subset in one pass.
Frequently asked questions
How do I bulk assign different theme templates in Shopify?
Export your products from EditEngine with the Template Suffix column, set the suffix per row to match each subset's template (for example gift-card, preorder, bundle), then import the file back through advanced import. That single round-trip lets you bulk assign Shopify different theme templates to different product subsets without opening each product in the admin.
Can I edit Shopify different theme templates in a spreadsheet?
Yes. EditEngine exports the Template Suffix column alongside Handle and Title, and you edit it in Excel or Google Sheets like any other field. Once you save the CSV and import it back, every row with a changed suffix points the product at a different theme template.
How long does a bulk different theme templates import take in Shopify?
Template Suffix is a single string per product, so even a few thousand rows finish in a minute or two. EditEngine streams the file, and the results CSV reports the exact duration once the bulk Shopify different theme templates update completes.
What format does Shopify accept for different theme templates imports?
A CSV or XLSX with a Handle column to match the product and a Template Suffix column holding the suffix only — no product. prefix, no .liquid extension. EditEngine's advanced import reads that format directly and applies the value to each product's templateSuffix field.
Can I undo a bulk Shopify different theme templates update?
There's no one-click undo, but the original export is your backup. Re-import the unedited file and every product reverts to the Template Suffix it had before, including blanks (which reset products to the default product.liquid).
Related tutorials
About EditEngine: EditEngine Bulk Product Editor helps Shopify merchants bulk edit, bulk import, and bulk export their product catalog in minutes instead of days. Install on Shopify →