Variants & options
How to Bulk Add or Remove Shopify Option Axes
Last updated
Need to bulk add Shopify or remove option axes so a product that currently varies only by Size also varies by Color — or so a stale axis goes away? With EditEngine Bulk Product Editor, you export the option columns to a spreadsheet, change the Option<N> Name and Value cells, and import the file back. The advanced import rebuilds the variant matrix in one pass, so the round-trip beats clicking variant-by-variant in the Shopify admin.
What you'll learn
- Export every product with its current option axes (Option1/2/3 Name and Value)
- Add a new option axis — or remove one — by editing the option columns and rows in a spreadsheet
- Import the updated file back to Shopify to rebuild the variant matrix in one operation
What you'll need
- The EditEngine Bulk Product Editor app installed in your Shopify store
- At least one product whose variants you want to add or remove an option axis on (this guide uses a shoe that currently varies only by Size)
- The Advanced import flow — option-axis changes rebuild the whole variant set and are advanced-import only
- A note of each variant's SKU, price, and inventory before you start, because changing an axis rebuilds the variants
- A spreadsheet editor (Excel, Google Sheets, Numbers — anything that opens CSV)
Every Shopify product has up to three option axes — Option1, Option2, Option3 — and the variant matrix is the cross-product of their values. Adding an axis multiplies the variants (3 Sizes × 2 Colors = 6 variants); removing one collapses them back. Because the variants themselves are derived from the axes, changing the axes rebuilds the whole set, which is why this workflow lives in the advanced import.
Step 1 — Export your Shopify or remove option axes
Open EditEngine and go to the Export page. This is where you choose which option columns land in your spreadsheet.
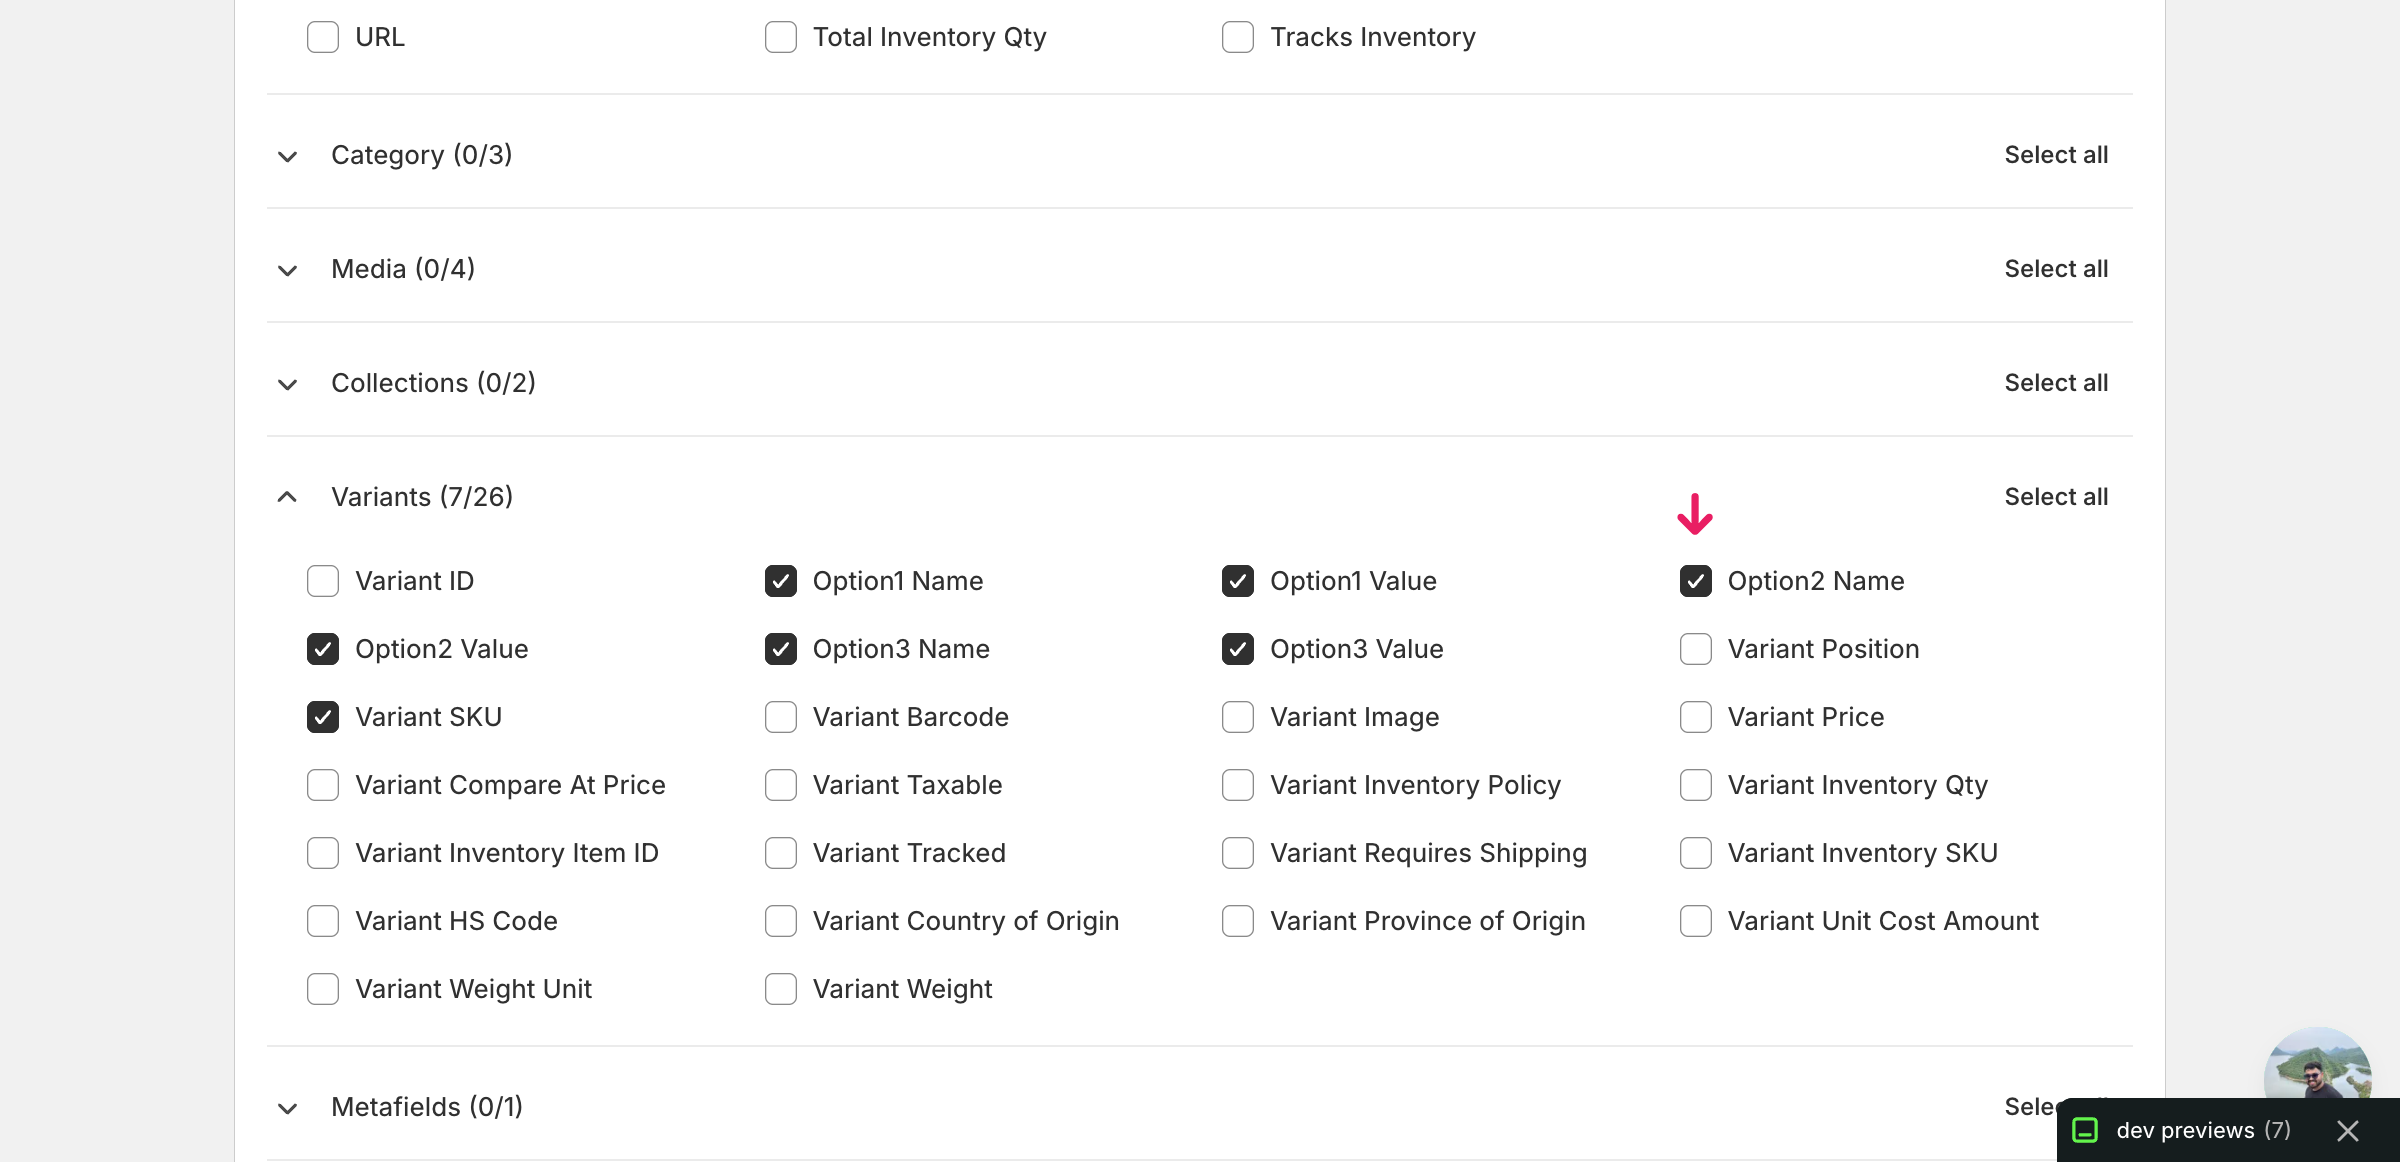
Pick the right columns
- Handle — the unique product identifier the importer uses to match each row back to the right product.
- Title — context only, so you can see which product a row belongs to while editing.
- Variant SKU — the per-variant identifier. Because changing an axis rebuilds variants, every variant row needs a SKU so the importer can re-create the right ones.
- Option1 Name — the name of the first axis (e.g.
Size). Must be identical on every row of the same product. - Option1 Value — this variant's value on the first axis (e.g.
M,L,XL). - Option2 Name — the name of the second axis. Leave blank to drop the axis, or set it (e.g.
Color) to add one. - Option2 Value — this variant's value on the second axis. Add a value here for every row when you introduce a Color axis.
- Option3 Name — the name of the third axis. Same rules as Option2 — fill to add, clear to remove.
- Option3 Value — this variant's value on the third axis.
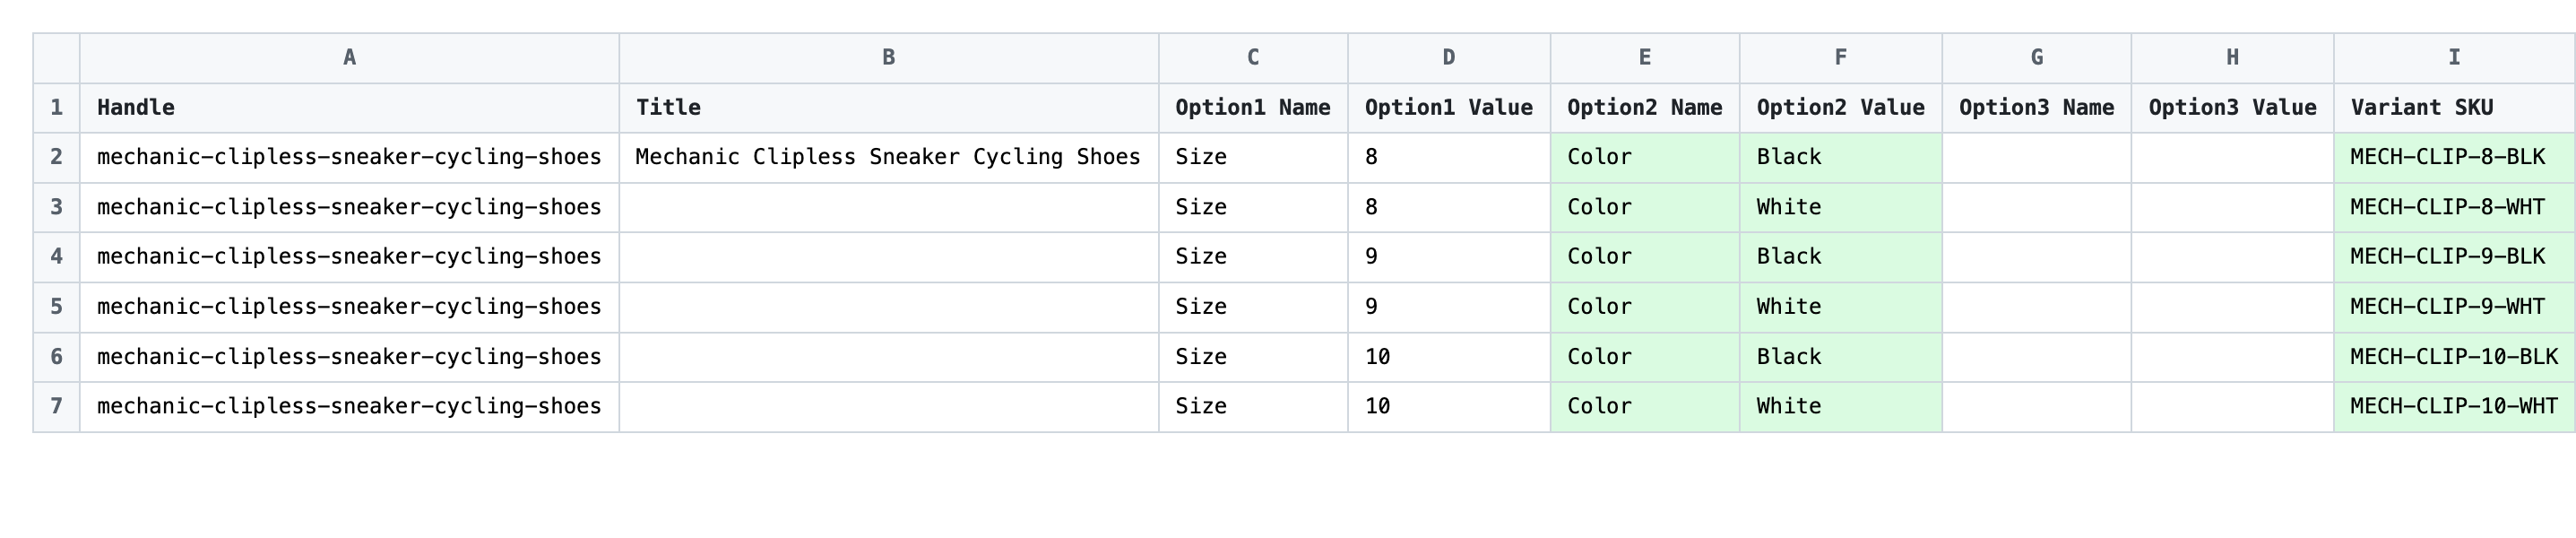
When the export completes, click Download. You'll get one row per variant — a product with 3 Sizes exports as 3 rows, and the second and later rows leave Title blank. That's the shape you need to edit before importing back.
New to exporting? This guide assumes you know how to run an export and focuses only on the columns and edit unique to this workflow.
Step 2 — Bulk add Shopify or remove option axes in your spreadsheet
Open the downloaded CSV in Excel or Google Sheets. The Option1/2/3 Name and Option1/2/3 Value columns hold the current axes — to add an axis, fill an empty Option<N> Name on every row and add rows for the new values; to remove one, clear that pair on every row.

To add a Color axis to a Size-only product, set Option2 Name to Color on every existing row, then duplicate each Size row once per Color value (Black, White) and fill Option2 Value accordingly. Give every new row its own Variant SKU — for example, SHOE-M-BLACK, SHOE-M-WHITE. To remove an axis instead, delete the rows you no longer want and clear the Option<N> Name and Option<N> Value cells on the rows that remain.
- ✅
Option1 Name=Size, Option1 Value=M, Option2 Name=Color, Option2 Value=Black, Variant SKU=SHOE-M-BLACK - ❌
Option2 Name=Color on row 1 but blank on row 2, or two rows with the exact same Size + Color and different SKUs
Keep Handle identical on every row of the same product — that's the matching key. Option<N> Name must be the same string on every row of one product; mixing Color and Colour will be read as two different axes. Don't reuse the same Option<N> Value combination across two rows of one product, or Shopify will reject the variant as a duplicate. Variants you delete from the file will be removed from the product when the import runs.
Save the file as CSV when you're done, and keep the original export handy in case you want to revert.
Tip: Decide your final variant list before you start typing — sketch the Size × Color matrix on paper first, then mirror it row-for-row in the spreadsheet so you don't end up with orphan variants or duplicate keys.
Step 3 — Import the edited file back to Shopify
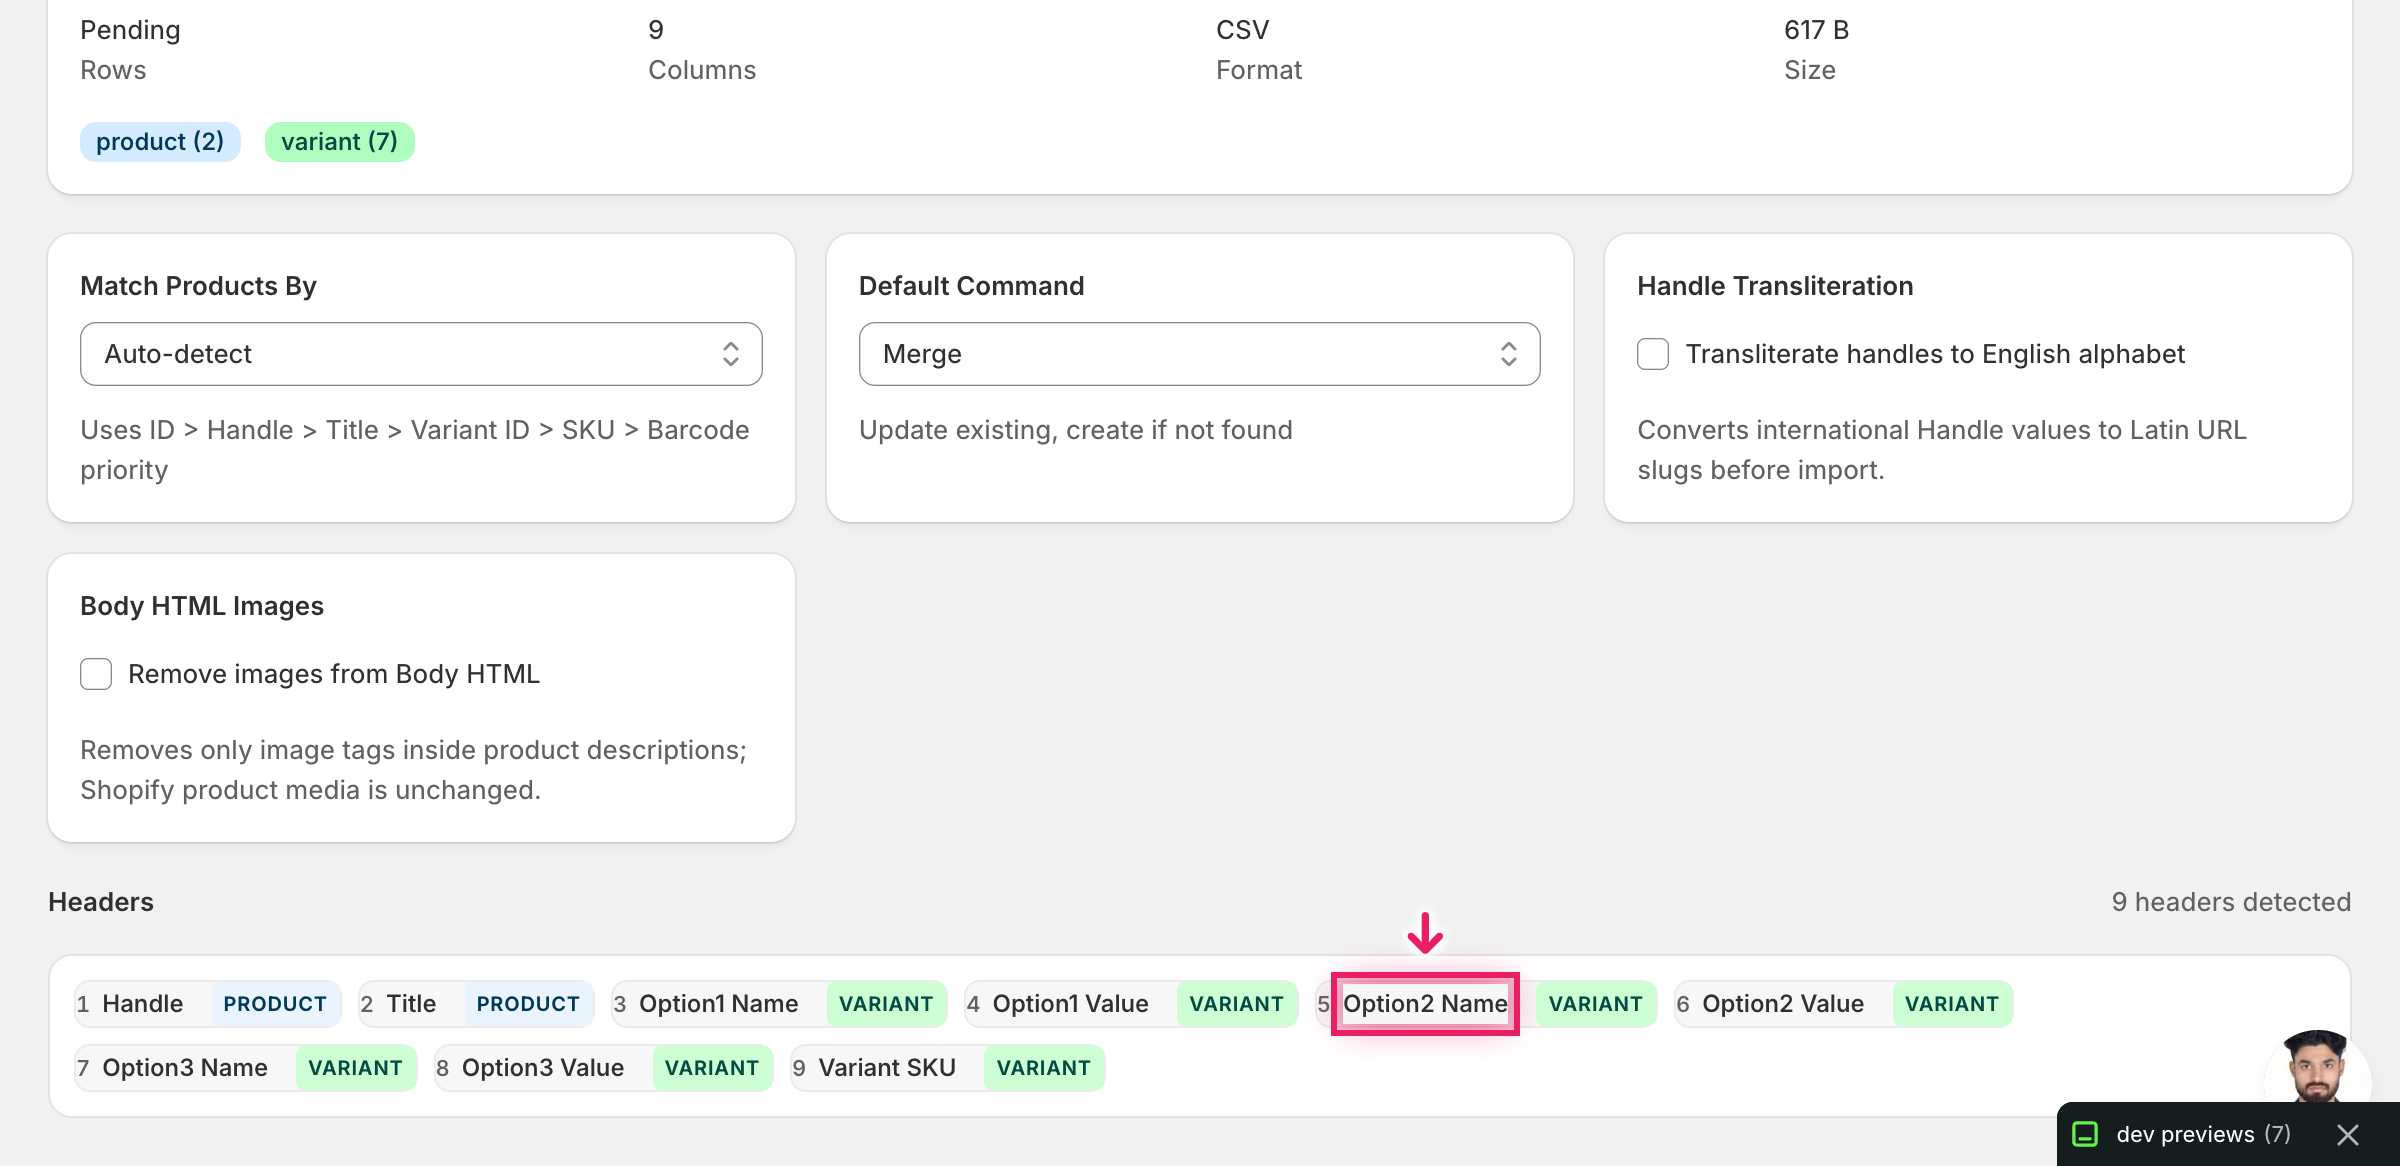
Open EditEngine → Import and select Advanced import. Then upload the file you just edited.
EditEngine reads the file and shows a summary. Check the Headers panel: Option1/2/3 Name and Option1/2/3 Value should all appear, and Variant SKU should carry the VARIANT badge. Leave Match Products By on Auto-detect (it matches by Handle) and Default Command on Merge so untouched columns aren't wiped.
Note: The advanced import does not have a dry-run toggle, and this workflow is destructive — adding or removing an axis rebuilds the whole variant set, so any variant missing from the file will be deleted. Test on a single product first: filter your export to one Handle, run the round-trip, confirm the rebuilt variants look right in the Shopify admin, then import the full catalog.
Click Start Import and wait for the job to finish — a small file takes seconds, larger catalogs a couple of minutes. When it completes, EditEngine shows a per-row summary.
Download the results CSV. It lists every row with a pass/fail status — that file is your proof the change went through, and the new values are now live in your Shopify admin.
Tips and troubleshooting
Changing an axis rebuilds every variant — bring the full set. The advanced import treats your spreadsheet as the new source of truth for the product's variants. Any variant that isn't in the file will be dropped, taking its SKU, price, and inventory with it. Before you save the CSV, sanity-check that every variant you want to keep has its own row with the correct Variant SKU, and don't omit rows just because nothing on them changed.
Keep Option<N> Name identical across every row of one product. Option1 Name, Option2 Name, and Option3 Name name the axes themselves, not the per-variant choices — those go in Option<N> Value. If row 1 says Color and row 2 says color or Colour, Shopify reads them as two different axes and the import fails or produces a malformed variant set. Set the name once at the top, then copy it down the column.
Test on one product before you touch the catalog. The advanced import has no dry-run for option-axis changes, and the operation is destructive. Use the export filter to pull a single Handle, run the full round-trip on that one product, and open it in the Shopify admin to confirm the rebuilt variants — names, values, SKUs, prices, inventory — look exactly right. Only then re-export the rest of the catalog and run it through.
Frequently asked questions
How do I bulk add or remove option axes in Shopify?
Export your products from EditEngine with the Option1/2/3 Name and Value columns plus Variant SKU, then add or delete an option in the spreadsheet by changing the column headers and expanding or collapsing the rows. Import the file back through the advanced flow to bulk add Shopify or remove option axes in one pass.
Can I edit Shopify or remove option axes in a spreadsheet?
Yes — option axes live in the Option1 Name / Option1 Value, Option2 Name / Option2 Value, and Option3 Name / Option3 Value columns. EditEngine exports those columns and the advanced import rebuilds the variant matrix from whatever you save, which is how you edit Shopify or remove option axes in a CSV.
How long does a bulk or remove option axes import take in Shopify?
A single product with a handful of new variants finishes in seconds. A catalog of a few hundred products typically completes in two to five minutes because each row rebuilds variants, and the results CSV reports the exact duration for your job.
What format does Shopify accept for or remove option axes imports?
A CSV or XLSX with Handle, Variant SKU, and the Option1/2/3 Name and Value columns. EditEngine's advanced import reads that format directly and uses Option<N> Name to decide which axes the product should have after the run.
Can I undo a bulk Shopify or remove option axes update?
There is no one-click undo, so the original export is your backup — keep it. To revert, re-import that unedited file and EditEngine will rebuild the variant set back to its prior shape, which is the safe way to roll back a bulk add Shopify or remove option axes change.
Related tutorials
About EditEngine: EditEngine Bulk Product Editor helps Shopify merchants bulk edit, bulk import, and bulk export their product catalog in minutes instead of days. Install on Shopify →