Products
How to Bulk Reorder Shopify Product Images
Last updated
Need to bulk reorder Shopify product images so your strongest lifestyle shot leads instead of a packshot or warehouse photo? With EditEngine Bulk Product Editor, you export every image to a spreadsheet, add an Image Position column with the new sequence, and import the file back. The reorder applies across every product in the file in one job, and the results CSV tells you exactly which rows moved.
What you'll learn
- Export every product image with its ID, source URL, and alt text
- Renumber images in a spreadsheet by adding an Image Position column
- Import the new order back to Shopify and verify it with the per-row results CSV
What you'll need
- The EditEngine Bulk Product Editor app installed in your Shopify store
- Products with two or more images attached (the seed product has three)
- The Advanced import flow — image media is advanced-import only
- A spreadsheet editor (Excel, Google Sheets, Numbers — anything that opens CSV)
Image position is the integer Shopify uses to decide which photo shows first on a product page — position 1 is the featured image, position 2 sits next to it in the gallery, and so on. The Shopify admin makes you drag-and-drop one product at a time, which is fine for a single SKU but a slog across a catalog. The spreadsheet workflow below lets you renumber the order on hundreds of products in a single import.
Step 1 — Export your Shopify product images
Open EditEngine and go to the Export page. This is where you pick which image fields land in your spreadsheet.
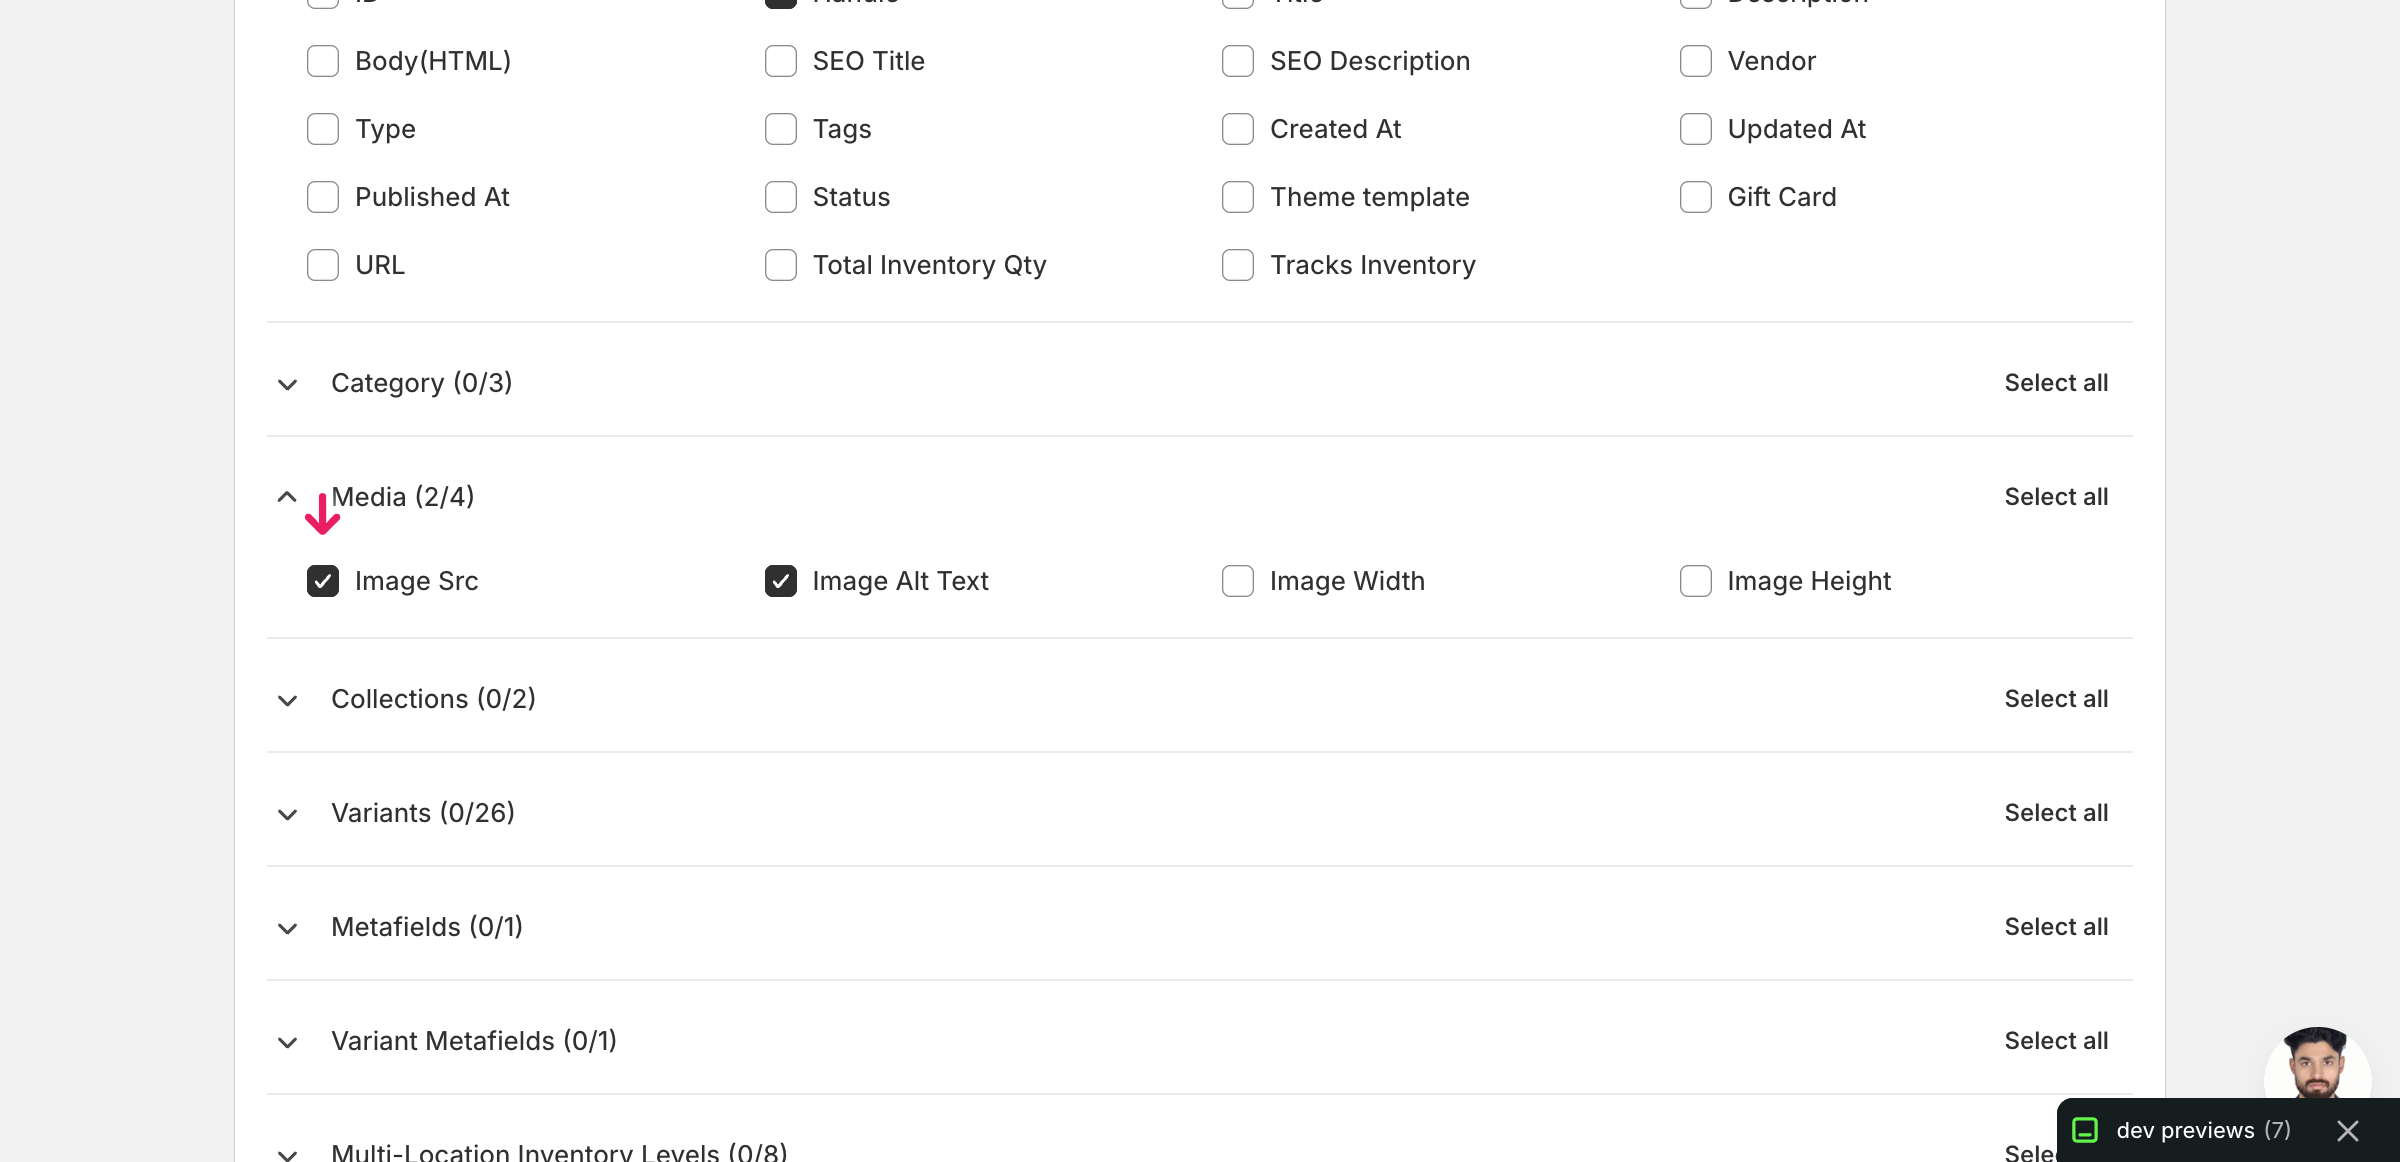
Pick the right columns
- Handle — the unique product identifier the importer uses to match each row back to the right product.
- Image Src — the existing image URL. EditEngine matches each row to a live image by this URL, so it is the key that tells the importer which photo to renumber.
- Image Alt Text — exported for context only. You don't need to edit it for a reorder, but expanding the Media group and ticking Image Src plus Image Alt Text is the cleanest way to get one row per image in your file.
When the export completes, click Download. You'll get one row per image: a product with three photos exports as three rows, and the second and later rows leave Title blank — that's normal. Note that the export does not emit an Image Position column; you'll add that yourself in Step 2 because it's import-only.
New to exporting? This guide assumes you know how to run an export and focuses only on the columns and edit unique to this workflow.
Step 2 — Bulk reorder Shopify product images in your spreadsheet
Open the downloaded CSV in Excel or Google Sheets. You'll see one row per image grouped by Handle — that's the order you're about to rewrite.
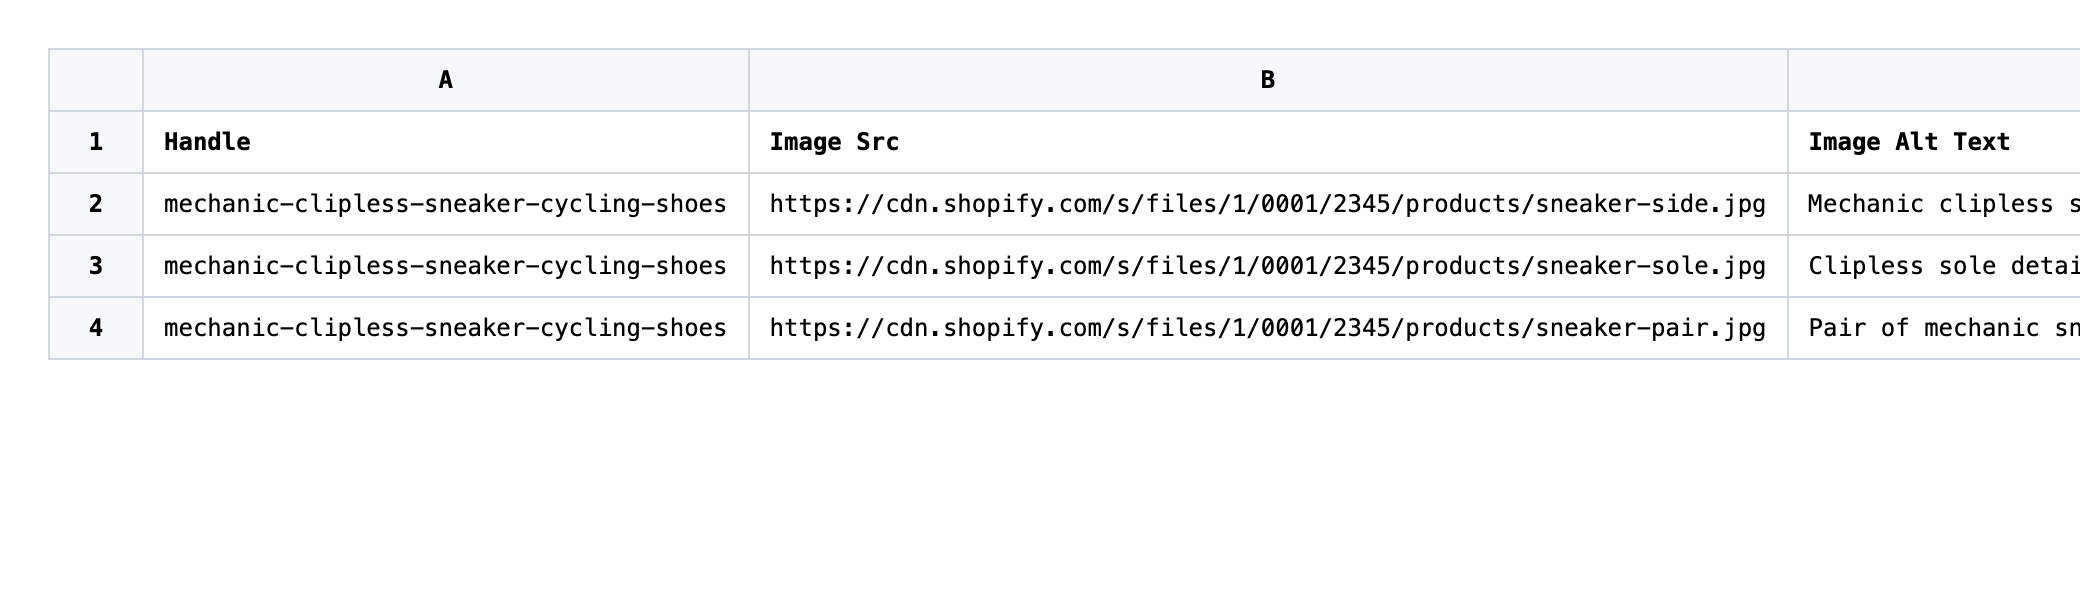
Add a new column named Image Position (the exact header — capitalization matches but spacing must). For each product's image rows, type the position number you want that image to take: 1 for the new featured image, 2 for the next, and so on. The numbers must be integers starting at 1, with no gaps and no duplicates within a single Handle.
- ✅
2, 3, 1 — promote the third exported image to position 1 and push the first two down - ❌
1, 1, 2 — duplicates within one Handle, or 0, 1, 2 which starts below 1
Leave every other column exactly as exported. Do not edit Image Src — that URL is the matching key, so changing it points the row at a different image (or none at all), and a mistyped URL triggers a failed media upload that blocks the rest of the product's image edits. If a product has variants without their own images, rows with a Handle but a blank Image Src are extra variant rows; leave their Image Position blank because there is no image to renumber.

Save the file as CSV when you're done, and keep the original export handy in case you want to revert.
Tip: Image Position is a Shopify image attribute, not a variant one. You only number each image row once per product — variants share the gallery order with the parent product.
Step 3 — Import the edited file back to Shopify
Open EditEngine → Import and select Advanced import. Then upload the file you just edited.
EditEngine reads the file and shows a summary. Check the Headers panel: Image Src and Image Position should both carry the MEDIA badge, which confirms the importer recognized them as image fields. Leave Match Products By on Auto-detect and Default Command on Merge.
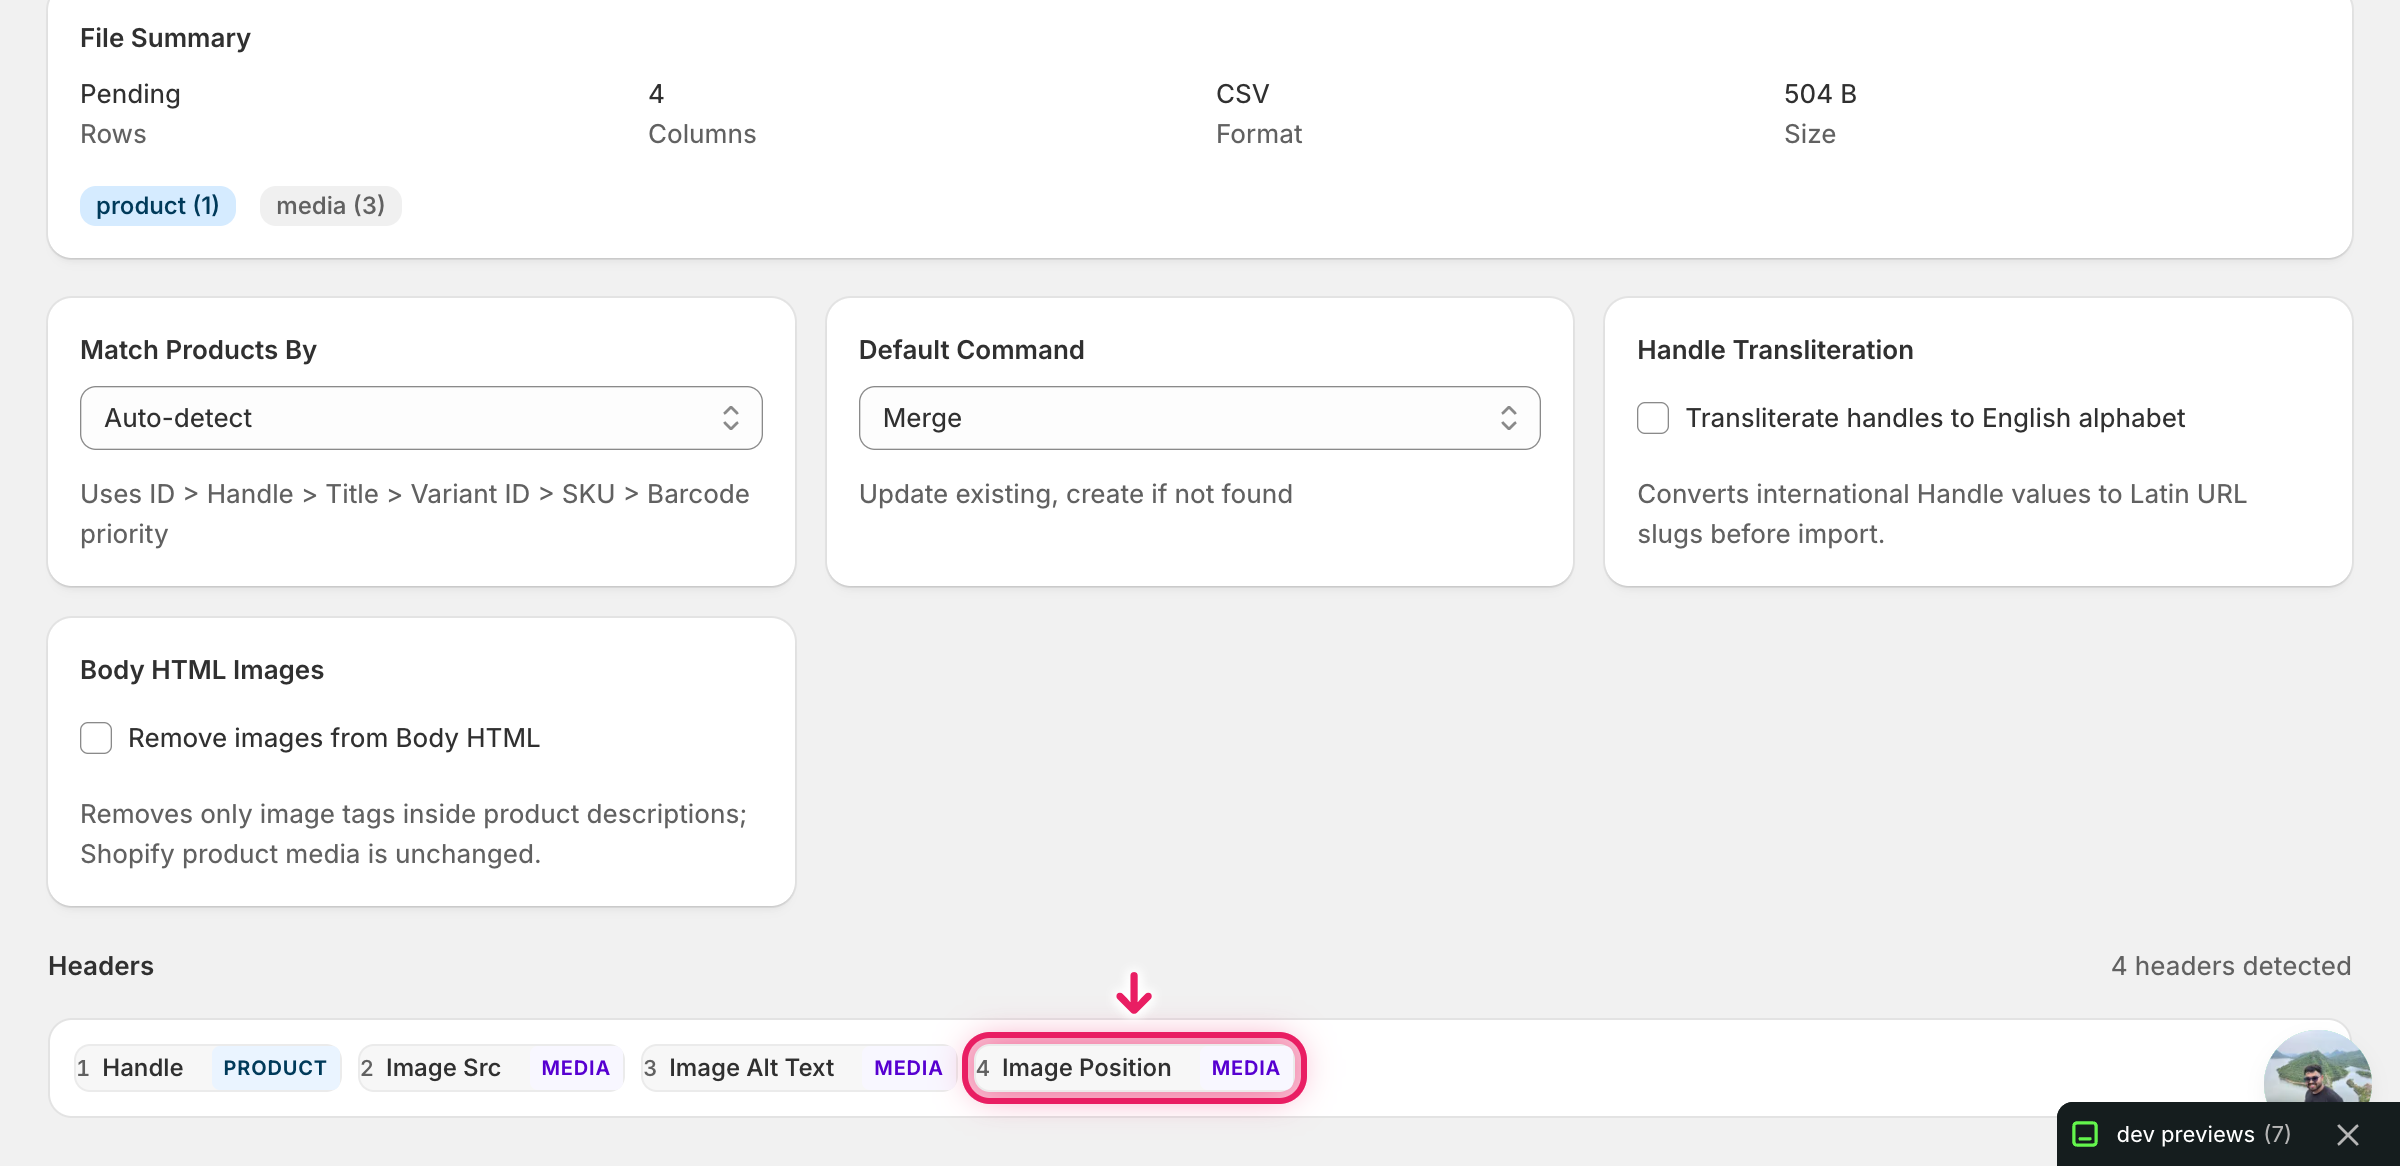
Note: This advanced import does not have a dry-run toggle, and a reorder is destructive in the sense that it overwrites the existing order on every product in the file. Run a first import with just one product (two or three image rows) and confirm the new order in the Shopify admin before you commit the full catalog. That catches a duplicated position number or a renamed header before it sweeps through every product.
Click Start Import and wait for the job to finish — a small file takes seconds, larger catalogs a couple of minutes. When it completes, EditEngine shows a per-row summary.
Download the results CSV. It lists every row with a pass/fail status — that file is your proof the change went through, and the new values are now live in your Shopify admin.
Tips and troubleshooting
The header must read Image Position exactly. EditEngine's auto-detection matches the column by name. Image Position works; Position, Image Order, or Img Position won't get the MEDIA badge on the mapping screen and the reorder will be ignored. Check the Headers panel before you start the import — if the badge isn't there, fix the header and re-upload.
Image Src is the identifier — leave the exported URL untouched. EditEngine ties each row to an existing image by the URL in Image Src because Image ID is not exposed in the export UI. If you edit, shorten, or reorder those URLs the importer can't find the image that row belongs to and the position won't apply. Re-export to get fresh URLs if a product's images have changed since your last download.
Don't edit Image Src in the same pass as a reorder. A mistyped Image Src creates a failed media upload, and once that fails the importer skips the rest of the product's image edits — including the reorder you cared about. Keep reorders and URL replacements in separate imports so one broken URL doesn't take a whole product's gallery offline.
Position numbers are integers with no gaps. Use 1, 2, 3 — not 1.0, 10, 20, or 1, 3, 4. Shopify normalizes the gallery to a contiguous sequence starting at 1, so gaps get collapsed and decimals are rejected. Within a single Handle, every position number must be unique, or the importer will pick one row and drop the rest.
Frequently asked questions
How do I bulk reorder product images in Shopify?
Export your products from EditEngine with the Handle, Image Src, and Image Alt Text columns, add an Image Position column in your spreadsheet, and number each image row in the order you want them to appear. Import the file back through the advanced flow and EditEngine will bulk reorder Shopify product images on every product in the file.
Can I edit Shopify product images in a spreadsheet?
Yes. EditEngine exports one row per image, and you can edit the order, alt text, or media URL in Excel or Google Sheets and import the file back. The Shopify admin has no native spreadsheet view for product images, which is why the EditEngine round-trip is the practical way to bulk edit Shopify product images.
How long does a bulk product images import take in Shopify?
A reorder across a handful of products finishes in seconds because no media is being uploaded — only the position number changes. A catalog of a few thousand image rows usually completes in a minute or two, and the results CSV reports the exact duration for the bulk reorder Shopify product images job.
What format does Shopify accept for product images imports?
A CSV or XLSX with a Handle column to match the product, Image Src with the existing image URL as the row's matching key, and Image Position with the new sequence number. EditEngine's advanced import reads this Shopify product images CSV directly and applies the new order in place.
Can I undo a bulk Shopify product images update?
There's no one-click undo, but the original export is your backup. Re-import the unedited file (with or without the Image Position column removed) and the previous order is restored — nothing is deleted by a bulk reorder Shopify product images job, only renumbered.
Related tutorials
- How to Bulk Update Shopify Image Alt Text Per Product
- How to Bulk Replace Shopify Images By URL
- How to Bulk Add Shopify Multiple Images Per Product
About EditEngine: EditEngine Bulk Product Editor helps Shopify merchants bulk edit, bulk import, and bulk export their product catalog in minutes instead of days. Install on Shopify →