Products
How to Bulk Add Multiple Images Per Product in Shopify
Last updated
Need to bulk add Shopify multiple images per product across your catalog without uploading photos one at a time in the admin? With EditEngine Bulk Product Editor, you export your products to a spreadsheet, append one new row per extra image under each product's Handle, and import the file back. Because Shopify exports one row per image already, adding photos is just adding more rows.
What you'll learn
- Export every product with its current multiple images
- Edit multiple images per row in a spreadsheet
- Import the updated file back to Shopify
What you'll need
- The EditEngine Bulk Product Editor app installed in your Shopify store
- At least one product already in your Shopify store (it can already have images or none)
- The Advanced import flow enabled — image media columns are advanced-import only
- Publicly reachable URLs for the images you want to add (your CDN, an image host, or Shopify's free Burst stock photos)
- A spreadsheet editor (Excel, Google Sheets, Numbers — anything that opens CSV)
Shopify stores product photos as a list of media items — see Add media to products. The CSV export expresses that list with one row per image: every photo on a product gets its own row that shares the same Handle. Appending new image rows under an existing Handle is exactly how the CSV format expects new gallery photos to arrive.
Step 1 — Export your Shopify multiple images
Open EditEngine and go to the Export page. This is where you pick the columns that come back in your spreadsheet.
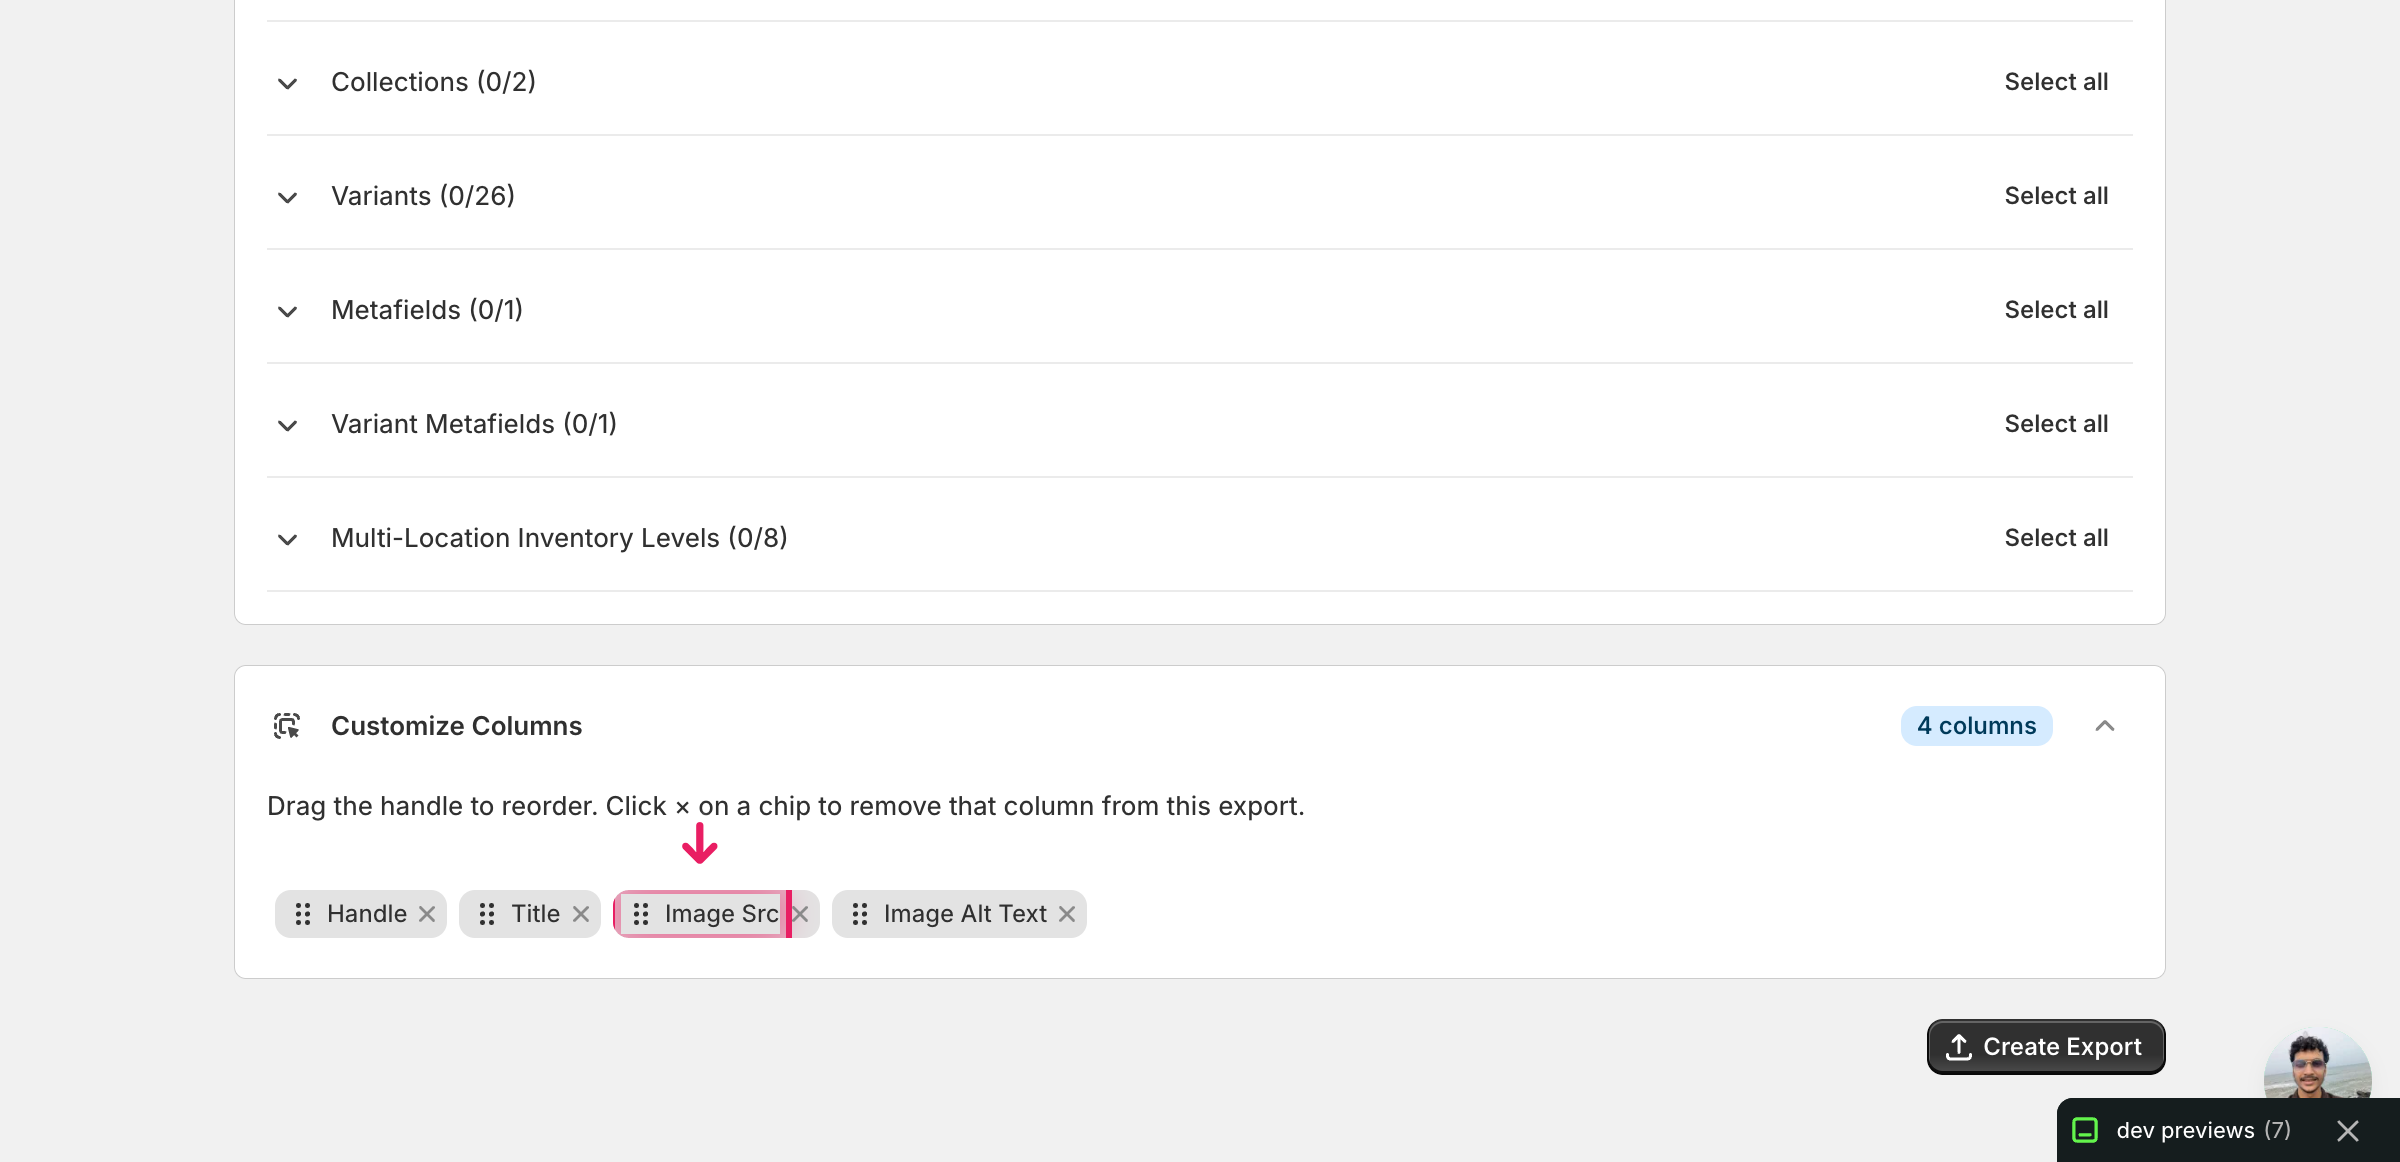
Pick the right columns
- Handle — the unique product identifier the importer uses to match every new image row back to the right product.
- Title — context only, so you can see which product you are adding photos to while editing. Leave it blank on the new rows you append.
- Image Src — the image URL. Each new image you want to add gets its own row with a fresh URL in this column — expand the Media group and tick Image Src to include it.
- Image Alt Text — the description attached to each image. Optional but recommended on the rows you add, because alt text is harder to backfill later than to write upfront.
When the export finishes, click Download. You'll get one row per image: products with several photos already repeat across rows with a blank Title on the second and later rows — that is the same shape you'll use when you append new images below.
New to exporting? This guide assumes you know how to run an export and focuses only on the columns and edit unique to this workflow.
Step 2 — Bulk add Shopify multiple images per product in your spreadsheet
Open the downloaded CSV in Excel or Google Sheets. The Image Src column (column C) holds each photo's URL, and below the existing rows for each product is where your new images go.
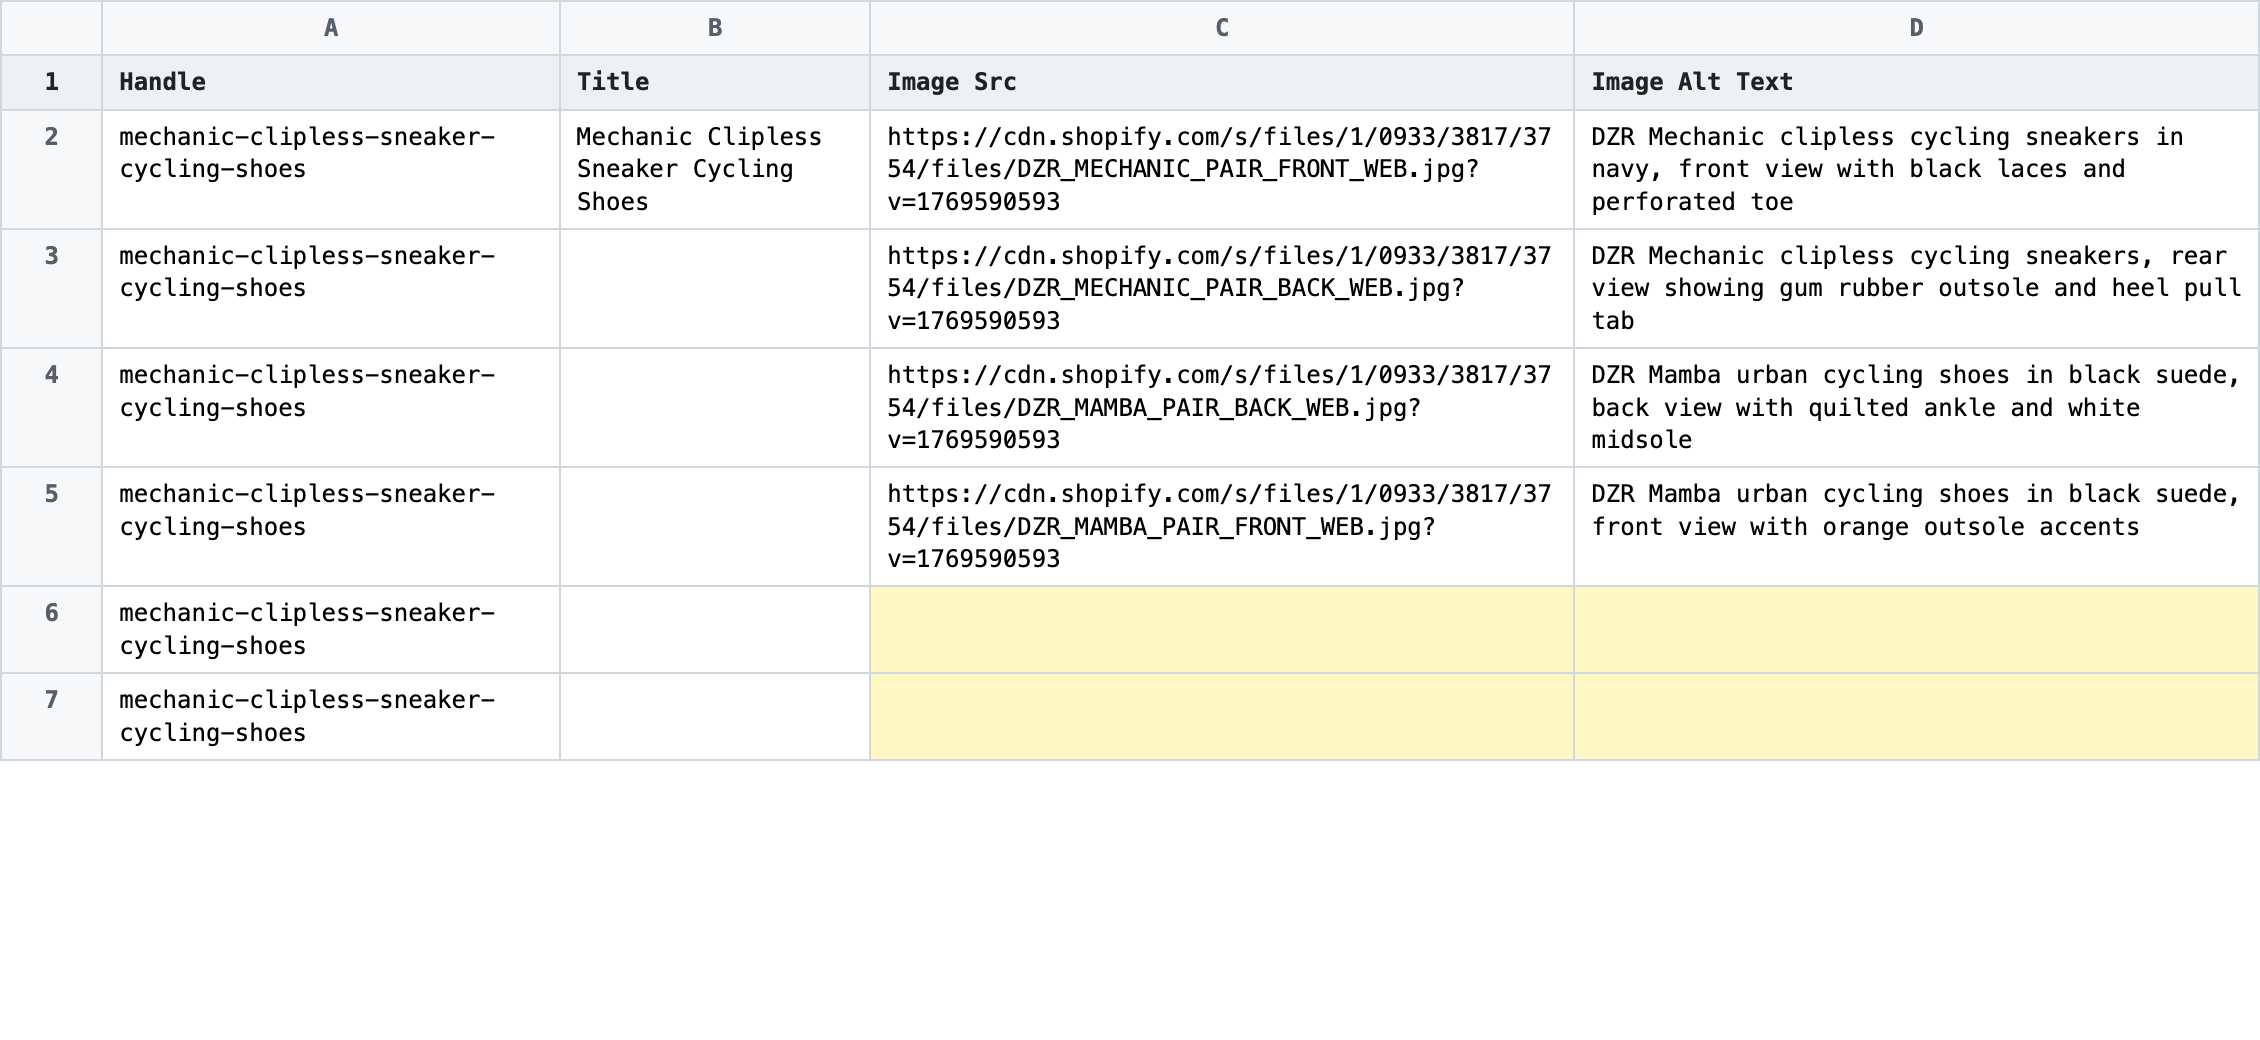
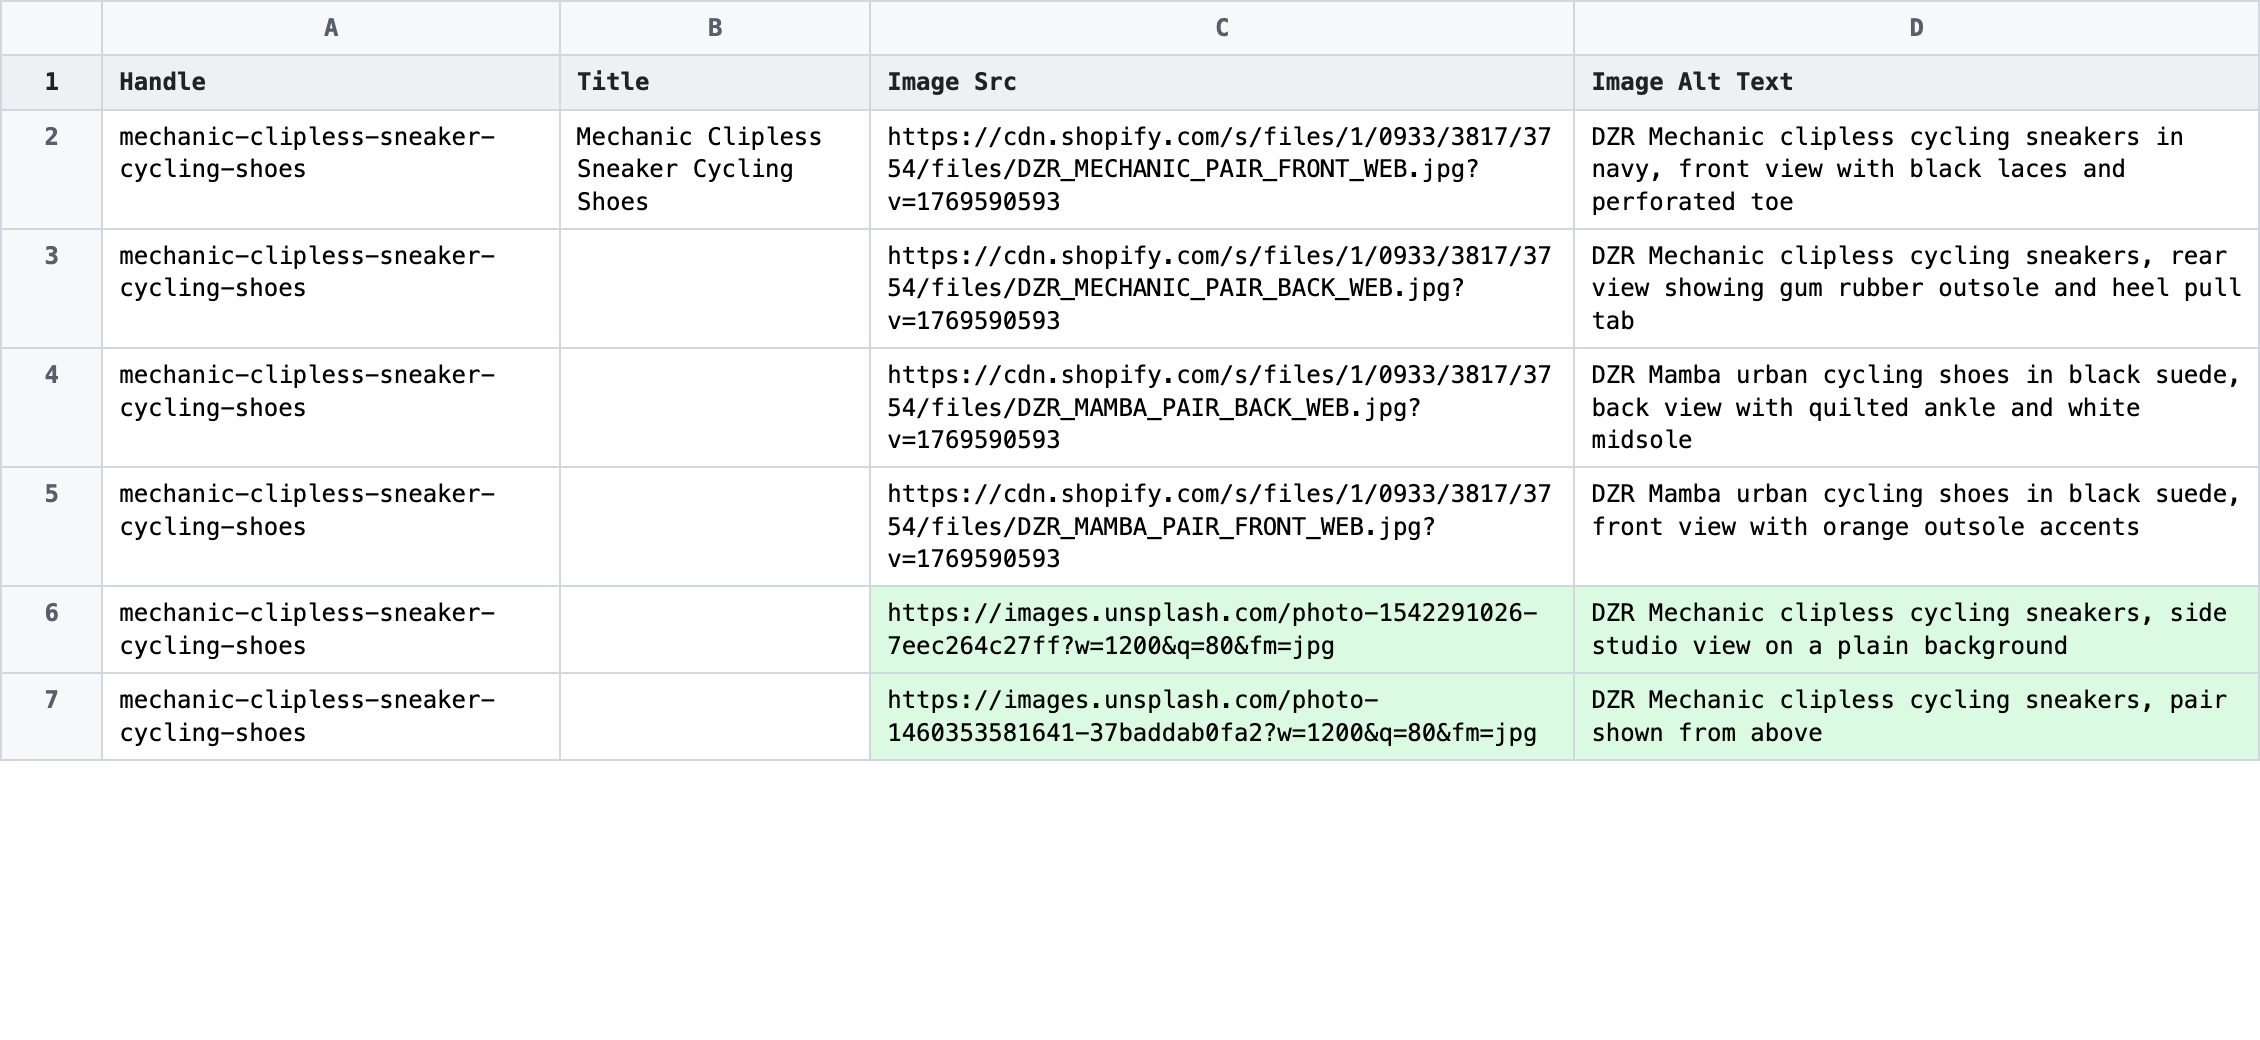
For every product that needs more photos, insert a new row directly beneath its last existing image row. Copy the Handle value from the row above, leave Title blank, and paste a new public image URL into Image Src. Add a short, descriptive Image Alt Text if you have one. Repeat the row for each extra photo — two new rows give the product two new images, five rows give five.
- ✅
dzr-mechanic-clipless,,https://images.unsplash.com/photo-1542291026-7eec264c27ff?w=1200&q=80&fm=jpg,DZR Mechanic clipless cycling sneakers, side studio view - ❌
dzr-mechanic-clipless,DZR Mechanic Clipless,file:///Users/me/Desktop/shoe.jpg,
Leave every existing image row alone. Do not edit Image Src on the original rows — that URL is how Shopify identifies photos already on the product, and changing it would point the importer at a different image. Make sure the Handle on each new row exactly matches the product you want to add the image to; a typo creates an orphan row that the importer rejects.
Save the file as CSV when you're done, and keep the original export handy in case you want to revert.
Tip: Open every new URL in a private browser tab before saving the CSV — if you can see the image without logging in, Shopify can fetch it during import.
Step 3 — Import the edited file back to Shopify
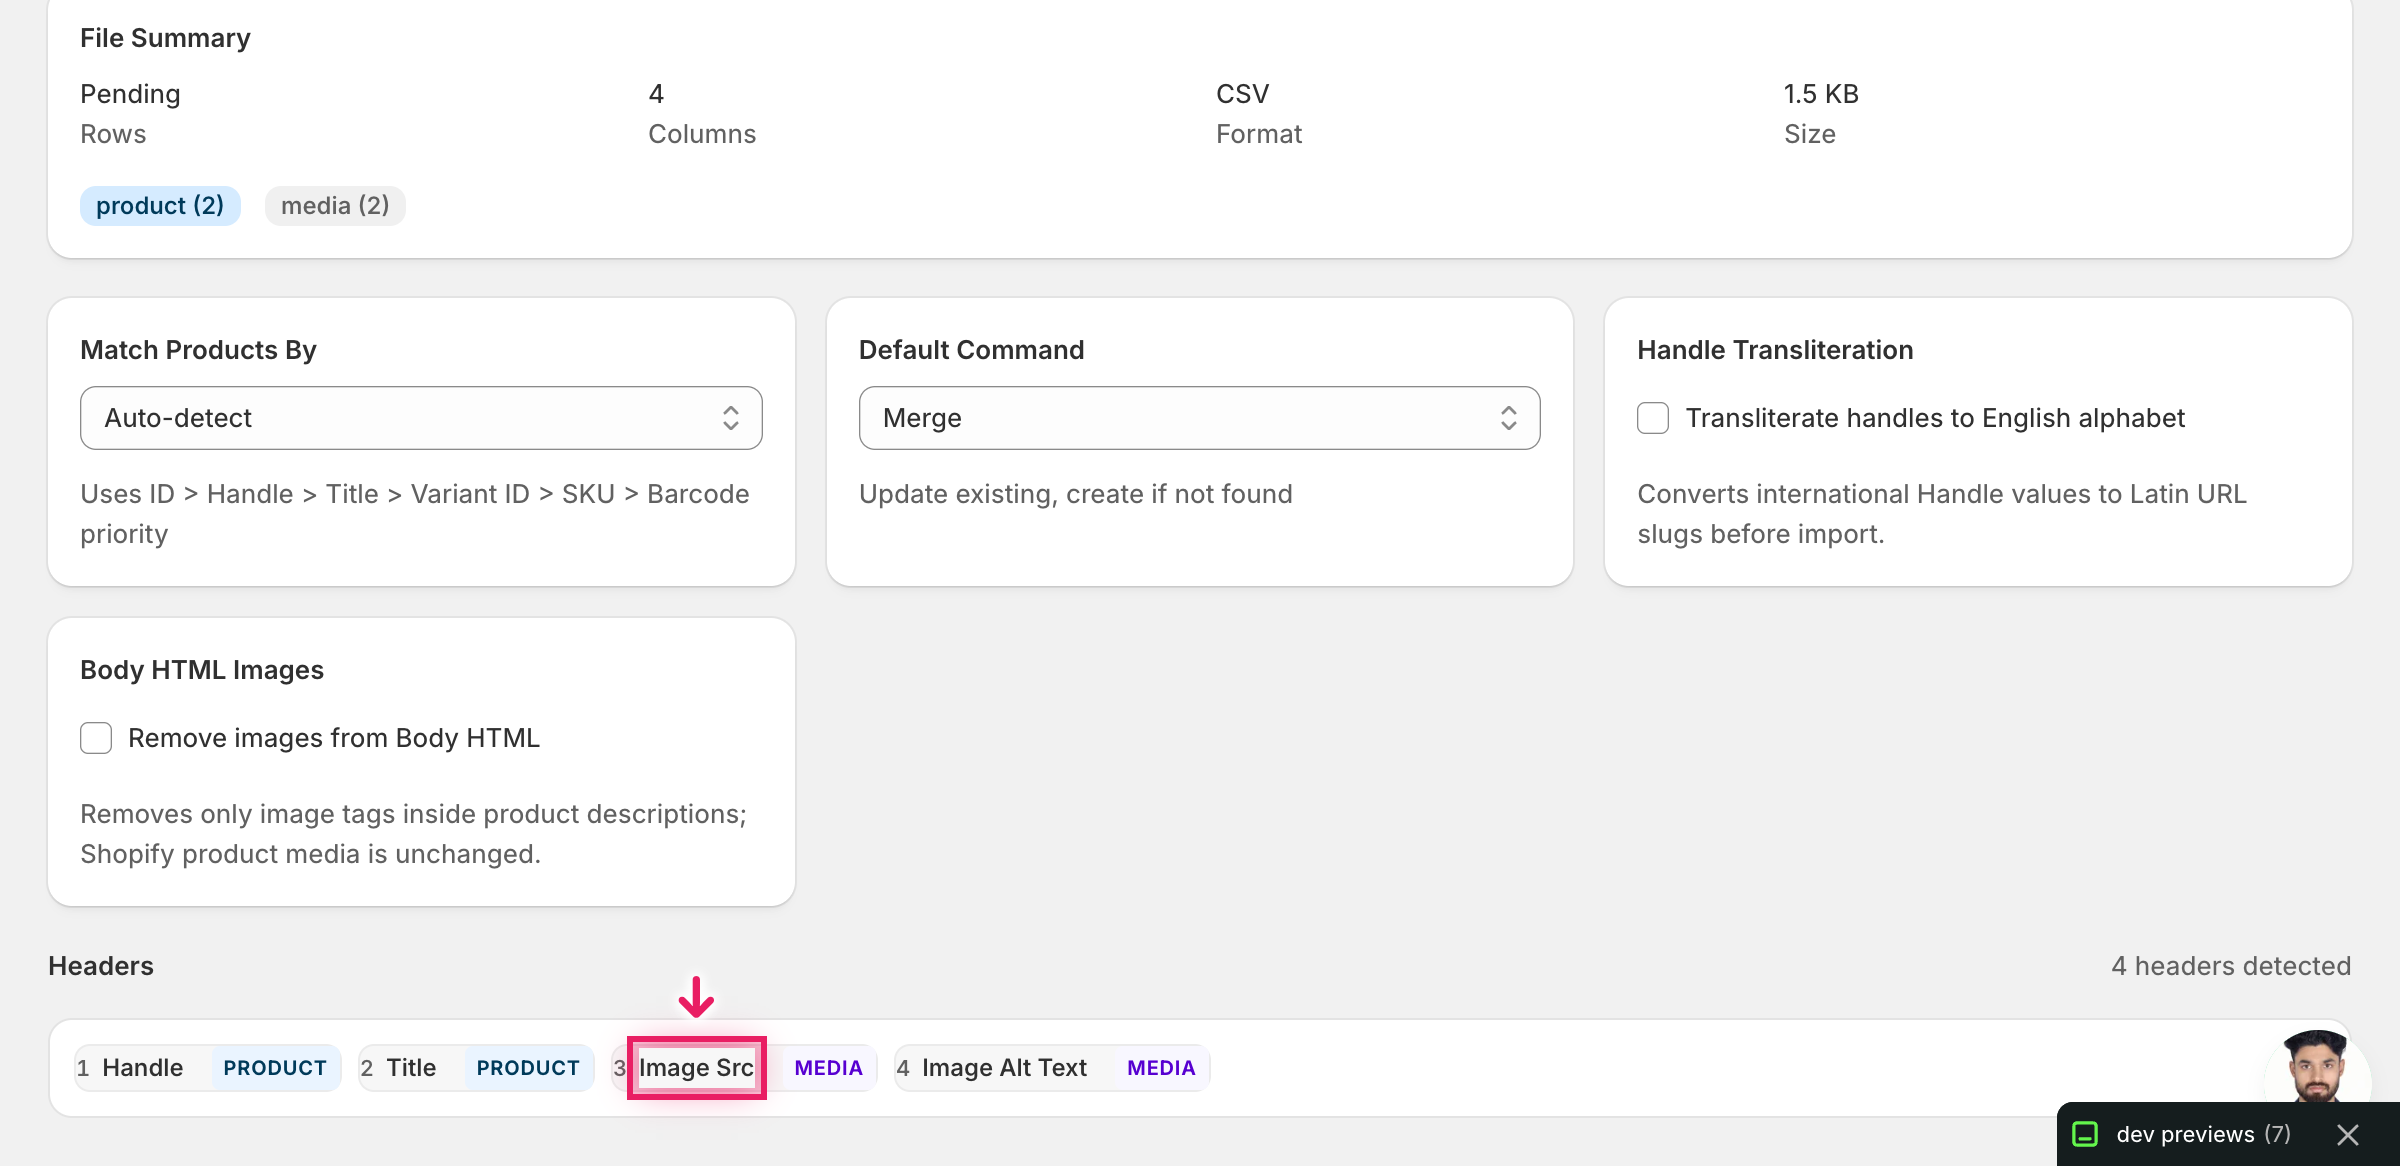
Open EditEngine → Import and select Advanced import. Then upload the file you just edited.
EditEngine reads the file and shows a summary. Check the Headers panel: Image Src and Image Alt Text should both carry the MEDIA badge, which confirms the importer recognized them as image fields. Leave Match Products By on Auto-detect (it will use Handle) and Default Command on Merge — Merge is what appends your new rows without touching existing photos.
Note: This advanced import does not have a dry-run toggle. Adding images is non-destructive under the Merge command — the original photos stay in place — but Shopify still has to fetch every new URL. Run a first import with two or three new image rows, confirm the photos appear in the admin, then import the full file. That catches a broken URL or a Handle typo before you commit the whole batch.
Click Start Import and wait for the job to finish — a small file takes seconds, larger catalogs a couple of minutes. When it completes, EditEngine shows a per-row summary.
Download the results CSV. It lists every row with a pass/fail status — that file is your proof the change went through, and the new images are now live on your products in the Shopify admin.
Tips and troubleshooting
One new image, one new row, same Handle. Each photo you add is its own row that repeats the product's Handle and leaves Title blank — that is exactly how EditEngine exported the product's existing images, so you are matching the format it already uses. Treat it like extending a list: copy the Handle down, fill in a new Image Src, and the importer does the rest.
Row order is gallery order. Image order follows row order, so rows you append at the bottom become the last photos in the gallery. If you want the new images to appear first or in a specific position, add an Image Position column and number every row for that product (1, 2, 3...) — Shopify will sort the gallery by that value.
Merge adds, Replace overwrites. The default Merge command adds your new image rows without removing existing photos. To start the gallery over and replace it entirely, use the Image Command column with a REPLACE value on the new rows, or switch the Default Command on the mapping screen — but test on a single product first because replace is destructive.
Semicolons let one row carry many images. Instead of writing one new row per image, you can list several URLs in a single Image Src cell separated by semicolons. EditEngine splits them into separate images on import. This is handy when one product needs many new photos and you'd rather not insert ten rows by hand.
Public URLs only — Shopify fetches each one. Image Src URLs must be publicly reachable. Shopify's importer downloads each URL when the job runs, so password-protected pages, private S3 buckets, intranet hosts, and local-disk paths like file:// all fail. If your photos live somewhere private, upload them to your CDN or a public host first and use those URLs in the CSV.
Frequently asked questions
How do I bulk add multiple images in Shopify?
Export your products from EditEngine with the Handle, Image Src, and Image Alt Text columns, then add one new row per extra photo under each product's Handle in a spreadsheet. Import the file back through the advanced import flow and Shopify will fetch the new URLs — that is how you bulk add Shopify multiple images per product without uploading one at a time in the admin.
Can I edit Shopify multiple images in a spreadsheet?
Yes. EditEngine exports one row per image, so adding photos is just adding more rows that repeat the Handle, and Shopify has no built-in spreadsheet editor for this. Excel, Google Sheets, or any CSV editor will work for the bulk edit Shopify multiple images workflow.
How long does a bulk multiple images import take in Shopify?
Shopify has to fetch every new Image Src URL, so duration scales with image count rather than row count. A few dozen new photos finish in under a minute; several hundred can take a few minutes, and the results CSV from the bulk add Shopify multiple images per product job shows the exact time.
What format does Shopify accept for multiple images imports?
A CSV or XLSX with a Handle column to match the product and an Image Src column with a publicly reachable URL on each new row. Image Alt Text is optional but recommended — EditEngine's advanced import reads this Shopify multiple images CSV layout directly.
Can I undo a bulk Shopify multiple images update?
There is no one-click undo, but because the default Merge command only adds rows, the original images are untouched. To remove the photos you just added, re-export the product, delete the new image rows in the spreadsheet, and re-import with the Image Command column set to DELETE for those rows — reversing the bulk add Shopify multiple images per product change without disturbing the originals.
Related tutorials
- How to Bulk Update Shopify Image Alt Text Per Product
- How to Bulk Reorder Shopify Product Images
- How to Bulk Replace Shopify Images By URL
About EditEngine: EditEngine Bulk Product Editor helps Shopify merchants bulk edit, bulk import, and bulk export their product catalog in minutes instead of days. Install on Shopify →