
B2B companies
Shopify Companies: Export and Import
Published by Profitonium Apps · Last updated
Availability: Companies export is available when Shopify exposes B2B company data to your store and the app. Companies Advanced Import is currently restricted to internal test shops; it is not enabled for ordinary merchant stores. The import steps below describe that restricted workflow, not a publicly available import feature.
Use the Companies resource to export or update Shopify B2B companies, their locations, linked customers, roles, catalogs, checkout settings, payment terms, tax settings, addresses, metafields, and location store credit through a CSV or XLSX spreadsheet.
Companies files combine several Shopify records on repeated rows. Use a focused export for the exact job instead of importing every available column. Company, location, contact, and store-credit changes can affect wholesale ordering and customer access immediately.
Before you start
- Install EditEngine Bulk Product Editor in a store where Shopify B2B Companies are available.
- Use Advanced import for the edited spreadsheet.
- Keep one untouched, access-controlled export. Advanced imports do not have one-click undo.
- Test new companies, customer roles,
DELETE, and every kind ofREPLACEon a small non-critical batch. - Keep location Store Credit Transactions in a separate, single-use spreadsheet.
- Remove any column group you do not intend to change, especially Linked Customers, metafields, tax exemptions, and transaction history.
EditEngine follows the main columns and repeated-row shape in the Matrixify Companies spreadsheet format. Matrixify also publishes practical tutorials for exporting B2B Companies, creating them in bulk, and assigning customers to locations. This guide calls out where EditEngine's current import behavior differs.
Step 1 — Export a focused Companies file
Open EditEngine → Export, choose Companies, and select CSV or Excel format.
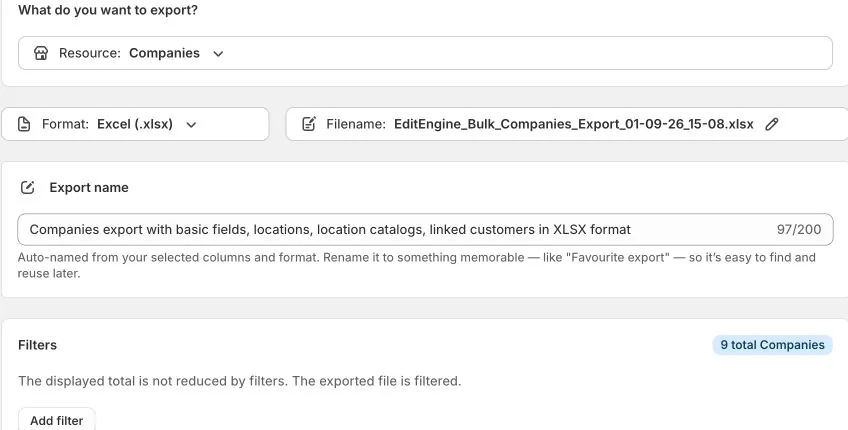
The current default selects 61 of 81 columns: Base, Locations, Location Catalogs, and Linked Customers. First and Last Order, Location Store Credit, Location Store Credit Transactions, Company Metafields, and Location Metafields are optional.
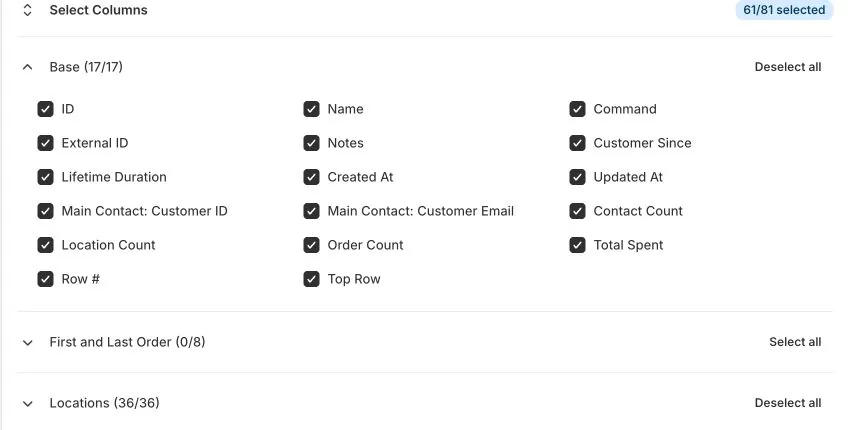
Do not treat the default as a universal round-trip template. Select only the groups needed for this job:
| Task | Keep these columns |
|---|---|
| Update company details | ID, Name, Command, and the fields being changed |
| Update locations | Company ID/Name plus Location ID, Name, Command, and changed location fields |
| Assign catalogs | Company and Location identity plus Location: Catalogs and Catalogs Command |
| Manage customer access | Company, Location, and Customer identity plus Customer: Command and Location Role |
| Update metafields | Owner identity plus only the intended metafield columns |
| Change store credit | Location identity plus Currency, Transaction Command, Amount, and optional credit settings |
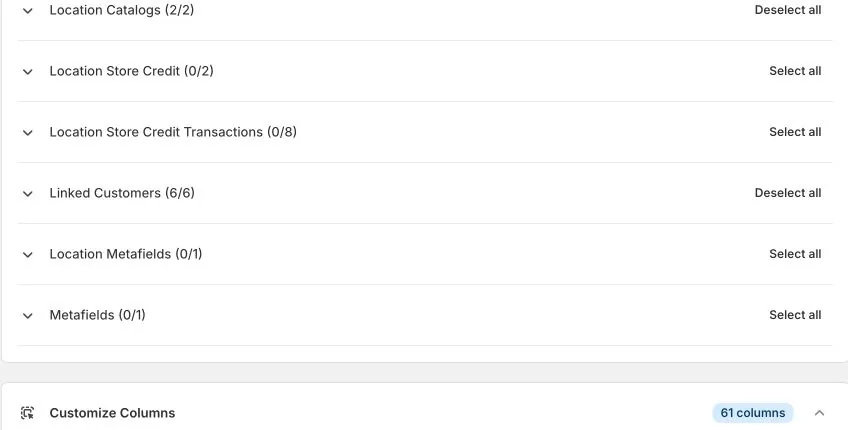
For a simple company update, deselect Locations and Linked Customers. This avoids sending child records back through the importer when you did not intend to change them.
Step 2 — Understand the repeated-row structure
One company can occupy several rows because it can have multiple locations, contacts, role assignments, and store-credit transactions. EditEngine exports:
- Row # as the file-wide row order.
- Top Row as
TRUEon the first row of each company. - company identity fields on every row for that company.
- location identity fields on every row for that location.
- company details only on the company's first row.
- location details only on the location's first row.
Keep every company's rows together. If you sort the sheet, sort it back by Row # before importing.
ID,Name,Command,Location: ID,Location: Name,Location: Command,Customer: Email,Customer: Location Role
1001,Northwind Wholesale,MERGE,2001,London HQ,MERGE,ada@example.com,Location admin
1001,Northwind Wholesale,MERGE,2001,London HQ,MERGE,grace@example.com,Ordering only
1001,Northwind Wholesale,MERGE,2002,Oxford Depot,MERGE,linus@example.com,Ordering only
Protect blank-sensitive columns on repeated rows
EditEngine groups repeated rows and the last parsed value wins for the same metafield or tax-exemption set. The export shows company metafields only on the company top row and location metafields or location details only on the first row for that location. Later spill rows are blank.
Before importing a multi-row file:
- Remove each Metafield: or Location Metafield: column unless you intend to change it.
- When keeping a metafield, repeat its intended value on every row for that company or location. To delete it, leave it blank on every row for that owner.
- Remove Location: Tax Exemptions unless you intend to replace the complete exemption set.
- When keeping Tax Exemptions, repeat the complete list on every row for that location.
Otherwise, a later blank spill row can win and delete the earlier value.
Step 3 — Match the correct Company
EditEngine identifies an existing company in this order:
- ID
- External ID
- Name
Use the exported ID for an update in the same store. External ID is useful as a durable ERP or CRM key. Name is the last fallback and must identify one exact company.
ID,Name,Command,External ID,Notes
1001,Northwind Wholesale,UPDATE,northwind-b2b,Priority wholesale account
Important matching rules:
- When ID is present, EditEngine verifies that ID and does not fall back to External ID or Name.
- A stale ID makes
UPDATEandDELETEfail.MERGEorNEWcan attempt creation, which can then fail on a duplicate Name or External ID. - Multiple exact matches fail instead of EditEngine choosing one.
- Shopify IDs are store-specific. Clear Company, Location, and Customer IDs during a cross-store migration, then use External IDs, names, or customer emails as appropriate.
- A new company requires Name. If no active Location row is supplied, EditEngine creates a default location using the company name.
Step 4 — Choose the Company Command
| Command | What EditEngine does |
|---|---|
MERGE | Updates a matched company or creates it when no match exists. |
NEW | Creates a company and fails when the identity already exists. |
UPDATE | Updates an existing company and fails when it cannot be found. |
REPLACE | Deletes the matched company, then recreates it from the spreadsheet. |
DELETE | Deletes the matched company. |
IGNORE | Skips that spreadsheet row. Use it on every repeated row to skip the whole company. |
A blank Company Command uses the Default Command selected after upload in Advanced import. That screen normally defaults to Merge, so blank normally means MERGE.
REPLACE changes every dependent identity
Company REPLACE is a delete followed by a create. The Company ID and all Location IDs change. Unlisted locations, contacts, roles, catalogs, metafields, and other relationships are not preserved automatically.
EditEngine validates locally resolvable location, catalog, contact, and main-contact inputs before deleting. A later Shopify error can still occur after deletion. A company with a non-zero location store-credit balance normally cannot be deleted; debit each balance to zero before Company DELETE or REPLACE.
Use MERGE or UPDATE for routine edits. Use REPLACE only with a complete reconstruction file, an untouched export, and a tested recovery plan.
Step 5 — Edit company details and Main Contact
Editable company fields are:
- Name
- External ID
- Notes
- Customer Since when creating the company
- Main Contact: Customer ID or Main Contact: Customer Email
Blank Name, External ID, Notes, and Customer Since cells are no-ops on an existing company. They do not clear the current value. Customer Since is sent only during creation because Shopify does not allow it to be updated.
To set the Main Contact, provide an existing Customer ID or Email. EditEngine adds that customer as a company contact first when needed, then promotes the contact to Main Contact.
ID,Name,Command,Main Contact: Customer Email
1001,Northwind Wholesale,UPDATE,ada@example.com
Unlike Matrixify's documented behavior, a blank Main Contact ID or Email is a no-op in EditEngine; it does not clear the current Main Contact. Clear it in Shopify Admin if needed.
These company columns are context only during EditEngine import: Lifetime Duration, Created At, Updated At, Contact Count, Location Count, Order Count, Total Spent, Row #, Top Row, and all First Order: and Last Order: columns.
Step 6 — Create, update, replace, or delete Locations
EditEngine identifies a location inside the matched company in this order:
- Location: ID
- Location: External ID
- Location: Name
Location Name is required for creation. If the same company has duplicate location names, use Location ID or a unique External ID.
| Location Command | Result |
|---|---|
MERGE | Updates a matched location or creates one when no match exists. |
NEW | Creates a location and fails when it already exists. |
UPDATE | Updates an existing location and fails when it cannot be found. |
REPLACE | Recreates that row's location and deletes every unlisted existing location when any location row uses REPLACE. |
DELETE | Deletes the identified location. |
IGNORE | Skips that location row. |
A blank Location: Command always means MERGE in EditEngine, even when the Advanced import Default Command is UPDATE or another value.
One Location REPLACE row activates the full unlisted-location sweep. Include every location the company must retain. Recreated locations receive new IDs, so customer roles and other references must target the replacement Location Name or External ID. Zero any location store-credit balance before deleting or replacing that location.
Editable location details include Name, External ID, Phone, Notes, Locale, shipping and billing addresses, tax settings, shipping-address checkout permission, draft checkout, and payment terms. Blank detail cells are generally omitted rather than clearing an existing value.
Use country-code phone numbers such as '+15417543000. Address updates can be partial, but a new shipping or billing address needs enough valid Shopify address data; Address 1 and Country Code are the safest minimum.
Location: Created At, Location: Updated At, and Location: Checkout Pay Now Only are export-only.
Step 7 — Set checkout, payment, and tax settings
Use these location columns:
| Column | Accepted value |
|---|---|
| Location: Allow Shipping To Any Address | TRUE or FALSE |
| Location: Checkout To Draft | TRUE or FALSE |
| Location: Checkout Payment Terms | An existing Shopify template name such as Net 30 |
| Location: Tax ID | The location's tax registration ID |
| Location: Tax Setting | Collect or Do not collect |
| Location: Tax Exemptions | The complete comma- or semicolon-separated exemption list |
EditEngine resolves payment terms by an exact template name, including Shopify's translated name. A missing or ambiguous template fails that company. A blank Payment Terms or Tax ID cell is a no-op and does not clear the current value.
Tax Exemptions behaves differently: if the column exists, its value is treated as the desired complete set. A blank cell clears all exemptions. Remove the entire column when exemptions should remain unchanged, and follow the repeated-row rule from Step 2.
Step 8 — Assign Location Catalogs
List catalog titles with semicolons:
ID,Name,Command,Location: ID,Location: Name,Location: Command,Location: Catalogs,Location: Catalogs Command
1001,Northwind Wholesale,UPDATE,2001,London HQ,UPDATE,Wholesale UK; Summer catalog,MERGE| Catalogs Command | Result |
|---|---|
MERGE | Adds the listed catalogs and keeps existing assignments. This is the blank default. |
DELETE | Removes only the listed catalogs. |
REPLACE | Makes the listed titles the complete catalog set. A blank list removes every catalog. |
Each title must match one existing Shopify catalog. Missing or duplicate exact-title matches fail the company instead of choosing one.
Step 9 — Link Customers and manage Location roles
The customer must already exist in Shopify. EditEngine finds it by Customer: ID, then Customer: Email. A supplied stale Customer ID does not fall back to Email.
| Customer Command | Result |
|---|---|
MERGE | Adds the customer to the company if needed and manages the role in the identified location. This is the blank default. |
DELETE | Removes the contact from the company. It does not delete the Shopify customer. |
IGNORE | Skips that customer row. |
Set Customer: Location Role to Ordering only or Location admin. When that column is present and blank for a customer-location row, EditEngine removes that customer's role from that location while keeping the customer in the company.
ID,Name,Command,Location: ID,Location: Name,Customer: Email,Customer: Command,Customer: Location Role
1001,Northwind Wholesale,UPDATE,2001,London HQ,ada@example.com,MERGE,Location admin
1001,Northwind Wholesale,UPDATE,2001,London HQ,grace@example.com,MERGE,
1001,Northwind Wholesale,UPDATE,,,former@example.com,DELETE,
Follow Matrixify's customer-removal pattern: use DELETE only to remove the contact from the whole company; use MERGE with a blank Location Role to remove one location assignment.
Because blank roles are meaningful, remove the entire Linked Customers group when you are not changing access. For an access job, keep only the targeted contact rows and verify every Company, Location, and Customer identity. Customer: First Name and Customer: Last Name are export-only.
Step 10 — Update Company and Location metafields
Company metafields use:
Metafield: custom.account_tier [single_line_text_field]
Gold
Location metafields use:
Location Metafield: custom.delivery_zone [single_line_text_field]
London
A nonblank cell sets the metafield. A blank cell in an included metafield column deletes it. Remove the entire column to leave it unchanged. For repeated company or location rows, repeat the intended value on every matching row as described in Step 2.
Keep the exported type in the header. When the header omits a type, EditEngine uses single_line_text_field.
Step 11 — Handle Location Store Credit separately
Location: Store Credit Balance is an export-only snapshot. To change a balance, use:
- Location: Store Credit Currency
- Location: Store Credit Transaction Command
- Location: Store Credit Transaction Amount
- optional Expire At and Send Receipt for a credit
| Transaction Command | Result |
|---|---|
CREDIT | Adds a positive amount. |
DEBIT | Deducts a positive amount. |
SET | Credits or debits the difference needed to reach the supplied target balance. Zero is allowed. |
ID,Name,Command,Location: ID,Location: Name,Location: Command,Location: Store Credit Currency,Location: Store Credit Transaction Command,Location: Store Credit Transaction Amount
1001,Northwind Wholesale,UPDATE,2001,London HQ,UPDATE,USD,SET,500.00
Do not re-import exported Location Store Credit Transaction history. EditEngine reads the Transaction ID column but does not use it as an idempotency key. Re-importing an exported
CREDITorDEBITrow can apply the money movement again. This differs from Matrixify's documented duplicate-transaction protection.
Use a separate single-use file containing only intended transaction rows. Run a small batch, review every result, then create a fresh balance export. Transaction Created At, Event, and Remaining Balance are export-only.
Step 12 — Import through Advanced import
For XLSX, name the worksheet Companies. For CSV, use a clear filename such as companies.csv.
Open EditEngine → Import, select Advanced import, and upload the edited file.
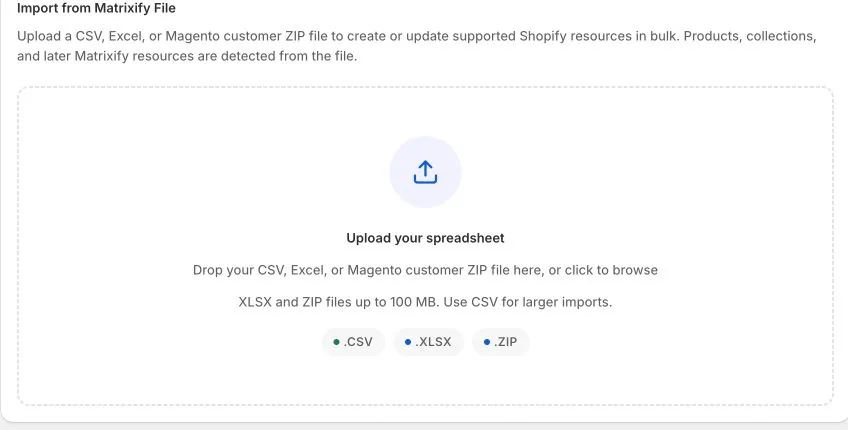
After upload, verify:
- The detected resource says Companies.
- The file overview lists the intended Companies worksheet as ready to import.
- Company, Location, and Customer identities point to the intended records.
- Company and Location commands are explicit where their behavior matters.
- Every
DELETEandREPLACEhas a complete backup and test batch. - Linked Customers, Tax Exemptions, and metafield columns are absent unless intentionally being changed.
- Store Credit Transactions are absent unless this is a dedicated single-use credit job.
Start with the test batch. When the job finishes, download the results file and review every failure. One company can fail while other valid companies continue.
Step 13 — Verify the round trip
Verify the result in Shopify Admin and with a fresh focused export:
- Open each affected company and inspect Name, External ID, Notes, Customer Since, and Main Contact.
- Check every retained location, address, phone, locale, checkout rule, payment term, and tax setting.
- Confirm the complete catalog set for each changed location.
- Verify linked customers and their exact location roles.
- Check Company and Location metafields.
- For store credit, compare the fresh balance and transaction history with the single intended operation.
- Run a new Companies export with the same focused columns and compare it with the intended spreadsheet.
An untouched export is a reconstruction reference, not an exact rollback. Company and Location IDs change after REPLACE, and deleted relationships or historical Shopify-calculated values cannot be restored automatically from the Companies spreadsheet.
Common mistakes
Importing all 61 default columns for a simple company edit. Deselect Locations and Linked Customers when the job only changes company details.
Sorting a multi-row file without restoring Row # order. Keep every company's location, customer, metafield, and transaction rows together.
Leaving blank metafield or Tax Exemptions cells on spill rows. The later blank can win and delete the earlier value. Remove the column or repeat the complete intended value.
Leaving Customer: Location Role blank unintentionally. When that column is included, blank removes the role for the identified customer-location pair.
Using Location REPLACE for one changed branch. It deletes every unlisted existing location. Include all locations the company must retain.
Using Company REPLACE as a normal update. It deletes and recreates the company and its dependent records. Use MERGE or UPDATE for in-place changes.
Keeping source-store IDs during migration. Company, Location, and Customer IDs are store-specific. Clear them and use suitable cross-store identities.
Blanking Notes, Main Contact, or Payment Terms to clear them. Those blank cells are no-ops in EditEngine's Companies importer.
Round-tripping Store Credit Transaction history. Transaction IDs do not prevent EditEngine from applying a money movement again. Build a separate single-use operation file.
Related tutorials
- Bulk update company notes — a notes-only task that leaves locations and contacts out of the working file; import remains restricted.
- Import and export resource availability — check public, restricted, and export-only workflows.
- Export and import Shopify Customers — prepare customers before linking them to B2B companies.
- Export and import Custom Collections — round-trip manual collection details and membership.
- Export and import Smart Collections — round-trip automated collection rules and details.
About EditEngine: EditEngine Bulk Product Editor helps Shopify merchants bulk edit, import, and export store data from spreadsheets. Install on Shopify →