
Store content
Shopify Pages: Export and Import
Published by Profitonium Apps · Last updated
Use the Pages resource to export or edit the pages managed under Shopify Admin → Online Store → Pages. You can round-trip page titles, URL handles, body content, publication settings, theme templates, SEO fields, and custom metafields through a CSV or XLSX spreadsheet.
This resource does not edit product descriptions, collection descriptions, or blog articles. Each of those belongs to a different Shopify resource.
Before you start
- Install EditEngine Bulk Product Editor in your Shopify store.
- Use Advanced import for the edited spreadsheet.
- Keep one untouched copy of the export. Advanced imports do not have one-click undo.
- Test handle changes,
DELETE, andREPLACEon one or two non-critical pages before importing the complete file.
EditEngine follows the Matrixify Pages spreadsheet format for its main columns and commands. This guide also calls out the EditEngine-specific behavior that matters during a round trip.
Step 1 — Export Pages
Open EditEngine → Export, choose Pages as the resource, and select the fields you need.
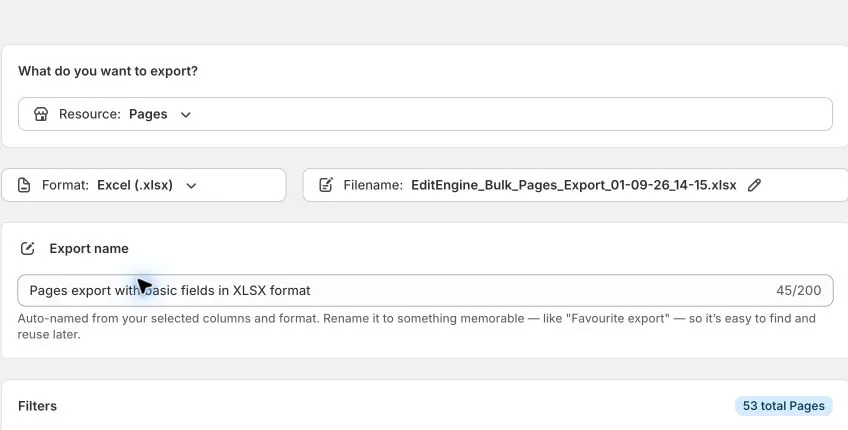
Keep these columns in a normal round-trip file:
- ID — the safest identifier for an existing page.
- Handle — the page's URL handle and the next matching key when ID is unavailable.
- Command — controls what the importer does. EditEngine exports
MERGE. - Title — required when creating a page or using
REPLACE.
Add the fields you intend to review or change:
- Body HTML
- Published and Published At
- Template Suffix
- Page metafields, including the exported SEO fields
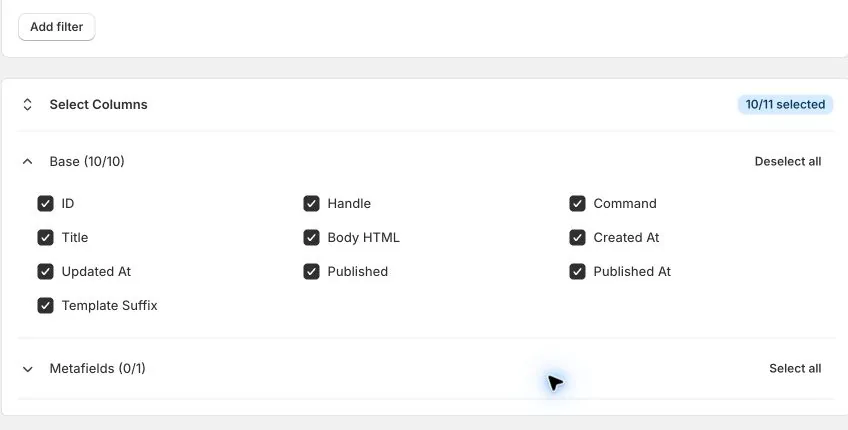
Created At and Updated At are export context only. Importing values in those columns does not change Shopify's timestamps.
Download the CSV or XLSX, then duplicate it before editing. Use the duplicate as your working file and keep the original unchanged as a recovery reference.
Step 2 — Identify each page correctly
EditEngine matches an existing page by ID first and Handle second. It never uses Title to find an existing page because different pages can have the same title.
For a routine update, keep the exported ID:
ID,Handle,Command,Title,Body HTML
1234567890,shipping-information,UPDATE,Shipping information,"<p>Orders ship in 2–3 business days.</p>"
An UPDATE, REPLACE, or DELETE row containing only a Title fails instead of risking a change to the wrong page. A Title-only NEW row is allowed; Shopify generates its handle when the Handle cell is blank.
ID,Handle,Command,Title,Body HTML,Published
,,NEW,Size guide,"<h2>Find your size</h2><p>Use the chart below.</p>",TRUE
Rows with the same ID or Handle are grouped as one page. If a file repeats a page, keep its identity consistent on every row. Title-only rows are treated as separate pages and are not grouped together.
Step 3 — Choose the right Command
| Command | What EditEngine does |
|---|---|
MERGE | Updates the matching page, or creates a page when no match exists. This is the exported round-trip command. |
NEW | Creates a page and fails if the supplied ID or Handle already exists. |
UPDATE | Updates an existing page and fails if EditEngine cannot find it. |
REPLACE | Deletes the existing page and recreates it from the spreadsheet. Title is required and the Shopify page ID changes. |
DELETE | Deletes the page matched by ID or Handle. |
IGNORE | Skips the row without changing Shopify. |
Important: check the default for blank Pages commands
For the Pages resource, a blank Command cell resolves to UPDATE when the job's Default Command is missing or Merge. If you explicitly select another default—NEW, UPDATE, REPLACE, DELETE, or IGNORE—that default applies to blank Command cells instead. A nonblank row command always takes precedence. Use an explicit MERGE when you want “update if found, create if missing.”
Keep EditEngine's exported MERGE values during a normal round trip, and do not leave commands blank when a destructive default is selected. The normal UPDATE fallback matches Matrixify's documented Pages default; EditEngine's explicitly selected job default can override that fallback.
For deletion, first follow Matrixify's safe pattern: export the pages, keep only the intended targets, and set their Command to DELETE. Confirm the IDs and Handles before importing.
Step 4 — Edit page fields
Body HTML
EditEngine preserves valid HTML in Body HTML. Plain text is converted to paragraphs and line breaks before Shopify receives it.
- A blank Body HTML cell clears the page body when that column is included.
- Omitting the Body HTML column leaves the existing body unchanged.
- The Remove images from Body HTML Advanced import option strips embedded
<img>tags when enabled.
Published and Published At
Use TRUE to publish a page and FALSE to unpublish it. EditEngine also accepts YES/NO and 1/0.
A blank Published cell is a no-op in EditEngine—it does not unpublish the page. Omit the column as the clearest way to leave publication unchanged.
Use Published At when you need a publication date or future schedule. The Matrixify timestamp format includes the time-zone offset:
ID,Handle,Command,Title,Published,Published At
1234567890,holiday-hours,UPDATE,Holiday hours,TRUE,2026-09-15 09:00:00 +0530
When the date is in the future, EditEngine sends the future publish date without prematurely forcing the page live.
Template Suffix
Set Template Suffix to the suffix of the page template you want Shopify to use. A blank cell clears the current suffix when the column is included; omitting the column leaves it unchanged.
Handles and redirects
To change an existing page's Handle, identify the page by ID and enter the new Handle. If you identify it only by Handle, that Handle is being used to find the page and cannot also safely describe a rename.
The Advanced import options enable Transliterate handles to English alphabet and Create redirects for changed handles by default. With an ID-based rename, EditEngine attempts to create a redirect from /pages/old-handle to /pages/new-handle. A redirect failure is reported as a warning while the page update remains successful.
SEO and custom metafields
EditEngine exports page SEO as these Matrixify-compatible metafield columns:
Metafield: title_tag [string],Metafield: description_tag [string]
Size guide | Example Store,"Use our size guide to choose the right fit."
Custom page metafields use the same header pattern:
Metafield: custom.audience [single_line_text_field]
Wholesale customers
Keep the exported type in the header. A blank value in an included metafield column deletes that metafield; omitting the column leaves it unchanged. Matrixify's broader metafield rules are documented in its Metafields reference.
Step 5 — Import through Advanced import
Open EditEngine → Import, select Advanced import, and upload the edited CSV or XLSX.
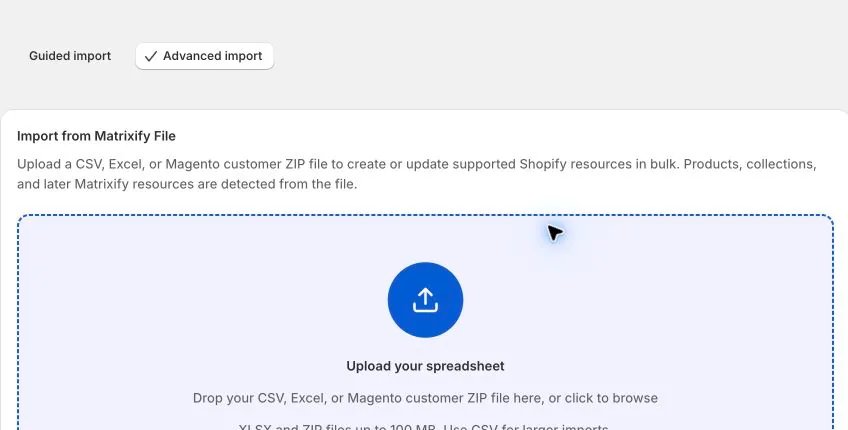
After upload, verify:
- The detected resource says Pages.
- Existing-page rows keep an ID or exact Handle.
MERGE,NEW,REPLACE, andDELETEare explicit wherever their behavior matters.- Transliterate handles and Create redirects for changed handles match your intention.
- Remove images from Body HTML is off unless you deliberately want to strip embedded images.
Start the import, then download the results file when it finishes. Review every failure and warning, even when the overall job says it completed.
Step 6 — Verify the round trip
Verify the result in Shopify Admin and with a fresh export:
- Open each affected page under Online Store → Pages and inspect its title, content, visibility, template, and URL.
- If you changed a Handle, open the old
/pages/...URL and confirm that it redirects to the new page. - Run a new Pages export with the same columns and compare it with your intended spreadsheet.
For REPLACE, Shopify receives a newly created page after the original is deleted, so the ID changes. Re-importing the untouched export is not a guaranteed automatic rollback. For DELETE, the untouched export is a reconstruction reference—not one-click recovery.
Common mistakes
Clearing Command because the import screen says Merge.
A blank Pages Command resolves to UPDATE with the normal Merge default; another explicitly selected Default Command applies instead. Keep the exported command or set it explicitly.
Trying to match an existing page by Title.
EditEngine uses ID or Handle only. Keep ID for the safest round trip.
Blanking Body HTML or Template Suffix to mean “unchanged.”
Those blanks clear the existing value. Remove the entire column when you do not want to update it.
Expecting a blank Published cell to unpublish.
Blank Published is a no-op for Pages. Use FALSE explicitly.
Renaming a Handle without ID.
Keep the page ID so EditEngine can find the old record, apply the new Handle, and create the redirect.
Using REPLACE as a normal update.
REPLACE deletes and recreates the page with a new ID. Use MERGE or UPDATE for in-place edits.
Related tutorials
- Export and import Shopify Custom Collections — round-trip manual collection details and direct product membership.
- Export and import Shopify Smart Collections — round-trip automated collection details and rules.
About EditEngine: EditEngine Bulk Product Editor helps Shopify merchants bulk edit, import, and export store data from spreadsheets. Install on Shopify →