
Store content
Shopify Menus: Export and Import
Published by Profitonium Apps · Last updated
Use the Menus resource to export or import the navigation trees managed under Shopify Admin → Content → Menus. EditEngine writes a Matrixify-shaped CSV or XLSX sheet with one row per menu item and repeats the menu identity on each row.
You can use that sheet to back up menus, rename them, add or remove links, rebuild nested navigation, change item positions, or copy menus between stores.
This guide follows the official Matrixify Menus sheet format and its tutorials for creating menus, rearranging menu items, copying menus between stores, and deleting menus or items. The sheet layout is compatible, but the command details below describe EditEngine's current Advanced Import behavior.
Before you start
- Use Advanced import, not Guided import, for a Menus spreadsheet.
- Keep one untouched, access-controlled export. Advanced imports do not have one-click undo.
- Test with a non-default menu before changing a live storefront navigation tree.
- Create the linked products, collections, pages, blogs, articles, metaobjects, or policies in the destination store before importing menu links to them.
- Treat menu-level
DELETEandREPLACEas destructive.REPLACEdeletes a matched menu and recreates it. - Do not delete, replace, or change the handle of a row where
Is DefaultisTRUE; Shopify protects default menus from those operations.
Export needs Shopify's read_online_store_navigation scope. Import also needs write_online_store_navigation.
Step 1 — Export Menus
Open EditEngine → Export, choose Menus, and select CSV or Excel format.
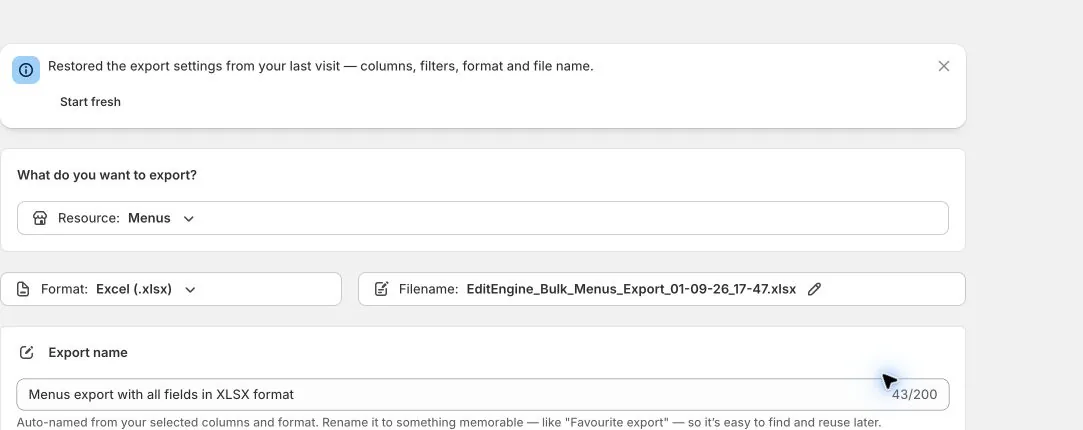
The total shown in the export panel is the store's total number of menus. Adding filters does not change that displayed total; the generated spreadsheet is filtered.
EditEngine writes one Menus worksheet. Each menu item becomes one row in depth-first tree order. An empty menu becomes one row with blank Menu Item columns. If you deselect the whole Menu Items column group, the export also collapses to one row per menu.
Step 2 — Choose the round-trip columns
The Menus panel exposes 18 selectable columns: seven menu-level columns and eleven repeating Menu Item columns.
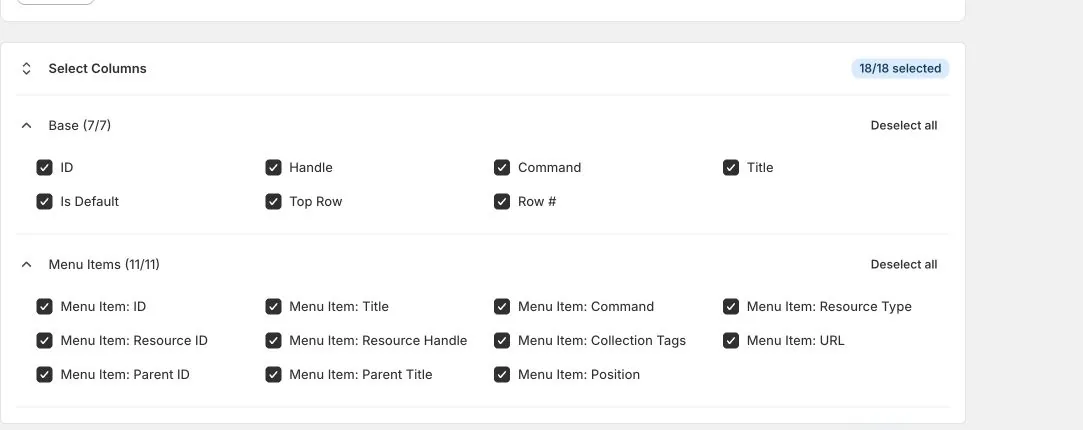
| Column | Round-trip meaning |
|---|---|
ID | Shopify's store-specific menu ID and strongest same-store identity. |
Handle | Stable menu handle and secondary identity. Required by EditEngine when creating or replacing a menu. |
Command | Exports as MERGE; controls the menu-level import operation. |
Title | Menu title, fallback identity, and required create/replace value. |
Is Default | Export-only marker for a Shopify-protected default menu. |
Top Row | Export-only TRUE marker on the first row of each menu block. |
Row # | Export-only running row number across the sheet. |
Menu Item: ID | Shopify's menu-item ID. A full GID can match an existing top-level item during MERGE. |
Menu Item: Title | Required item label and fallback match key for top-level MERGE. |
Menu Item: Command | Exports as MERGE; use MERGE or DELETE for an item row. Blank defaults to MERGE. |
Menu Item: Resource Type | Link kind such as PRODUCT, COLLECTION, PAGE, ARTICLE, or HTTP. |
Menu Item: Resource ID | Store-specific Shopify ID for the linked resource. |
Menu Item: Resource Handle | Portable linked-resource key when that type supports handle lookup. |
Menu Item: Collection Tags | Optional collection tag filter for a COLLECTION link. |
Menu Item: URL | Destination URL. Required for HTTP; also preserved on fixed destinations that do not require a Resource ID, when no Resource ID is supplied. Resource-linked destinations use their ID or handle. |
Menu Item: Parent ID | Connects a child row to another item row in the same file tree. |
Menu Item: Parent Title | Alternative parent pointer when that title is unique within the menu. |
Menu Item: Position | One-based position among siblings. Explicit positions take priority over spreadsheet row order. |
EditEngine always emits ID, Handle, Command, and Title so the file can round-trip even if those columns are removed from the visible selection. Keep all 18 columns in the untouched recovery copy.
Step 3 — Filter to a safe menu set
Use Add filter to limit the export by menu Title or ID.
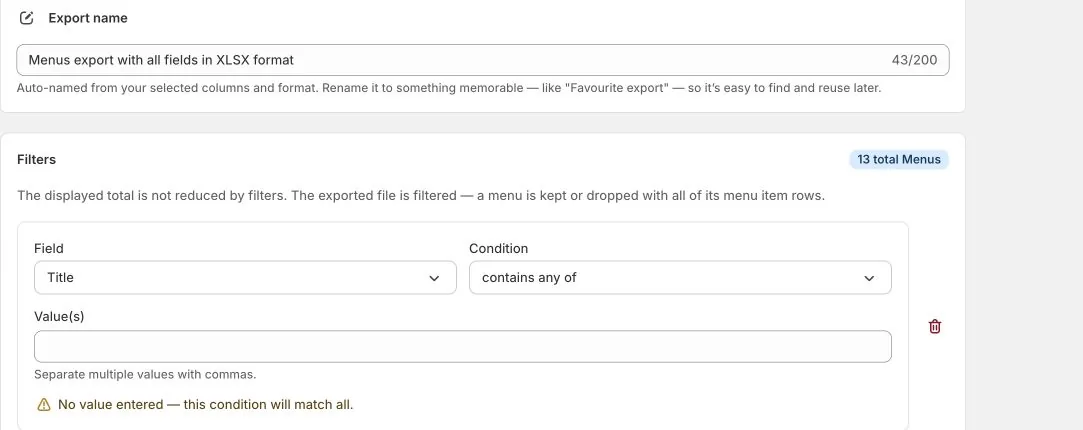
Title supports contains any, equals any, pattern matching, and contains none. ID supports equals any, does not equal, greater than or equal, less than or equal, and between. Multiple filters can match all conditions or any condition.
Filters apply at menu level: a matching menu is kept with all of its item rows, or dropped with all of them. A blank filter is ignored. An incomplete or non-numeric ID range is also ignored, with a warning, so remove unfinished conditions before creating the export.
EditEngine's inclusive ID range filters are an intentional addition to the simpler ID and Title filtering described by Matrixify.
Step 4 — Understand the row model
A Menus sheet is a set of trees, not a flat list of unrelated links. Repeat the same menu identity and Command on every row in one menu block.
Parent linkage is resolved inside that block:
Menu Item: Parent IDconnects a child to the item row carrying that same item ID.Menu Item: Parent Titleworks when exactly one item has that title.- A missing Parent Title produces a warning and treats the item as top-level.
- An ambiguous Parent Title fails that row instead of choosing a parent silently.
Menu Item: Positionis one-based among siblings. When it is blank, row order breaks ties.
If an item row is invalid, EditEngine can omit that row while importing healthy siblings. Descendants of the invalid item are also skipped because their parent tree cannot be built safely.
Step 5 — Understand menu identity
EditEngine identifies an existing menu in this order:
IDHandleTitle
Use ID for the safest same-store update. Shopify IDs belong to one store, so do not carry a source menu ID into another store.
Keep ID, Handle, Title, and Command consistent across every row in one menu block. If you change the grouping identity part-way through a block, EditEngine can interpret the rows as separate menus instead of one tree.
Step 6 — Choose the menu-level Command
MERGE is the exported and default menu command.
| Command | EditEngine behavior |
|---|---|
MERGE | Updates a match or creates a menu when no match exists. It preserves unmentioned existing top-level items, but every listed top-level item replaces its entire existing subtree. |
NEW | Creates a menu and fails when ID, Handle, or Title already matches an existing menu. Requires Handle and Title. |
UPDATE | Updates a match and fails when none exists. The file's item tree is the complete source of truth, so unlisted items are removed. |
REPLACE | Validates the replacement tree and linked resources, then deletes a match and recreates it. Creates when absent. Requires Handle and Title. |
DELETE | Deletes the entire matched menu and fails when none exists. |
IGNORE | Skips the menu block without changing Shopify. |
MERGE is shallow at the top level
This is the most important EditEngine detail to review before import. MERGE preserves existing top-level items that your file does not mention. However, when a spreadsheet row matches a top-level item by full Menu Item GID or by title, the spreadsheet version replaces that item's complete subtree. Children missing from the file under that listed parent are removed.
Use Menu Item: Command = DELETE to remove one matched top-level item during MERGE. EditEngine then sends Shopify the resulting complete tree. Use explicit Position values if you also need to reorder preserved and changed top-level items.
UPDATE does not preserve unlisted top-level items: its spreadsheet tree is the complete result. REPLACE has the same complete-tree input, but it deletes and recreates the menu record.
Task: change one branch and preserve the other top-level links
Suppose a non-default menu contains top-level Shop, About, and Help, with FAQ and Shipping beneath Help. You want Shipping to point to /pages/delivery, while keeping every other link. First export the complete menu and keep an untouched copy. In a working copy, retain the Help parent and all descendants you want beneath it; Shop and About can be omitted because the menu command is MERGE.
The example below is a complete two-child Help branch. EditEngine exports numeric IDs: convert each existing Menu Item ID to its full GID (for example, 5001 becomes gid://shopify/MenuItem/5001) and convert every matching Parent ID consistently. A menu ID itself accepts either numeric form or a full Menu GID. Replace all sample IDs with your store's values, keep the existing Handle and Title, and preserve the parent's original top-level Position. The URLs are relative paths within your storefront and must lead to real pages.
For the complete export, ID-conversion, Advanced Import review, and result-checking workflow, follow Update Shopify menu branches in bulk.
ID,Handle,Command,Title,Menu Item: ID,Menu Item: Title,Menu Item: Resource Type,Menu Item: URL,Menu Item: Parent ID,Menu Item: Position
gid://shopify/Menu/9001,help-menu,MERGE,Help menu,gid://shopify/MenuItem/5001,Help,HTTP,/pages/help,,3
gid://shopify/Menu/9001,help-menu,MERGE,Help menu,gid://shopify/MenuItem/5002,FAQ,HTTP,/pages/faq,gid://shopify/MenuItem/5001,1
gid://shopify/Menu/9001,help-menu,MERGE,Help menu,gid://shopify/MenuItem/5003,Shipping,HTTP,/pages/delivery,gid://shopify/MenuItem/5001,2
This file supplies the whole replacement Help branch. Omitting FAQ from it would remove FAQ even though the menu command is MERGE. If your actual Help branch has more children or grandchildren, include every one you want to keep with its resource type, destination, parent, and position. Preserve resource-linked types and handles for PRODUCT, COLLECTION, PAGE, and other Shopify links; this HTTP example is specifically for URL links.
Upload the working file through Advanced Import as Menus and test on the non-default menu. Inspect the result for row warnings, then verify that Shop and About remain, Help still contains FAQ and Shipping in order, and Shipping opens the new destination. Invalid item rows can be skipped, so inspect the complete branch rather than relying only on the job's completed status.
The official Matrixify menu-position tutorial shows editing parent pointers and sibling positions. EditEngine's shallow MERGE requires the complete listed branch, including valid link details, even when you change only one child.
Step 7 — Create a new nested menu
For a new menu, repeat the new Handle, Command, and Title on every item row. Use temporary item IDs only as in-file parent keys, or use Parent Title when item titles are unique.
ID,Handle,Command,Title,Menu Item: ID,Menu Item: Title,Menu Item: Command,Menu Item: Resource Type,Menu Item: Resource Handle,Menu Item: URL,Menu Item: Parent ID,Menu Item: Parent Title,Menu Item: Position
,summer-menu,NEW,Summer menu,temp-shop,Shop,MERGE,COLLECTION,summer,,,,1
,summer-menu,NEW,Summer menu,temp-shirts,Shirts,MERGE,COLLECTION,shirts,,temp-shop,,1
,summer-menu,NEW,Summer menu,temp-help,Help,MERGE,HTTP,,https://example.com/pages/help,,,2
The first row creates a top-level collection link, the second nests another collection beneath it through temp-shop, and the third creates a top-level external URL.
EditEngine requires both Handle and Title for NEW and REPLACE. Matrixify's create-menu tutorial treats Handle as optional, so this is a deliberate EditEngine difference. Do not omit Handle from a new or replacement menu.
Step 8 — Link items to Shopify resources
Supported Resource Type values are:
ARTICLE, BLOG, CATALOG, COLLECTION, COLLECTIONS, CUSTOMER_ACCOUNT_PAGE, FRONTPAGE, HTTP, METAOBJECT, PAGE, PRODUCT, SEARCH, and SHOP_POLICY.
For portable files, prefer Resource Handle where supported:
- PRODUCT, COLLECTION, PAGE, and BLOG use that resource's handle.
- ARTICLE uses
blog_handle.article_handle. - METAOBJECT uses
definition_handle.entry_handle. - SHOP_POLICY accepts
CONTACT_INFORMATION,LEGAL_NOTICE,PRIVACY_POLICY,REFUND_POLICY,SHIPPING_POLICY,SUBSCRIPTION_POLICY,TERMS_OF_SALE, orTERMS_OF_SERVICE; the corresponding policy must exist in Shopify. - CUSTOMER_ACCOUNT_PAGE accepts
orders,profile, orsettings. - HTTP requires Menu Item URL.
- Fixed destinations such as CATALOG, COLLECTIONS, FRONTPAGE, SEARCH, and CUSTOMER_ACCOUNT_PAGE do not need a store-specific Resource ID.
For resource-linked types, EditEngine verifies supplied IDs and resolves supported handles before writing. An invalid link row can fail without blocking healthy sibling rows. Shopify permission errors for SHOP_POLICY are isolated to those rows.
The export includes Menu Item URL for all link types. On import, EditEngine uses it for HTTP and preserves a supplied URL on fixed destinations that do not require a Resource ID when no Resource ID is present. Change a product or collection destination through Resource ID or Resource Handle, not by editing its exported URL.
Step 9 — Copy menus between stores
Shopify menu and resource IDs are store-specific. To move a menu tree to another store:
- Export the Menus resource from the source store.
- Keep an untouched copy before editing.
- Clear the menu
IDcolumn. - Clear store-specific
Menu Item: Resource IDvalues. - Keep Handle, Title, Resource Type, and supported Resource Handle values.
- Make sure every linked destination resource already exists in the target store with the expected handle.
- For parent linkage, replace exported Menu Item IDs with fresh temporary in-file keys and update matching Parent ID cells, or use unique Parent Title values.
- Use
NEWwhen the target must not already contain the menu, or a carefully reviewedMERGEwhen an existing Handle or Title may be updated. - Test one non-default menu before moving storefront navigation.
Do not assume that clearing only the menu ID makes the file portable. Product, collection, page, article, blog, metaobject, and policy IDs must also belong to the destination store.
Step 10 — Upload through Advanced import
Open EditEngine → Import, select Advanced import, and upload the edited CSV or XLSX.
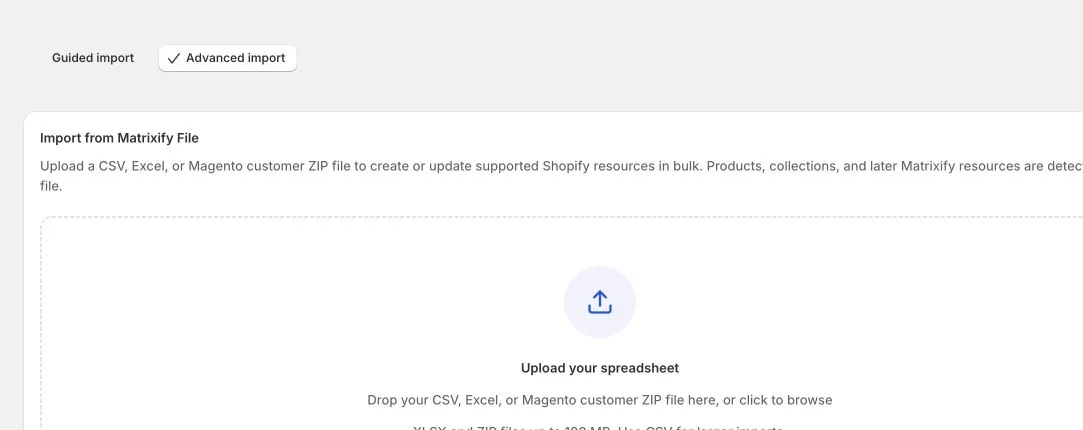
For XLSX, keep the worksheet named Menus or Menu. A CSV has one logical sheet; keep the standard Menus headers and use a descriptive file name.
After analysis, verify:
- The detected resource is Menus.
- The sheet and row count match the intended working file.
read_online_store_navigationandwrite_online_store_navigationare granted.- Every menu block has one consistent identity and Command.
- Every new or replacement menu has both Handle and Title.
- Every Parent ID or Parent Title resolves within the intended menu tree.
- Every linked resource exists in this store.
- No default menu is marked for DELETE, REPLACE, or a handle change.
Run the smallest test file first. Download the result and review Import Status and Import Comment for failures and warnings before importing more menus.
Step 11 — Verify the round trip
Do not rely only on the completed job status:
- Open Shopify Admin → Content → Menus and inspect every changed test menu.
- Confirm the menu title and handle.
- Expand the full tree and check every label, link destination, parent, and sibling position.
- Open each storefront link, especially external HTTP URLs and linked resources copied from another store.
- Create a fresh focused Menus export and compare IDs, handles, parent pointers, positions, and resource handles with the intended result.
- Keep the result file beside the untouched pre-import export.
The untouched export is a manual recovery source, not an automatic rollback. If a destructive command changes a live tree, restore it through another reviewed import or in Shopify Admin.
Common mistakes
Using Guided import. Menus use the Matrixify-shaped Advanced Import path.
Treating MERGE as a recursive child merge. A listed top-level item replaces its whole subtree. Include every child you want to keep below that parent.
Using UPDATE with a partial tree. UPDATE removes unlisted menu items because the file is the complete source of truth.
Assuming REPLACE is an in-place update. EditEngine validates first, then deletes a matched menu and recreates it. Its Shopify ID changes.
Omitting Handle from NEW or REPLACE. EditEngine requires both Handle and Title, even though Matrixify's create tutorial allows Shopify to generate a missing handle.
Editing URL on a PRODUCT or COLLECTION row. Use the linked resource ID or handle for PRODUCT and COLLECTION destinations; editing their exported URL does not change the link target.
Keeping source-store IDs. Clear menu and linked-resource IDs before a cross-store import.
Using duplicate Parent Titles. An ambiguous Parent Title fails rather than attaching the child arbitrarily. Use Parent ID-style temporary keys instead.
Deleting or replacing a default menu. Is Default is export-only, and Shopify protects that menu from deletion and handle changes.
Trusting the displayed total after adding filters. The panel keeps showing the store total; verify the generated sheet contains the intended filtered menus.
Related tutorials
- Update Shopify menu branches in bulk — edit one complete branch with MERGE while preserving other top-level links.
- Export and import Shopify Pages — prepare page destinations before importing page menu links.
- Export and import Shopify Blog Posts — move blogs and articles before navigation that links to them.
- Export and import Shopify Custom Collections — prepare collection handles used by menu items.
- Export and import Shopify Metaobjects — create definitions and entries before importing metaobject menu links.
About EditEngine: EditEngine Bulk Product Editor helps Shopify merchants bulk edit, import, and export store data from spreadsheets. Install on Shopify →