
Customers
Shopify Customers: Export and Import
Published by Profitonium Apps · Last updated
Use the Customers resource to export or update Shopify customer profiles, tags, marketing consent, addresses, custom metafields, account invitations, and store credit through a CSV or XLSX spreadsheet.
Customer files contain personal information. Store the untouched export securely, share it only with people who need access, and remove working copies when the job is complete.
Before you start
- Install EditEngine Bulk Product Editor in your Shopify store.
- Use Advanced import for the edited spreadsheet.
- Keep one untouched, access-controlled copy of the export. Advanced imports do not have one-click undo.
- Test
NEW, marketing-consent changes, address operations,DELETE, andREPLACEon a small non-critical batch. - Import marketing consent only when you have a valid record of the customer's choice.
- Keep Store Credit Transactions out of a normal customer round-trip file. Use a separate, single-use spreadsheet for those operations.
EditEngine follows the main columns and multi-row structure in the Matrixify Customers spreadsheet format. This guide calls out EditEngine-specific matching, blank-cell, activation-link, and store-credit behavior.
Step 1 — Export Customers
Open EditEngine → Export, choose Customers, and select CSV or Excel format.
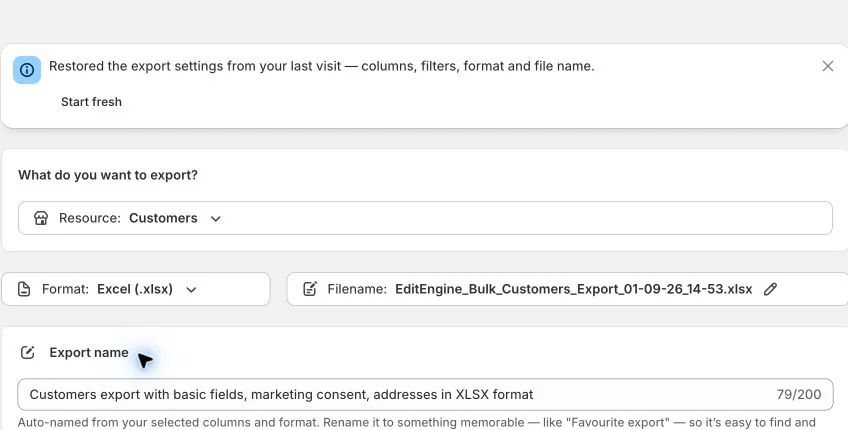
The default export selects the customer Base fields, Marketing Consent, and Addresses. Keep these round-trip keys:
- ID — the safest identifier for an existing customer in the same store.
- Email — the next matching key and the identity repeated on continuation rows.
- Command — controls the customer-level operation. EditEngine exports
MERGE. - Address ID and Address Command — identify and control each address.
- Tags Command — EditEngine exports
REPLACE, which reproduces the exported tag set.
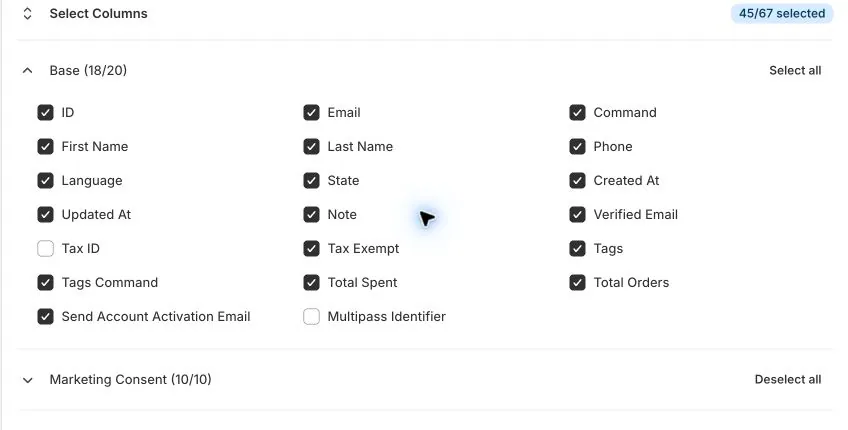
Optional sections add more data or permissions:
| Section | What it adds |
|---|---|
| First and Last Order | Export-only order IDs, names, dates, and totals. |
| Store Credit | Currency and current balance; Balance is export-only. |
| Store Credit Transactions | Transaction history plus columns for deliberate credit, debit, or set operations. |
| Addresses | One spreadsheet row per customer address. Selected by default. |
| Activation URLs | Generates fresh activation links for eligible legacy customer accounts and expires previously generated links. |
| Metafields | Dynamic customer metafield columns. |
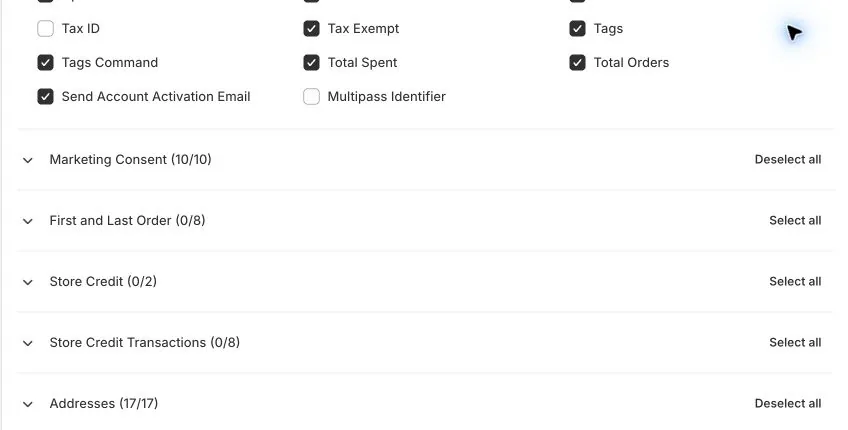
EditEngine always keeps ID and Email in the generated file because they anchor customer and continuation rows. Download the export, duplicate it, and edit only the duplicate.
Know which columns are context only
These exported values do not update the customer in EditEngine:
- State, Created At, Updated At, and Verified Email
- Tax ID — EditEngine exports Shopify's validated customer tax/VAT ID when one exists. The field is export-only, can be blank, and requires the store's approved protected-customer-data access.
- Total Spent and Total Orders
- every First Order: and Last Order: column
- SMS Marketing: Source
- Store Credit: Balance
- Store Credit Transaction: ID, Created At, Event, and Remaining Balance
- Row #, Top Row, and Account Activation URL
Older orders need extra Shopify access. EditEngine can export all-time first/last dates and the latest order ID, but order details older than Shopify's standard 60-day window can have blank Name, Price Total, or First Order ID values. Older dates may have day precision unless the store has Shopify's protected read_all_orders approval.
Step 2 — Identify each customer safely
EditEngine uses this lookup order:
- ID
- Phone
- the combination of First Name and Last Name
For a routine same-store update, keep the exported ID and Email:
ID,Email,Command,First Name,Last Name,Note
1001,ada@example.com,UPDATE,Ada,Lovelace,Wholesale contact
Important matching behavior:
- EditEngine verifies a supplied ID against Shopify. When an ID is present, it does not fall back to Email or Phone.
- A stale ID makes
UPDATEandDELETEfail.MERGEorNEWcan attempt to create a customer instead, but Shopify will reject a duplicate Email or Phone. - Without ID, Email wins over Phone and the name pair.
- First Name without Last Name is not an existing-customer lookup. Use ID, Email, or Phone whenever possible.
- If a lookup matches more than one customer, the row fails instead of choosing one.
- Shopify IDs are store-specific. Remove source-store customer and address IDs before a cross-store migration.
Phone numbers should include their country code. EditEngine accepts Matrixify's leading-apostrophe form, such as '+15417543000, and removes the apostrophe before sending the phone to Shopify.
Step 3 — Choose the Customer Command
| Command | What EditEngine does |
|---|---|
MERGE | Updates the matching customer, or creates one when no match exists. This is the exported and blank-cell default. |
NEW | Creates a customer and fails when the identity already exists. |
UPDATE | Updates an existing customer and fails when EditEngine cannot find it. |
REPLACE | Deletes the matching customer, then recreates it from the spreadsheet. The Shopify ID changes. |
DELETE | Deletes the matched customer. Shopify can refuse deletion when the customer is connected to orders. |
IGNORE | Skips the customer without changing Shopify. |
A blank Command uses the Default Command selected on the Advanced import screen. The screen defaults to Merge, so blank normally means MERGE. This matches Matrixify's documented Customers default.
REPLACE is a delete followed by a create
REPLACE is not a fuller version of update. EditEngine deletes the matched customer first, then creates a new customer and applies the spreadsheet's tags, consent, metafields, addresses, store-credit operations, and activation-email request.
If Shopify rejects creation after deletion, the original customer is already gone. Orders and other relationships are not reconstructed by a customer spreadsheet. Use MERGE or UPDATE for normal edits, and use REPLACE only after testing a complete reconstruction file.
Matrixify's bulk-delete Customers tutorial follows the safest deletion pattern: export first, keep only the intended customers, set DELETE, and import that reduced file.
Step 4 — Edit core customer fields
Editable profile fields include:
- Email, Phone, First Name, and Last Name
- Language — the customer's notification locale, such as
en - Note
- Tax Exempt — use
TRUEorFALSE - Multipass Identifier — available only for Shopify Plus Multipass stores
ID,Email,Command,First Name,Last Name,Phone,Language,Tax Exempt
1001,ada@example.com,UPDATE,Ada,Lovelace,'+15417543000,en,FALSE
For an existing customer, blank Email, Phone, name, Note, Language, or Multipass Identifier cells are no-ops in EditEngine. They do not clear the current value. Remove unused columns for the clearest update file.
A blank Tax Exempt cell is also a no-op. A nonblank value other than true/false forms (TRUE, FALSE, YES, NO, 1, 0) fails that row before mutation.
Passwords cannot be exported or migrated. For stores using legacy customer accounts, customers activate their destination account and choose a new password, as in Matrixify's customer migration and activation tutorial. Shopify's current customer accounts instead support passwordless sign-in with an emailed one-time code; do not send legacy activation invitations for that workflow.
Step 5 — Manage customer tags
Tags are comma-separated. Tags Command controls how they affect the existing set:
| Tags Command | Result |
|---|---|
MERGE | Adds the listed tags and keeps all current tags. This is the blank Tags Command default. |
DELETE | Removes only the listed tags. |
REPLACE | Makes the spreadsheet value the complete tag set. EditEngine exports this value. |
ID,Email,Command,Tags,Tags Command
1001,ada@example.com,UPDATE,VIP,MERGE
1002,grace@example.com,UPDATE,Legacy,DELETE
1003,linus@example.com,UPDATE,Wholesale,REPLACE
A blank Tags cell with REPLACE clears all customer tags. A blank Tags cell with MERGE or DELETE does nothing. Remove both tag columns when tags should remain unchanged.
Repeated rows for one customer can carry multiple tag operations. EditEngine applies them in spreadsheet order.
Tag-only task: add VIP without changing the profile
Use a four-column working file: ID, Command, Tags, and Tags Command. Copy the real ID from your export, keep Command=UPDATE, enter VIP, and deliberately change the exported Tags Command from REPLACE to MERGE. Leave Email out: ID already identifies the customer, and including an old exported email can overwrite the current profile email. A customer who already has Wholesale keeps that tag and gains VIP.
Keep one row per selected customer and remove address, marketing-consent, activation-email, metafield, and store-credit columns from this task file. Upload it through Advanced Import as Customers, test one customer, then inspect the complete tag set and confirm the profile and consent values are unchanged. UPDATE fails on a missing customer instead of creating one. To remove only VIP later, use the same file with Tags Command=DELETE only if VIP was newly added by this task and was not already present; do not use customer-level DELETE.
This reduced-file approach also follows Matrixify's bulk tag-update tutorial, which covers Customers as well as Products.
Step 6 — Update marketing consent carefully
Marketing Consent covers Email, SMS, and WhatsApp. Each channel can include:
- Status — for example
subscribed,unsubscribed,pending, ornot_subscribed - Level —
single_opt_in,confirmed_opt_in, orunknown - Updated At — a Matrixify or ISO date-time
ID,Email,Command,Email Marketing: Status,Email Marketing: Level,Email Marketing: Updated At
1001,ada@example.com,UPDATE,subscribed,confirmed_opt_in,2026-08-20 10:30:00 +0530
Rules that matter:
- A Status is required when Level or Updated At is present.
- Email Level defaults to
single_opt_inwhen Status is supplied without Level. not_subscribeddescribes a customer who has never subscribed. Shopify does not accept it as an update to an existing customer; useunsubscribedto withdraw an existing subscription.- WhatsApp consent requires the customer to have a phone number. Shopify returns a row error otherwise.
- SMS Marketing: Source is export-only.
- A blank channel Status leaves that consent channel unchanged.
Consent imports change communication permissions, not just labels. Confirm the source and timestamp before setting a customer to subscribed.
Step 7 — Keep multiple addresses together
Selecting Addresses expands a customer to one row per address. The first row has the profile fields; continuation rows repeat ID and Email beside the next address. Keep each customer's rows together and preserve Row # if you sort the file.
ID,Email,Command,Address ID,Address Command,Address Line 1,Address City,Address Country Code,Address Is Default
1001,ada@example.com,UPDATE,900,MERGE,1 Bytes Road,London,GB,TRUE
1001,ada@example.com,UPDATE,901,MERGE,2 Loop Avenue,Oxford,GB,FALSE
Address commands behave as follows:
| Address Command | Result |
|---|---|
MERGE | Updates Address ID, matches an identical id-less address, or creates a new address. This is the blank default. |
UPDATE | Updates Address ID or an exactly matching existing address; fails when none is found. |
DELETE | Deletes the listed address and requires Address ID. |
REPLACE | Keeps the addresses represented by the customer rows and deletes every other existing address. |
For REPLACE, include every address the customer must retain, not only the changed one. One REPLACE address row activates the unlisted-address sweep for that customer.
Address First Name, Last Name, and Phone inherit the customer-level values when their address cells are blank. Other blank address fields are omitted from an update; they do not clear existing address values. Use valid Country and Province codes where possible, and set one address's Address Is Default to TRUE when required.
Step 8 — Work with customer metafields
Customer metafields use the Matrixify header convention:
Metafield: custom.customer_tier [single_line_text_field]
Gold
Keep the exported type in the header. A nonblank cell sets the metafield; a blank cell in an included metafield column deletes it. Remove the entire metafield column when it should remain unchanged.
If the same customer and metafield appear on multiple continuation rows, the last parsed value wins, including a blank that deletes the metafield. An export can put the value on the first address row and leave later address rows blank. Do not re-import those blanks unchanged: repeat the intended value on every row for that customer, or use a separate one-row-per-customer metafield file. Remove metafield columns entirely from an address-only update.
Step 9 — Send legacy account activation safely
This step applies only when legacy customer accounts are enabled. EditEngine uses Shopify's customer account invitation mutation, which does not activate the current passwordless customer accounts. Set Send Account Activation Email to TRUE only for customers who should receive that legacy account invitation immediately after their row succeeds.
ID,Email,Command,Send Account Activation Email
1001,ada@example.com,UPDATE,TRUE
A blank or FALSE value sends nothing. State is export-only; it reflects whether the account is disabled, invited, enabled, or declined.
The optional Account Activation URL export is a different legacy-account workflow. Selecting it generates a fresh activation link for each eligible, not-yet-enabled customer. Every newly generated link expires that customer's previously generated activation URL, so EditEngine shows a warning and requires explicit confirmation before starting that export. Store and distribute activation links as sensitive, short-lived data.
Step 10 — Handle Store Credit as a separate operation
Store Credit: Balance is a snapshot and cannot be imported directly. To change a balance, use these transaction columns in a separate file:
- Store Credit: Currency
- Store Credit Transaction: Command
- Store Credit Transaction: Amount
- optional Expire At and Send Receipt
| Transaction Command | Result |
|---|---|
CREDIT | Adds a positive amount. Expire At and Send Receipt apply to the credit. |
DEBIT | Deducts a positive amount. |
SET | Reads the current currency balance and credits or debits the difference to reach the supplied amount. Zero is allowed. |
ID,Email,Command,Store Credit: Currency,Store Credit Transaction: Command,Store Credit Transaction: Amount
1001,ada@example.com,UPDATE,USD,SET,50.00
Do not re-import exported Store Credit Transaction history. In EditEngine, the transaction ID is not an idempotency key during import. Re-importing a
CREDITorDEBITrow can apply that money movement again. Exported debit history may also use a signed amount, while a deliberate import expects a positive Amount with the direction in Command.
Use a single-use file containing only the intended operation rows. Import a small batch, review every result, and run a fresh Store Credit export to verify the final balance. Store-credit columns require the related Shopify permissions; EditEngine requests them when needed.
Step 11 — Import through Advanced import
For XLSX, name the worksheet Customers or Customer. For a single CSV, use a clear filename such as customers.csv.
Open EditEngine → Import, select Advanced import, and upload the edited file.
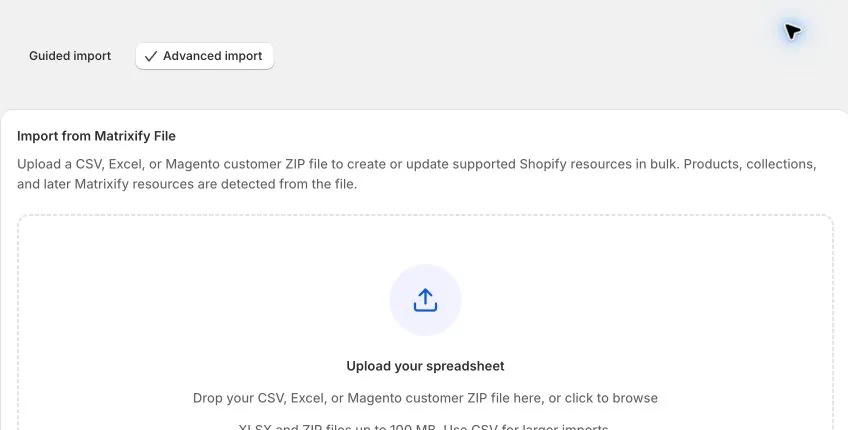
After upload, verify:
- The detected resource says Customers.
- Existing customers keep the intended ID, Email, or Phone.
- Customer, Tags, and Address commands are explicit where their behavior matters.
- Repeated address rows still belong to the correct customer.
- Marketing-consent changes have a valid source and timestamp.
- Every activation email,
DELETE, andREPLACEis intentional. - Store Credit Transactions are absent unless this is a dedicated single-use credit job.
Start with the test batch. When the job finishes, download the results file and review every failure. One invalid customer can fail by itself while other valid customers continue.
Step 12 — Verify the round trip
Verify the result in Shopify Admin and with a fresh export:
- Open the affected customer profiles and inspect names, contact details, Note, Language, and Tax Exempt.
- Check the complete customer tag set.
- Review Email, SMS, and WhatsApp consent states.
- Open every updated address and confirm the default address.
- Confirm metafields and any account invitation that was intentionally sent.
- For store credit, compare the fresh balance and transaction history with the single intended operation.
- Run a new Customers export with the same safe column groups and compare it with your intended file.
An untouched export is a reconstruction reference, not an exact rollback. Customer IDs change after REPLACE; passwords, order relationships, historical state, and other Shopify-calculated values cannot be restored from the Customers spreadsheet.
Common mistakes
Matching by name when Email or Phone is available.
Names are not reliably unique. Keep ID for same-store updates or use Email/Phone when ID is unavailable.
Keeping source-store IDs during a migration.
Customer and Address IDs are store-specific. Clear them before creating records in another store.
Blanking profile fields to clear them.
Blank Email, Phone, names, Note, Language, and Multipass cells are no-ops on update in EditEngine.
Blanking Tags while keeping Tags Command REPLACE.
That clears the entire customer tag set. Remove the tag columns when tags should not change.
Using Address REPLACE with only the changed address.
Every unlisted existing address is deleted. Include all addresses the customer must keep.
Treating not_subscribed as an unsubscribe action.
For an existing subscribed customer, use unsubscribed; not_subscribed is the never-subscribed state.
Generating Activation URLs as a harmless report.
Each fresh URL invalidates the previous generated link for that customer.
Round-tripping Store Credit Transaction history.
Transaction rows can apply money movements again. Build a separate single-use operation file instead.
Using REPLACE as a normal update.
It deletes and recreates the customer. Use MERGE or UPDATE for in-place changes.
Related tutorials
- Add tags to existing Shopify customers — follow a complete ID-only, four-column update workflow that preserves other tags and profile fields.
- Export and import Shopify Discounts — understand customer-specific discount eligibility and update promotion end dates.
- Export and import Shopify Orders — distinguish customer profiles from their linked order history.
- Export and import Shopify Metafields — work with typed values and customer-owned metafields.
About EditEngine: EditEngine Bulk Product Editor helps Shopify merchants bulk edit, import, and export store data from spreadsheets. Install on Shopify →