
Metafields
Shopify Metaobjects: Export and Import
Published by Profitonium Apps · Last updated
Availability: Metaobjects export and Advanced Import are available to merchant stores with the required Shopify access. Definitions must already exist; this workflow imports entries, not definitions.
Use the Metaobjects resource to round-trip Shopify metaobject entries through one CSV or XLSX spreadsheet. Each entry can occupy several rows: one row for each field in its definition.
A metaobject definition is the schema: its type, field keys, field types, validations, and capabilities. A metaobject entry is one record that uses that schema. EditEngine exports and imports entries; it does not create or migrate definitions.
This guide follows the Matrixify Metaobjects sheet format and its entry import and entry export tutorials. The behavior described below is EditEngine's current Advanced Import contract, including the places where it is stricter than Matrixify.
Before you start
- Use Advanced import, not Guided import, for the exported file.
- Keep one untouched, access-controlled export. Advanced imports do not have one-click undo.
- Confirm the required metaobject definitions already exist in the destination store.
- Keep the definition type, entry handle, field keys, and field value shapes unchanged for a normal round trip.
- Test one entry before importing a large set or any reference fields.
- Treat
DELETEandREPLACEas destructive commands.
EditEngine needs read_metaobject_definitions and read_metaobjects to export. Import also needs write_metaobjects. It does not request write_metaobject_definitions because definitions are outside this sheet's scope.
Step 1 — Select the Metaobjects resource
Open EditEngine → Export, choose Metaobjects, and select CSV or Excel format.
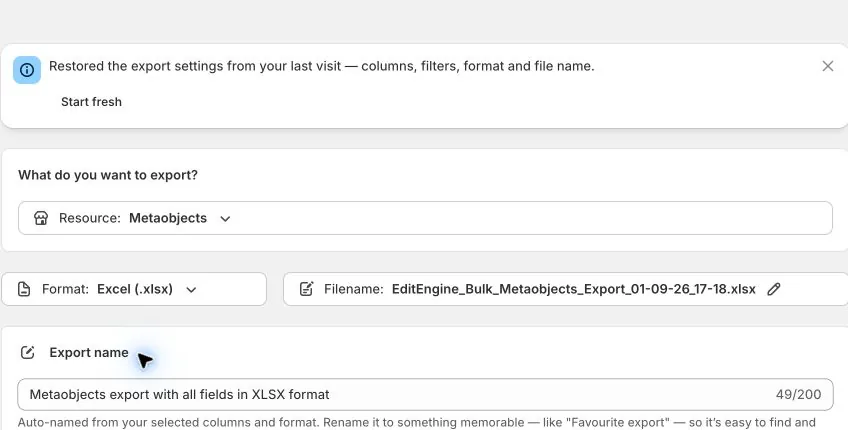
The export enumerates every definition in the current store, then exports the entries from each non-empty definition into one sheet named Metaobjects. Definitions with no entries produce no data rows. If the store has no entries, the result is a header-only file.
The number shown in the export panel counts metaobject entries across definitions. It is not reduced when you add filters.
Step 2 — Keep the round-trip columns
EditEngine selects all 12 Metaobjects columns by default.
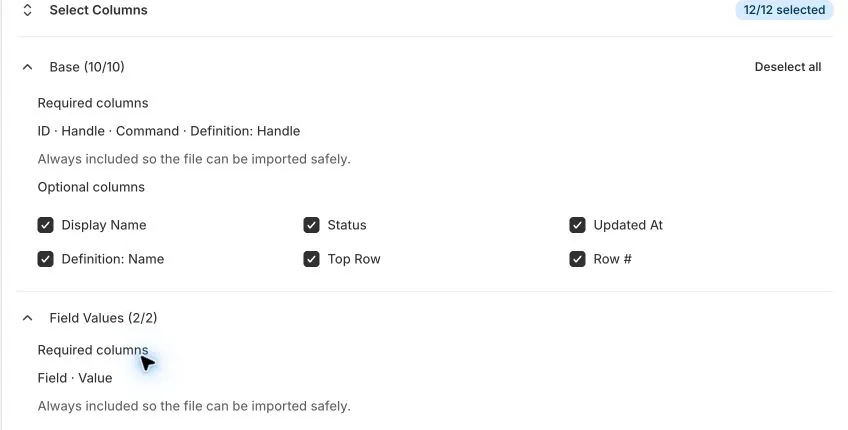
Six columns are always included because they carry identity, command, and field payload:
IDHandleCommandDefinition: HandleFieldValue
The remaining columns are optional:
| Column | Import behavior |
|---|---|
Display Name | Export-only. Shopify derives it from the definition's designated display-name field. |
Status | Imports Active or Draft when the definition has the publishable capability. |
Updated At | Export-only timestamp in the store's timezone. |
Definition: Name | Can resolve the definition when Definition: Handle is blank, but the name must match one definition uniquely. |
Top Row | Export-only marker: TRUE on the first exported row for an entry. |
Row # | Export-only sequence number that helps restore the original order after spreadsheet sorting. |
Keep all 12 columns for the safest same-store round trip. Top Row and Row # are not used to group the import; the identity columns are.
Step 3 — Understand the multi-row entry shape
Each field is a separate row. An entry with three fields has three rows that repeat the same identity:
ID,Handle,Command,Status,Definition: Handle,Definition: Name,Field,Value
2927034435,peter-bloom,MERGE,Active,beekeeper_profile,Beekeeper,name,Peter Bloom
2927034435,peter-bloom,MERGE,Active,beekeeper_profile,Beekeeper,description,A beekeeper from Latvia
2927034435,peter-bloom,MERGE,Active,beekeeper_profile,Beekeeper,website,https://example.com
EditEngine groups rows by ID when it is present. Without an ID, it groups by definition plus Handle. Keep the same identity, command, and status on every row for one entry, and keep those rows together.
If you sort the file, sort it back by Row # before importing. Avoid duplicate Field keys for the same entry; when a duplicate reaches the importer, the later value replaces the earlier one in that entry's plan.
Step 4 — Filter to a safe working set
Use Add filter to limit the export by Display Name, Definition Name, Updated At, Handle, or ID.
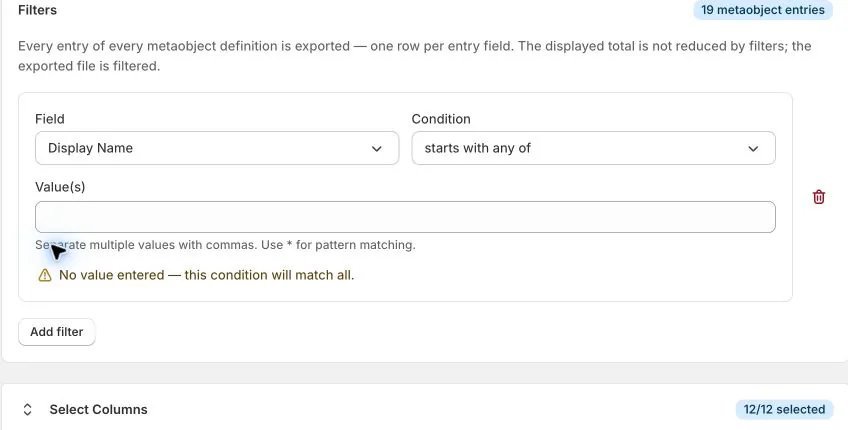
Useful focused exports include:
- Definition Name equals
Beekeeper - Handle starts with
peter- - Display Name contains words starting with
summer - Updated At on or after a known date
- ID between two numeric Shopify IDs
Multiple filters can match all conditions or any condition. A filter row with no value matches everything, so remove unused filters instead of leaving them blank.
Step 5 — Update or create with MERGE
MERGE is the default and the normal round-trip command. EditEngine targets the entry by Definition: Handle plus Handle, then uses Shopify's metaobject upsert patch behavior to update only the listed fields. If that pair does not exist, Shopify creates a new entry.
Handle,Command,Status,Definition: Handle,Field,Value
peter-bloom,MERGE,Active,beekeeper_profile,description,Updated biography
peter-bloom,MERGE,Active,beekeeper_profile,website,https://example.com/peter
Fields omitted from a MERGE entry stay unchanged. To leave one field alone, remove its entire row from the import file.
A blank
Valueis not a no-op and does not delete the whole entry. EditEngine sends an empty value for that field. Shopify may accept it as a cleared value or reject it according to the field type, required setting, and validation rules. Remove the row when you mean “unchanged.”
Every upsert needs a Handle and either Definition: Handle or a uniquely matching Definition: Name. Unlike Matrixify's documented auto-handle behavior, EditEngine does not generate a missing handle from Display Name.
Step 6 — Use the right command
| Command | EditEngine behavior |
|---|---|
MERGE | Patches the listed fields on the definition + handle target, or creates it when absent. Default. |
NEW | Creates a new entry. Fails when that definition + handle already exists. Leave source-store ID blank. |
UPDATE | Patches the listed fields only when the target already exists. Fails when it is not found. |
REPLACE | Deletes the existing entry when found, then recreates it from only the imported rows. Creates it when absent. Destructive. |
DELETE | Deletes the whole entry. Fails when the entry is not found. |
IGNORE | Skips that spreadsheet row. Use it on every row of an entry when you want the whole entry skipped. |
Use the same command on every field row for one entry. Mixed commands are not independent operations: grouped rows share one entry plan, and the first non-ignored grouped row supplies its command.
REPLACE is not a full-sheet replacement. It replaces each targeted entry. Omitted fields are lost because the old entry is deleted before the replacement is created. A recreated entry receives a new Shopify ID, which can affect other data that references the old entry.
Before DELETE, keep the exported ID and identity pair unchanged. A DELETE row can use a numeric ID, a full Metaobject GID, or the definition + handle pair. One row is enough to delete the whole entry; remove its extra field rows to make the intent obvious.
Step 7 — Do not rename identity accidentally
For EditEngine imports, Handle and the definition identify the upsert target. They are not ordinary editable fields.
- Changing
HandleunderMERGEcan create a second entry instead of renaming the original. - Changing
Definition: Handletargets a different definition; it does not move an existing entry. - Keeping only
IDis not enough forMERGE,NEW,UPDATE, orREPLACE; those commands still need the definition and handle used by the upsert. Definition: Handlewins when both definition handle and name are present.
If you intentionally need a different handle, create the replacement as a separate tested operation, update any references, and delete the old entry only after verification.
Step 8 — Handle Status correctly
Use Active or Draft. EditEngine accepts those values case-insensitively.
If the definition does not have Shopify's Active-draft status capability, remove the Status column or leave it blank for those entries. Sending a status to a non-publishable definition can fail with a capability error.
An unrecognized status is ignored by EditEngine rather than converted to a new status. Correct the typo instead of relying on that fallback.
Step 9 — Review reference fields
Metaobject fields use the same value types as Shopify metafields. EditEngine reads the destination definition to discover each field's type, then resolves supported references before writing.
| Reference field type | Readable import value |
|---|---|
| Product | Product handle, such as summer-shirt |
| Collection | Collection handle, such as summer-sale |
| Page | Page handle, such as shipping |
| Variant | product-handle.Variant Title |
| File | Exact file name, such as lookbook.pdf |
| Metaobject | definition-handle.entry-handle |
| Customer | Customer email |
| Company | Exact company name |
| Order | Order name, such as #1001 |
| Blog post | blog-handle.blog-post-handle |
Full Shopify GIDs and bare numeric IDs are also accepted for supported reference types. List references can stay in the exported representation; EditEngine accepts JSON arrays and common delimited list cells.
Taxonomy-value references remain Shopify GIDs because they do not have a portable handle. Review mixed_reference fields separately: EditEngine currently treats a non-GID mixed-reference value as a metaobject reference, so an exported readable Product, Collection, or other mixed target may not round-trip as written. Replace it with a verified destination GID or test that field before the main import.
Step 10 — Prepare a cross-store import
Shopify IDs are store-specific. For a destination-store import:
- Create matching definitions in Shopify Admin → Settings → Custom data first.
- Match the source definition type, field keys, field types, required fields, validations, and publishable capability.
- Clear or remove the source
IDcolumn. - Keep the destination definition's exact
Definition: Handleand the intended entryHandle. - Import referenced Products, Collections, Pages, Files, Customers, Companies, Orders, Blog Posts, and referenced Metaobjects before the entries that point to them.
- Replace any remaining source-store GIDs with destination identities or GIDs.
- Test one entry from each definition.
Matrixify's tutorial describes a generated retry sheet for references that do not exist yet. EditEngine Advanced Import currently resolves references against records that already exist in the destination store; do not rely on an automatic second pass.
Step 11 — Upload through Advanced Import
Open EditEngine → Import, select Advanced import, and upload the edited CSV or XLSX file.
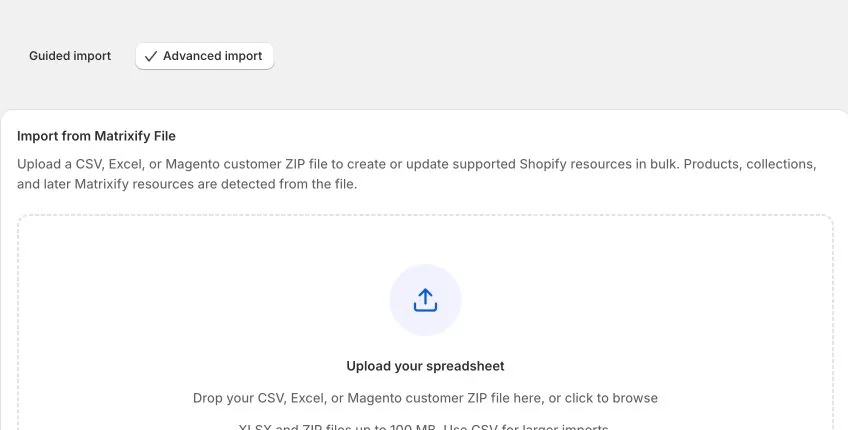
For XLSX, keep the worksheet named Metaobjects or Metaobject. EditEngine can also identify the resource from a Definition: Handle or Definition: Name header. A CSV has one logical sheet, so the standard Metaobjects headers are enough; a descriptive file name is helpful but not required.
After analysis, verify:
- The detected resource is Metaobjects.
- The sheet and entry count match your intended file.
- The supported commands list includes
MERGE,NEW,UPDATE,REPLACE,DELETE, andIGNORE. - Destructive mode is enabled only when every
DELETEorREPLACEis intentional. read_metaobject_definitions,read_metaobjects, andwrite_metaobjectsare granted.- Every entry has a handle, definition, and at least one field row unless it is a DELETE.
- Cross-store rows no longer carry source-store entry or reference IDs.
Run the small test first. Download the results file and review Import Status and Import Comment for every failed row before importing more entries.
Step 12 — Verify the round trip
Create a fresh focused Metaobjects export after the import:
- Filter by Definition Name, Handle, or ID for the changed entries.
- Compare every
FieldandValuewith the intended spreadsheet. - Confirm the final
Statusin Shopify Admin. - Confirm omitted MERGE/UPDATE fields stayed unchanged.
- Confirm every intended DELETE is absent.
- Check references from both the entry and any storefront section that uses it.
- Keep the results file with the untouched pre-import export.
An untouched export is a manual recovery source, not an automatic rollback. Restoring a deleted entry creates another Shopify record, and its new ID may require references to be updated.
Common mistakes
Importing definitions through the Metaobjects sheet. The sheet contains entries only. Create matching definitions and fields in Shopify Admin first.
Removing Handle because ID is present. EditEngine's upsert still targets Definition Handle + Handle. Keep all three for same-store updates.
Changing Handle under MERGE. That can create another entry instead of renaming the original.
Leaving a field row blank to mean unchanged. A blank Value is submitted as an empty field value. Remove the whole row to preserve that field.
Using REPLACE for a small edit. REPLACE deletes and recreates the entry, loses omitted fields, and changes its Shopify ID.
Mixing commands within one entry. Repeat one command consistently across all of its field rows.
Importing Status for a non-publishable definition. Remove or blank Status unless Active-draft status is enabled on that definition.
Keeping source-store IDs during a migration. Clear entry IDs and replace reference IDs with destination-store identities or GIDs.
Assuming every readable mixed reference will resolve. Test mixed_reference fields and prefer verified destination GIDs.
Expecting one-click undo. Advanced import has no automatic undo. Keep the untouched export and verify with a fresh export.
Related tutorials
- Import and export resource availability — check public, restricted, and export-only workflows.
- Export and import Shopify Metafields — round-trip one metafield per row across Shopify owner types.
- Update metaobject-reference metafields — point Product metafields at metaobject entries.
- Export and import Shopify Pages — round-trip Online Store page content and metafields.
About EditEngine: EditEngine Bulk Product Editor helps Shopify merchants bulk edit, import, and export store data from spreadsheets. Install on Shopify →