
Shop settings
Shopify Shop: Export and Import
Published by Profitonium Apps · Last updated
Use the Shop resource to export one row of details about the current Shopify store. You can round-trip Shop-level metafields through a CSV or XLSX spreadsheet, but you cannot import changes to the store name, domain, owner, address, currency, tax, plan, or other core Shop details.
This distinction is the whole guide: Shop details are export-only; Shop metafields are importable.
Before you start
- Install EditEngine Bulk Product Editor on the store you want to change.
- Use Advanced import for the edited Shop spreadsheet.
- Keep one untouched, access-controlled export. Advanced imports do not have one-click undo.
- Keep exactly one intentional Shop data row.
- Remove every metafield column you do not intend to change.
- Test new metafield types and reference values on a non-critical key first.
EditEngine follows the Matrixify Shop spreadsheet format. Matrixify also documents the same split between export-only Shop details and importable Shop metafields. The steps below describe EditEngine's current behavior, including where its import targeting and optional Command handling need extra care.
Step 1 — Select the Shop resource
Open EditEngine → Export, choose Shop, and select CSV or Excel format.
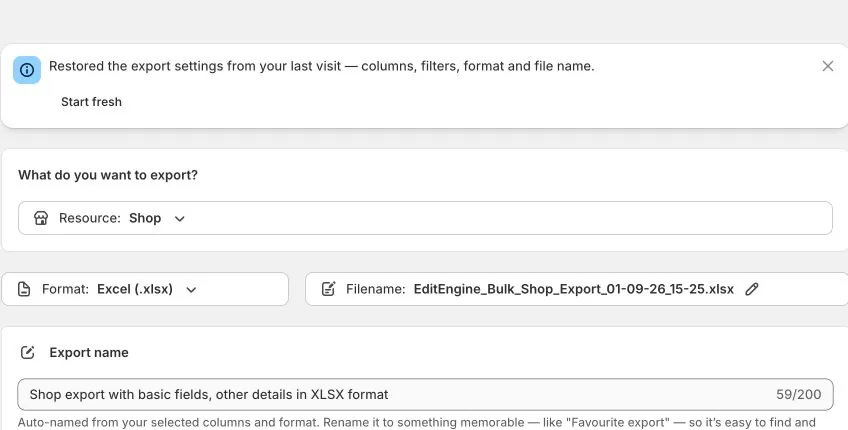
A Shop export is a singleton: it always represents the current store and produces at most one data row. There are no filters and no additional Shopify access scopes to grant for the Shop object.
The default export selects 47 of 48 options:
- Base: Shopify Domain, Name, Created At, and Updated At.
- Other Details: 43 store settings and informational fields.
- Metafields: optional and not selected by default.
Exporting metafields also depends on whether metafield export is included in your EditEngine plan.
Step 2 — Build a focused round-trip export
For a store-details backup, keep Base and Other Details. For a Shop metafield update, keep Base and Metafields, then deselect Other Details unless you need those columns as a visual reference.
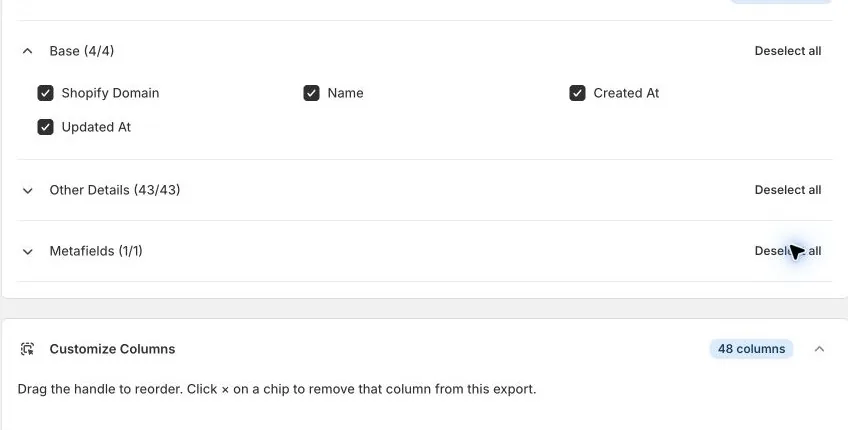
The screenshot shows all three groups selected so their relationship is clear. A safer metafield round trip is smaller: Shopify Domain plus only the intended Metafield columns.
When Metafields is selected, you can filter exported metafield columns by namespace or key. Leave both filters blank to export every Shop metafield that currently has a value.
EditEngine always includes Shopify Domain as the identity and context column, even if it was deselected in the export UI.
Step 3 — Understand the one-row Shop sheet
An XLSX export uses a worksheet named Shop. EditEngine also recognizes Shops and can detect a metafield-only sheet from its column headers.
Shopify Domain,Metafield: custom.store_note [single_line_text_field],Metafield: custom.launch_year [number_integer]
cool-store.myshopify.com,Priority storefront,2024
Keep one data row. Every row in a Shop import targets the same currently open store; extra rows are not separate shops.
The exported Shop sheet has no Command column. These columns are all export-only during EditEngine import:
- Base fields such as Name, Created At, and Updated At.
- Domain, Owner, contact details, address, location, and time-zone fields.
- Currency, tax, money-format, checkout, plan, setup, and weight-unit fields.
- Description, URL, unit system, shipping countries, customer-account settings, order-number settings, SMS settings, Shopify Plus, and development-store status.
Editing any of those cells does not update Shopify. Change core store settings in Shopify Admin instead.
Step 4 — Update an existing Shop metafield
Shop metafield headers use this exact pattern:
Metafield: namespace.key [type]For example:
Shopify Domain,Metafield: custom.store_note [single_line_text_field]
cool-store.myshopify.com,Holiday dispatch starts December 15
Keep the namespace, key, and type from the export header. A nonblank cell sets the value, and Shopify validates it against the supplied metafield type.
To leave a metafield unchanged, remove its entire column from the import file. Do not merely leave its cell blank.
Step 5 — Create a new Shop metafield
Add a new column using a valid namespace, key, and Shopify metafield type:
Shopify Domain,Metafield: custom.support_url [url],Metafield: custom.active [boolean]
cool-store.myshopify.com,https://example.com/support,true
If the namespace is omitted, EditEngine uses global. If the type is omitted, EditEngine uses single_line_text_field.
Use the explicit type for new metafields. Values for reference metafields must resolve in the destination store; a Product or Collection ID copied from another store is not portable. Where supported, use a destination-store handle instead of a source-store numeric ID.
Step 6 — Delete a Shop metafield
Keep the metafield column and clear its value in the single Shop row:
Shopify Domain,Metafield: custom.store_note [single_line_text_field]
cool-store.myshopify.com,
A blank included metafield cell is a delete instruction. Removing the entire column means unchanged; keeping the column with a blank value means delete.
Do not add duplicate Shop rows. EditEngine collects metafield operations from every intentional row and executes all sets before deletes. If one extra row has a blank cell for a metafield that another row sets, the later delete phase can remove the final value.
Trailing spreadsheet rows that are completely blank after the data are ignored, but another populated cell makes a row intentional. Keep the file to one data row instead of relying on blank-row detection.
Step 7 — Use Command only when needed
The exported file does not need a Command column. In Advanced import, leave the Shop resource's Default Command as MERGE for a normal round trip.
If you manually add a Command column, EditEngine accepts:
| Command | Shop behavior |
|---|---|
MERGE | Applies the row's metafield sets and deletes. |
UPDATE | Applies the same metafield sets and deletes to the current store. |
IGNORE | Skips the entire row. |
NEW, REPLACE, and DELETE are not supported Shop-row commands. To delete one Shop metafield, use a blank metafield cell as described in Step 6.
Step 8 — Confirm the destination store
Import targeting comes from the Shopify store where EditEngine is currently open. The Shopify Domain cell is useful identity and audit context, but EditEngine's Shop importer does not use it to switch the destination store or reject a different source domain.
Before a same-store update, confirm the exported domain matches the store in the Shopify Admin header. Before a cross-store copy:
- Open EditEngine in the destination store.
- Keep only the metafield columns you intend to copy.
- Replace the Shopify Domain cell with the destination store's
.myshopify.comdomain for an accurate audit trail. - Review reference metafield values for destination-store IDs or handles.
- Test one non-critical metafield first.
Core store details remain export-only and are not migrated by this sheet.
Step 9 — Import through Advanced import
Open EditEngine → Import, select Advanced import, and upload the edited CSV or XLSX file.
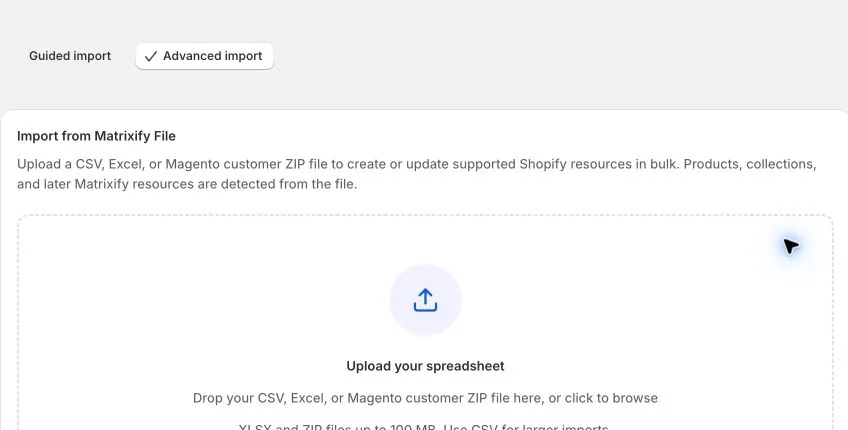
After upload, verify:
- The detected resource says Shop.
- The file overview lists the intended Shop worksheet as ready to import.
- There is exactly one intentional data row.
- Only the intended
Metafield:columns remain. - Every blank metafield cell is an intentional deletion.
- The Shopify Admin header shows the correct destination store.
- The Default Command is
MERGE, or an explicit supported Command is present.
Run the small test first. When it finishes, download the results file and review every metafield-specific error before importing additional keys.
Step 10 — Verify the round trip
Create a fresh focused Shop export after the import:
- Select Shop, Base, and Metafields.
- Filter to the namespaces or keys changed in the import.
- Compare the fresh one-row sheet with the intended values.
- Confirm updated and new metafields have the expected type and value.
- Confirm intentionally blank cells removed only the planned metafields.
- Keep the results file with the untouched pre-import export.
An untouched export is a manual recovery reference, not a one-click rollback. Core Shop detail columns cannot be restored through Shop import, and an incorrect metafield deletion must be corrected with another import using the saved value and type.
Common mistakes
Editing Name, Domain, Owner, address, currency, or tax columns. Those Shop details are export-only. Change them in Shopify Admin.
Importing all 48 options for a one-metafield update. Deselect Other Details and remove every unrelated metafield column.
Leaving an unrelated metafield cell blank. A blank included metafield cell deletes that metafield. Remove the entire column to leave it unchanged.
Adding several Shop rows. They all operate on the same current store. A blank duplicate can delete a value set by another row.
Assuming Shopify Domain chooses the destination. The currently open Shopify store is the destination. Check it before upload.
Using NEW, REPLACE, or DELETE as the Shop Command. Only MERGE, UPDATE, and IGNORE are accepted. Metafield deletion is represented by a blank cell.
Copying source-store reference IDs. Shopify IDs are store-specific. Resolve reference values against the destination store.
Expecting bulk-edit undo. Advanced import does not provide one-click undo. Keep an untouched export and verify with a fresh focused export.
Related tutorials
- Bulk edit Shopify metafields — work with Product-level metafields in the EditEngine bulk editor.
- Export and import Shopify Customers — round-trip customer profiles, addresses, consent, metafields, and store credit.
- Export and import Shopify Companies — round-trip B2B companies, locations, contacts, catalogs, and metafields.
About EditEngine: EditEngine Bulk Product Editor helps Shopify merchants bulk edit, import, and export store data from spreadsheets. Install on Shopify →