
Products
How to Bulk Import Shopify Products Using CSV or Excel
Published by Profitonium Apps · Last updated
To bulk import Shopify products, prepare your product data in a CSV or Excel file, upload it through EditEngine → Import → Advanced Import, confirm the detected product fields, and review every warning before processing the file. You can create new products or update existing products, including variants, options, images, collections, metafields, multi-location inventory, and market-specific prices.
For existing products, start with an EditEngine export so the spreadsheet retains stable identifiers such as Product ID and Handle. For new products, start with the Shopify product CSV and Excel templates. Keep only the columns required for the job, save an untouched copy, and test a small non-critical batch before importing the complete catalog.
This guide cross-checks the official Matrixify Products column reference, Products export tutorial, bulk Product import tutorial, and Product identification tutorial. Where EditEngine differs, the EditEngine behavior below takes precedence.
Quick Shopify product import workflow
- Prepare a CSV or Excel file with
Handle, product fields, and the variant identifiers needed for your workflow. - Open EditEngine → Import → Advanced Import and upload the file.
- Confirm that EditEngine detected the Products resource and mapped the intended columns.
- Review unmatched columns, validation warnings, commands, and required Shopify permissions.
- Import a small test batch, inspect the results file and affected products, then process the remaining catalog.
Before you start
- Use Advanced import, not Guided import.
- Keep an untouched, access-controlled export. Advanced Import has no one-click undo.
- Use one workflow per test file: for example, prices, tags, inventory, media, or metafields.
- Keep all rows for one product adjacent. Do not sort variant or media continuation rows away from their product.
- For same-store changes, retain the exported Product
ID. For cross-store work, remove source-store product, variant, inventory-item, media, collection, publication, and other Shopify IDs. - Treat Product
REPLACEandDELETE, VariantDELETE, ImageREPLACEorDELETE, and blank destructive cells as high-risk operations. - Product and variant creation remains subject to Shopify's own validation and store limits.
Step 1 — Select Products
Open EditEngine → Export, choose Products, and select CSV or Excel format.
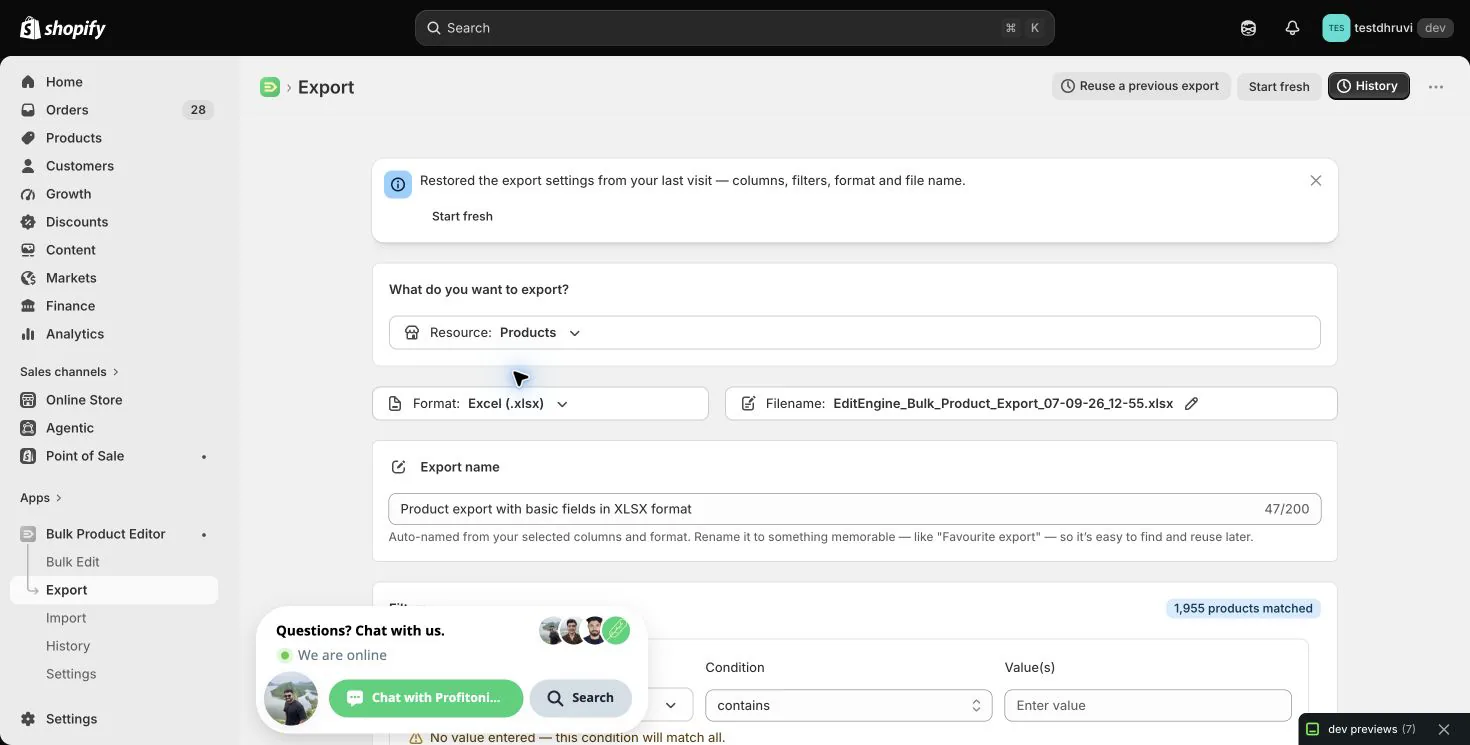
The production panel shows the number of products matching the current filter set. In the signed-in test store used for this guide, the unfiltered panel showed 1,955 products matched. EditEngine blocks an export when the current Product filters match zero products.
Step 2 — Choose a focused column set
Products exposes 67 selectable controls in nine groups. Only ID and Handle are selected by default. The Products column reference explains every control and the extra import-only headers, with examples and blank-cell behavior.
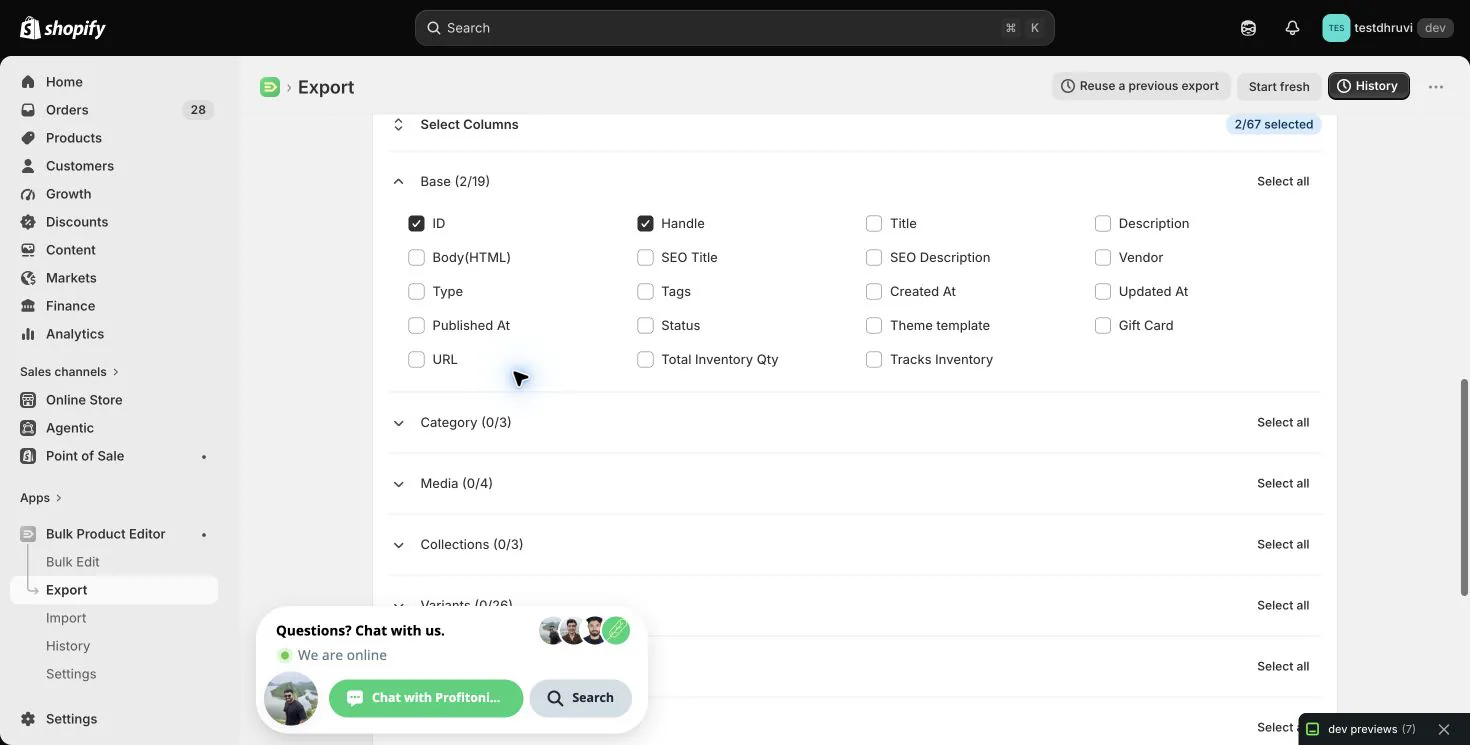
| Group | Controls | What it contains |
|---|---|---|
| Base | 19 | Product identity, title, descriptions, SEO, vendor, type, tags, dates, status, template, gift-card and inventory summary fields |
| Category | 3 | Category ID, name, and full breadcrumb |
| Media | 4 | Image source URL, alt text, width, and height |
| Collections | 3 | All, smart, and custom collection membership |
| Variants | 26 | Variant identity, options, position, SKU, barcode, image, prices, inventory item, shipping, customs, cost, and weight fields |
| Metafields | 1 | Dynamic Metafield: namespace.key [type] columns |
| Variant Metafields | 1 | Dynamic Variant Metafield: namespace.key [type] columns |
| Multi-Location Inventory Levels | 8 | Per-location available, on-hand, committed, reserved, damaged, safety-stock, quality-control, and incoming quantities |
| Market Prices (Catalogs) | 2 | Per-catalog fixed Price and Compare At Price columns |
ID and Handle are always written and placed first, even if their visible toggles are cleared. They are the export's round-trip keys.
Several controls expand into dynamic spreadsheet columns. Metafield headers include namespace, key, and Shopify type; inventory headers include the location name; market-price headers include the catalog title. Do not rename the dynamic part of these headers before import.
Some exported columns are informational rather than writable. Examples include Created At, Updated At, URL, Total Inventory Qty, Image Width and Height, and the committed, reserved, and incoming inventory states. EditEngine's importer classifies these as export-only instead of sending them back to Shopify.
The plain-text Description is export-only; edit Body HTML to change the description. Variant Inventory SKU is not a recognized import alias: remove it, or rename it to Variant SKU and supply the intended SKU before validation. The current exporter leaves Variant Inventory SKU and the three variant customs fields blank; consult the reference before treating a full export as a complete customs-data backup.
Step 3 — Add import-control columns deliberately
Unlike the official Matrixify Products export template, EditEngine's current Products exporter does not add these command headers to the file:
CommandVariant CommandImage CommandTags CommandMetafield Command
Add only the command columns needed by your workflow. A missing or blank command defaults to MERGE at each layer, but destructive work should always use an explicit command so it can be reviewed before upload.
ID,Handle,Command,Title,Tags,Tags Command
gid://shopify/Product/123456789,spring-shirt,UPDATE,Spring Shirt,"spring, featured",REPLACE
The product-level Command is read from the first row in the product group. Variant, Image, Tags, and Metafield commands are independent and can express child-level changes without replacing the whole product.
Step 4 — Filter the export
Use the Product filter panel to reduce the working set before exporting.
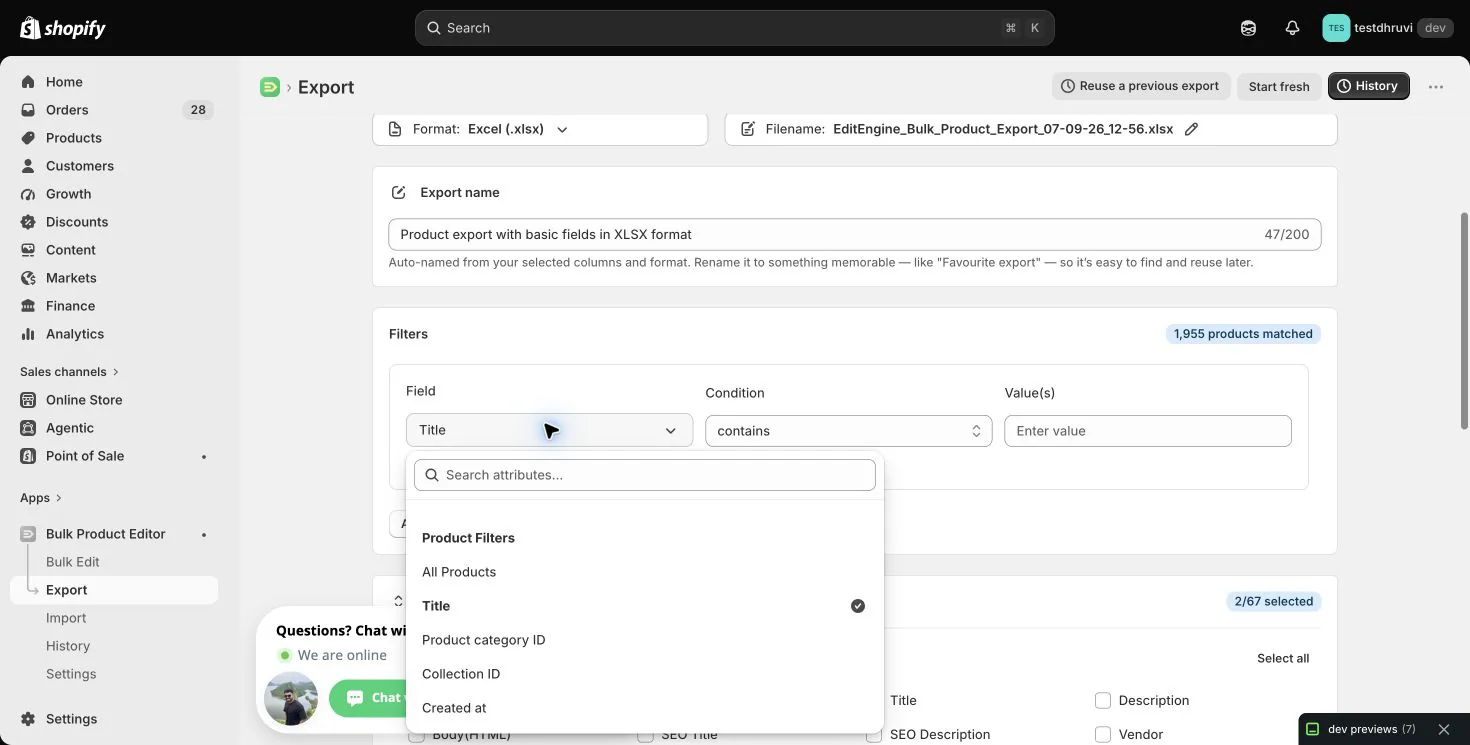
Production filters include product identity and text fields; status, vendor, type, tags, category and publication; price, inventory and location state; product, variant, SKU and barcode identifiers; bundle/component state; gift-card and tax flags; created, updated and published dates; and supported product metafields discovered in the store.
Multiple filters can match all or any conditions. Available operators depend on the field: text filters offer exact, contains, negative, empty and pattern choices; numbers and dates offer comparison or range choices; enumerated fields offer their supported values.
A blank text condition matches all products and shows a warning. Remove unfinished filters rather than assuming a blank value narrows the file. Confirm the matched count before creating an export.
Step 5 — Understand the multi-row Product shape
EditEngine writes the first variant and first media item on the product's first row. Remaining variants and media share continuation rows by their list positions; whichever list is longer determines how many additional rows are written. Product ID and Handle repeat on every row.
Variants and media are independent streams. A variant and an image appearing on the same spreadsheet row are not automatically linked. Use Variant Image for a variant's image and the Media fields for the product gallery.
Keep each product block together. The importer groups adjacent rows by product identity, reads product-level values from the first non-empty value in that group, and treats later blank-identity rows as continuations. Conflicting product-level values on later rows produce warnings rather than silently redefining the group.
Step 6 — Understand Product identity
With Match Products By → Auto-detect, EditEngine resolves an existing product in this order:
- Product
ID - exact
Handle, case-insensitively - exact
Title Variant IDVariant SKUVariant Barcode
Use Product ID for the safest same-store update. A Title match produces a warning, and more than one exact Title match fails as ambiguous.
You can force a variant identifier by naming the header Variant ID [ID], Variant SKU [ID], or Variant Barcode [ID]. A forced SKU or barcode that matches multiple products can fan the row out to all matches for an ordinary update. If a forced identifier is empty or misses, EditEngine can fall back to a product-level ID, Handle, or Title and reports a warning.
For REPLACE and DELETE, a forced multi-match targets only the first product and reports the other matches. Use a unique Product ID or Handle for destructive commands.
This follows Matrixify's general identity order and [ID] convention. EditEngine additionally fails ambiguous exact Titles and reports its fallback and multi-match decisions in the result instead of silently choosing an uncertain record.
Step 7 — Choose the Product Command
| Command | EditEngine Advanced Import behavior |
|---|---|
MERGE | Updates a verified match; creates a Product when no match exists. Default. |
NEW | Creates a Product and fails when its supplied Product ID or Handle already belongs to an existing Product. |
UPDATE | Updates an existing Product and fails when none is found. |
REPLACE | Validates the recreate payload, deletes the matched Product, then creates it again. Creates when no match exists. |
DELETE | Permanently deletes the matched Product and fails when none is found. |
IGNORE | Skips the Product group without changing Shopify. |
Use UPDATE for a same-store focused edit when creation on a miss would be unsafe. Use MERGE when create-on-miss is intentional.
REPLACE is delete-and-create
Product REPLACE is not an in-place overwrite. A successful replacement receives a new Shopify Product ID and can break references to the old record. Omitted fields, variants, media, metafields, memberships, and other associations are not preserved automatically.
EditEngine adds an important pre-delete guard: when an existing Product is matched, a replacement with no non-empty Title fails before deletion. The importer also validates the recreate plan before emitting the delete phase. These checks reduce risk, but they do not make REPLACE reversible.
Step 8 — Control variants, tags, media, metafields, and inventory
Variants
Variant Command supports MERGE, NEW, UPDATE, REPLACE, DELETE, and IGNORE. Variant identity can use Variant ID, option combination, SKU, or barcode according to the imported row and matching mode. Keep option names consistent across a product group and make every option combination unique.
An all-REPLACE variant set defines a complete replacement family. Mixing Variant REPLACE with other variant commands is treated as MERGE with a warning. Use a dedicated, fully reviewed variant-replacement file instead.
Tags
Tags Command supports MERGE, DELETE, and REPLACE and is applied in row order. Blank Tags with MERGE or DELETE is a no-op; blank Tags with explicit REPLACE clears the complete tag set.
Media
Image Command defaults to MERGE. MERGE keeps existing media, reuses an exact exported URL without re-uploading it, and adds new public URLs. DELETE removes the matched media URL. REPLACE makes the supplied image rows the complete product media set.
Image Src must be an absolute HTTP, HTTPS, FTP, or SFTP URL. Invalid sources are skipped with row warnings. Image Alt Text can be intentionally blank, and Image Position is an import header even though the current four-control Media export group does not expose it.
Metafields
Dynamic Product and Variant Metafield headers round-trip their Shopify types. Metafield Command supports MERGE-style upserts, DELETE, and REPLACE semantics. A blank selected metafield cell can represent an intentional clear or delete depending on the column and command, so remove metafield columns that are outside the workflow.
Inventory and market prices
Per-location Available, On Hand, Damaged, Safety Stock, and Quality Control columns set absolute quantities. Matching ... Adjust: <Location> headers apply deltas but are import-only controls. If SET and ADJUST are populated for the same inventory state and row, EditEngine keeps SET and warns that ADJUST was ignored.
Blank inventory cells can change stock availability. A blank
Inventory Available: <Location>SET cell can deactivate an existing variant's inventory at that location. Use0for an intentional zero quantity. Remove an unused location column entirely; do not leave it blank assuming it means “leave unchanged.” Blank adjustment cells do nothing.
Committed, Reserved, and Incoming quantities are export-only. Market Price and Compare At Price controls emit Price / <Catalog> and Compare At Price / <Catalog> columns for eligible active market catalogs. The importer also recognizes Included / <Catalog>, but the current Product export UI does not emit that membership column. This differs from Matrixify's broader Pricing by Catalogs template.
A blank Price / <Catalog> removes the fixed price. A blank Compare At Price / <Catalog> clears that compare-at value only when the same row also supplies Price / <Catalog>; without that price, the clear is skipped with a warning. Omit catalog columns that are not part of your change.
Collection membership and current Matrixify files
All Collections reports membership across collection types and is export-only. Smart Collections reports compatible automated memberships; you cannot change their rules through a Products row. Custom Collections exports collection titles, but import resolves handles or title-derived handles. For reliable membership changes, replace each exported title with the destination collection's exact handle, especially when its handle differs from the title's slug.
Matrixify now documents a unified Collections sheet with source and condition records. EditEngine still uses separate Custom Collections and Smart Collections resources and does not import that unified source schema. Do not rename its sheet and assume the source, exclusion, or nested-collection rules will survive. Manage unsupported flexible collection structure in Shopify Admin.
Step 9 — Prepare cross-store files
Shopify IDs belong to one store. For a cross-store Products import:
- Keep an untouched source export.
- Remove Product ID and all Variant, Inventory Item, media, collection, publication, and other source-store IDs.
- Keep or deliberately remap Handles, SKUs, barcodes, collection handles, location names, catalog titles, and reference-metafield values.
- Make sure destination locations, collections, publications, catalogs, metaobject references, and other dependencies already exist.
- Use explicit
NEWwhen every Product must be absent, or a reviewedMERGEwhen destination Handles may be updated. - Start with one representative single-variant Product and one representative multi-variant Product.
Do not use source IDs as convenient labels. A numeric ID can resolve to a different object in another store or fail verification.
Step 10 — Upload through Advanced Import
Open EditEngine → Import, select Advanced import, and upload the edited CSV or XLSX.
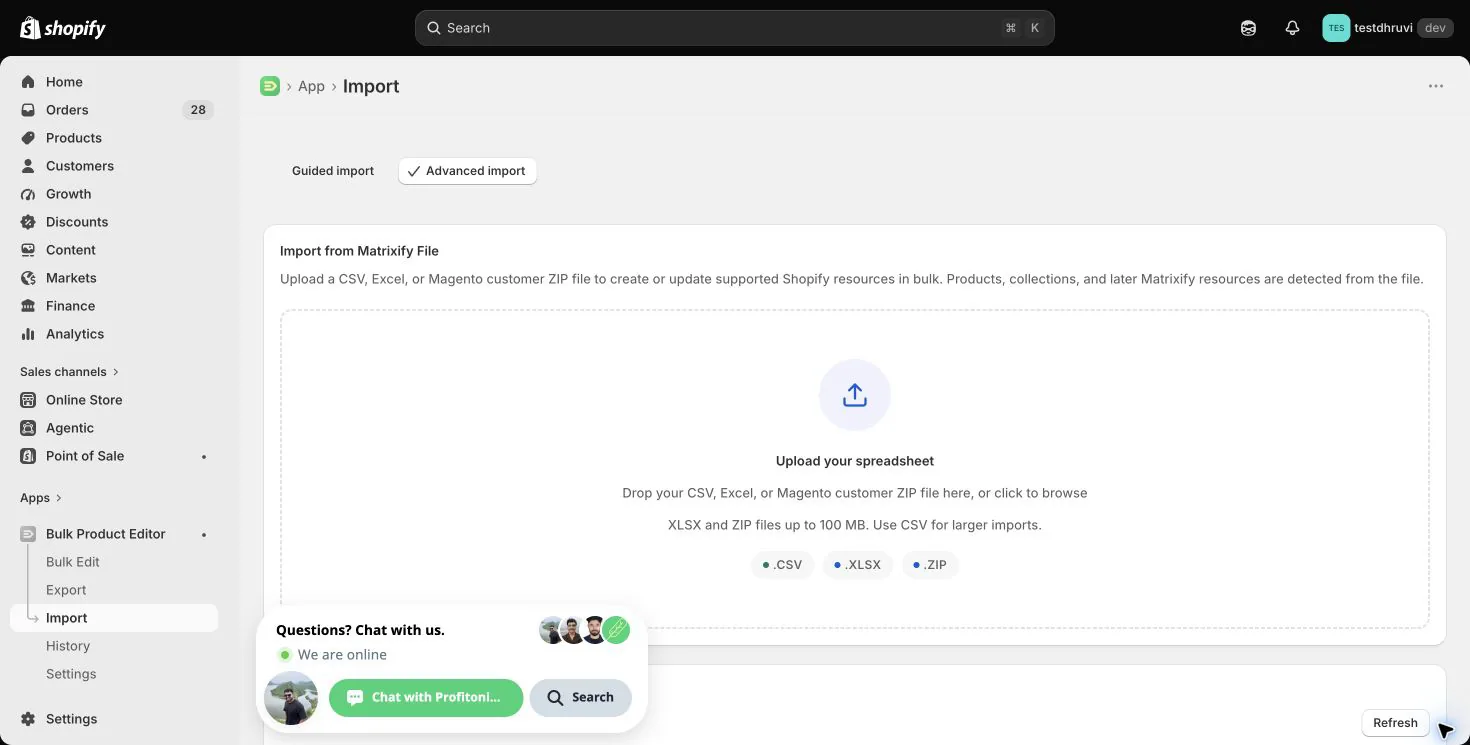
For XLSX, keep the worksheet named Products. For CSV, keep standard Product headers and use a descriptive filename containing Products.
Before starting the import:
- Confirm that EditEngine detects the Products resource and intended worksheet.
- Review every recognized, unknown, and export-only header.
- Confirm the Product match mode and every
[ID]header. - Confirm every Product, Variant, Image, Tags, and Metafield command.
- Remove fields whose blank cells are not deliberate.
- Review dynamic location and catalog names against the destination store.
- Enable destructive operations only for a file that intentionally replaces or deletes records.
- Run a small test file before the complete batch.
Download the result file and review each row's status, comment, warnings, and resolved identity before retrying failures.
Step 11 — Verify the round trip
Do not rely only on a completed job status:
- Open the test Products in Shopify Admin.
- Check product fields, status, SEO, category, template, and tags.
- Verify every variant, option combination, SKU, price, cost, weight, shipping and inventory value.
- Inspect product media order, alt text, and variant-image links.
- Check custom collection membership, product and variant metafields, and market-specific prices.
- Create a new focused export and compare it with the intended spreadsheet result.
- Keep the result file beside the untouched pre-import export.
The untouched export is a manual recovery source, not an automatic rollback. A deleted Product or delete-and-create replacement can lose its original ID and external references even if you later rebuild similar data.
Common mistakes
Using Guided import. Products round trips use Advanced Import.
Selecting all 67 controls for a small change. Extra columns increase review risk, especially when blanks have field-specific semantics.
Expecting Command columns in the export. Add the exact import-control headers deliberately; EditEngine's current Product exporter does not emit them.
Sorting continuation rows independently. Keep every product's variants and media adjacent.
Assuming media and variant rows align. They are independent streams even when they share a spreadsheet row.
Using Title for destructive matching. Duplicate exact titles are ambiguous. Use Product ID or Handle.
Treating REPLACE as an update. Product REPLACE deletes and recreates the record with a new ID.
Using a blank Tags cell with Tags Command REPLACE. That intentionally clears every tag.
Writing to committed, reserved, or incoming inventory. Those states are export-only in EditEngine.
Keeping source-store IDs. Remove and remap every store-scoped reference before migration.
Related tutorials
- Products column reference — all 67 export controls, import-only headers, and exact blank-cell behavior.
- Bulk create Shopify Products from a spreadsheet — build a deliberate NEW workflow.
- Change Product status per row — update Active, Draft, and Archived status safely.
- Bulk add multiple images per Product — append public image URLs without replacing the gallery.
- Update inventory across multiple locations — work with location-specific quantity columns.
- Export and import Shopify Metafields — use the standalone Metafields resource when owner-wide auditing is clearer.
About EditEngine: EditEngine Bulk Product Editor helps Shopify merchants bulk edit, import, and export store data from spreadsheets. Install on Shopify →