
Customers
Bulk Add Shopify Customer Tags
Published by Profitonium Apps · Last updated
Add VIP, Wholesale, or another tag to selected existing Shopify customers with EditEngine Bulk Editor. This workflow uses Advanced Import, a same-store Customer ID, and two separate commands: UPDATE targets an existing customer, while Tags Command=MERGE adds the supplied tags without replacing the current tag set.
For example, a customer tagged Wholesale becomes tagged Wholesale and VIP. Contact details, addresses, marketing consent, metafields, and store credit are outside this four-column file.
Customer imports are publicly available in EditEngine. Grant the customer permissions requested by the app, and start with one non-critical customer. Keep the original export securely; Advanced Import has no one-click undo.
Step 1 — Export the customers you want to tag
Open EditEngine → Export, choose Customers, and select CSV or Excel format.
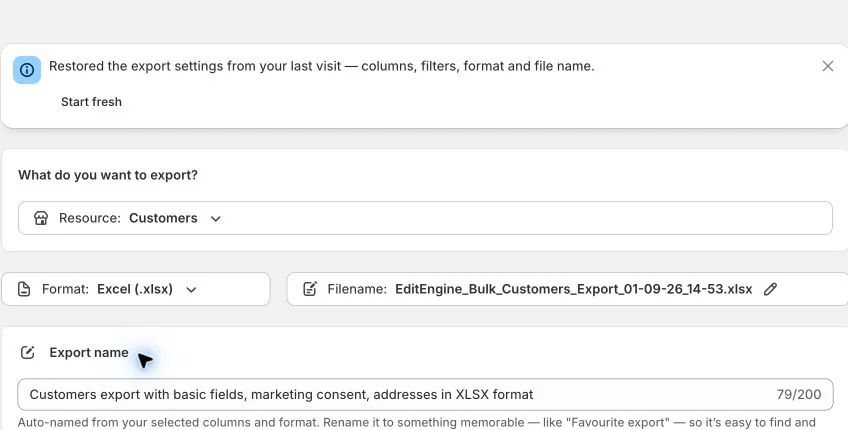
Use Add filter to narrow the customer set. For the first test, select ID → equals any of and enter the known customer's ID, or Email → equals any of and enter the current email. For a larger group, Tags → equals any of → Wholesale matches an existing whole tag; a contains operator can also match longer tag names.
When combining conditions, check whether they must match all or any. Remove unfinished conditions. The displayed customer total is store-wide; verify the actual customers in the downloaded file rather than treating that number as the filtered result.
Step 2 — Keep a backup of the existing tags
In Select Columns → Base, retain ID, Command, Tags, and Tags Command. You can keep Email in the export to recognize customers during review; EditEngine includes ID and Email as export identity columns. Deselect unrelated groups such as Addresses, Marketing Consent, Store Credit, and Activation URLs for this task.
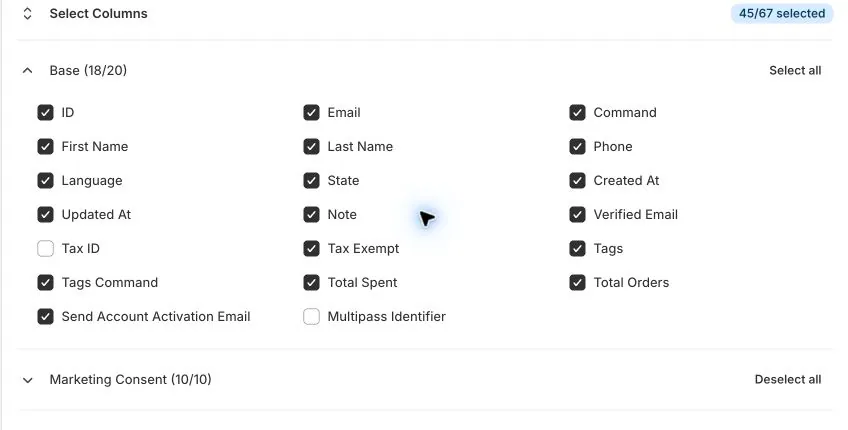
Create the focused export and download it. Save an untouched copy before changing any cell. It records which customers already had the tag and their original complete tag sets. Work in a separate copy and keep one row per selected customer.
The export writes Command=MERGE and Tags Command=REPLACE. Change these deliberately in the next step: leaving tag REPLACE would make your new value the customer's entire tag set.
Step 3 — Build the four-column update file
Keep exactly these columns in the working copy:
| Column | Value for this task |
|---|---|
ID | The customer's unchanged ID from this store's export. Format it as text. |
Command | UPDATE, so a missing customer fails instead of being created. |
Tags | Only the tags to add. Separate multiple tags with commas. |
Tags Command | MERGE, to preserve every existing tag. |
ID,Command,Tags,Tags Command
gid://shopify/Customer/1001,UPDATE,VIP,MERGE
gid://shopify/Customer/1002,UPDATE,"VIP, Autumn Event",MERGE
The IDs are examples; replace them with actual exported IDs. Remove Email from the import copy. ID already identifies the customer, and importing an old exported Email can overwrite a more recent profile email.
Remove every other column, including Address Command, consent fields, Send Account Activation Email, metafields, and Store Credit Transaction fields. An extra column is not necessary to preserve its data. This is a same-store update; do not use IDs copied from another Shopify store.
Save Excel files with a worksheet named Customers. Name the CSV exactly Customers.csv: these four shared headers alone can otherwise be mistaken for Products. Make a separate one-customer test copy with the same exact filename, stored in a different folder from the full file.
Step 4 — Review the one-customer file in Advanced Import
Open EditEngine → Import, select Advanced import, and upload the test file.
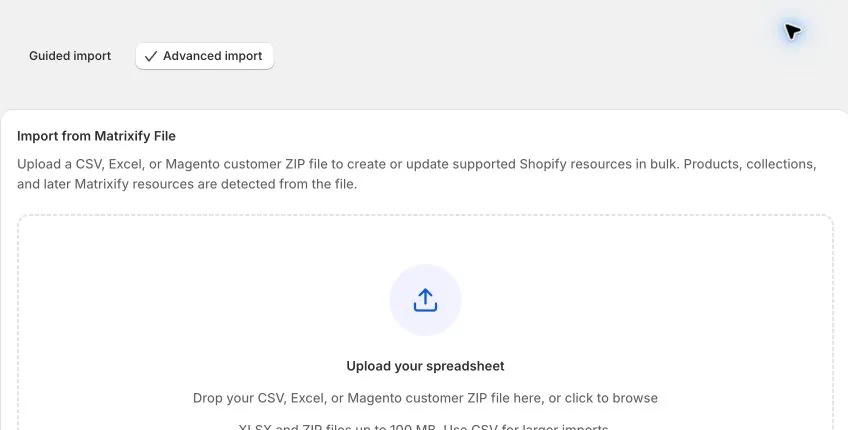
Confirm that the detected resource is Customers and that all four headers are recognized. If Products is detected, stop and correct the filename or worksheet name before uploading again. Review the explicit Command=UPDATE and Tags Command=MERGE in your spreadsheet. Resolve any unknown-column or permission warning before proceeding.
Review the detected headers and any sample rows shown. A sample is not a full-file or before-and-after validation. Check the actual ID, tags, commands, and number of records in your spreadsheet before starting the test. Do not enable customer deletion or replacement for this workflow.
Step 5 — Check the test result, then process the remaining customers
Start the one-customer import. When it finishes, download the result file and read its status and comments. A completed job can still contain failed rows.
Open that customer in Shopify Admin → Customers. Confirm that the new tag exists, all earlier tags remain, and the profile details and marketing-consent states are unchanged. A customer ID that no longer exists should fail UPDATE; investigate it instead of changing the command to MERGE.
After the test passes, import the remaining customer rows with the same four-column structure. Review their results and create a fresh focused Customers export to compare the final tag sets with the intended changes.
Blank cells, retries, and recovery
A blank Tags cell with Tags Command=MERGE makes no tag change. Blank Tags with REPLACE clears all tags. Always keep MERGE explicit for this task.
Adding an already-present tag does not create a second copy of it, but inspect the current profile before retrying a failed row. Keep the result file beside the original export so you can distinguish successful rows from rows that still need work.
To reverse a mistaken addition, remove only the tags newly added by this task. Tags Command=DELETE removes the listed tags while Command remains UPDATE. Do not remove VIP from a customer who already had it before this import. Replacing a whole tag set from an old backup can also erase legitimate tags added afterwards, so compare the current profile first.
Matrixify compatibility
The tag commands follow the Matrixify Customers reference and bulk tags tutorial. That tutorial covers Customers as well as Products. This EditEngine workflow deliberately uses an ID-only customer lookup and explicit UPDATE, so the working file cannot overwrite an email or create a customer on a missing match.
Related tutorials
- Customers export and import — profile, address, consent, metafield, and store-credit behavior.
- Update discount end dates — extend an existing promotion through a separate focused file.
- Metafields export and import — use typed customer attributes when a tag is not enough.
About EditEngine: EditEngine Bulk Product Editor helps Shopify merchants bulk edit, import, and export store data from spreadsheets.